
Opt for a cohesive ceiling strategy that blends drama, practicality, and budget. Start with a design like coffered or tray ceilings to add depth, paired with recessed or cove lighting for warmth and even illumination. Exposed beams bring rustic character without a full remodel, while skylight alternatives boost daylight in smaller rooms. Balance bold ceiling colors with lighter walls, and choose budget-friendly textures or premium panels based on your goals. If you keep exploring, you’ll uncover actionable steps and tips.
What’s the Impact of a New Ceiling Design?

A new ceiling design can transform a room’s feel and function in tangible ways. You’ll notice improved acoustics, better lighting distribution, and a sense of height that makes spaces feel more welcoming.
The impact isn’t just aesthetic; it aligns daily use with your routines, boosting comfort and efficiency. When you plan ceiling installation, you’re investing in durability and value, so choose materials that suit climate, maintenance needs, and your lifestyle.
Design trends guide you, but practicality keeps you grounded: easy access for repairs, airtight seams, and proper ventilation matter as much as beauty.
A thoughtful ceiling choice creates belonging—a space that reflects you and supports shared moments.
Track costs, timelines, and installers to ensure a smooth, dependable project from start to finish.
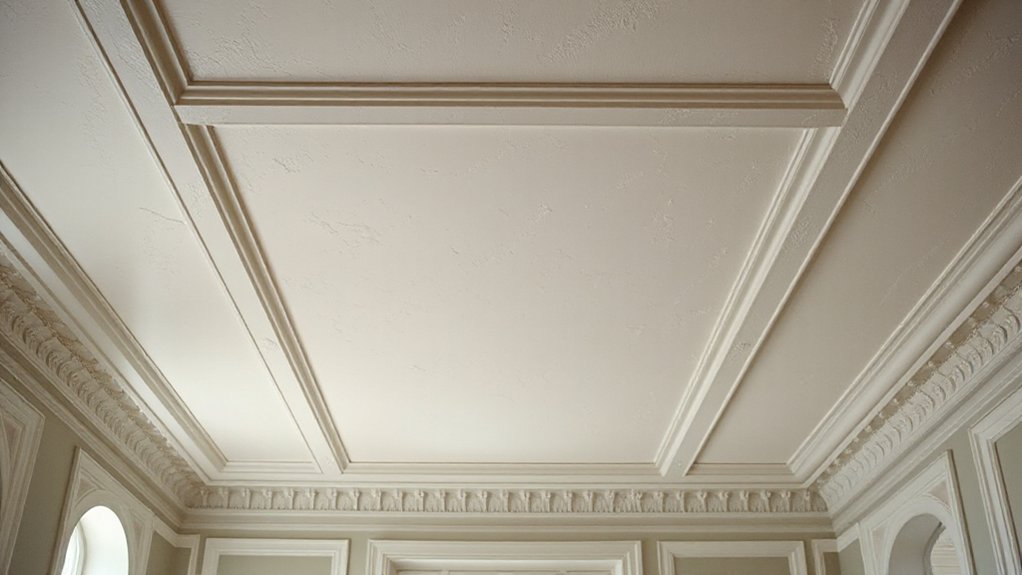
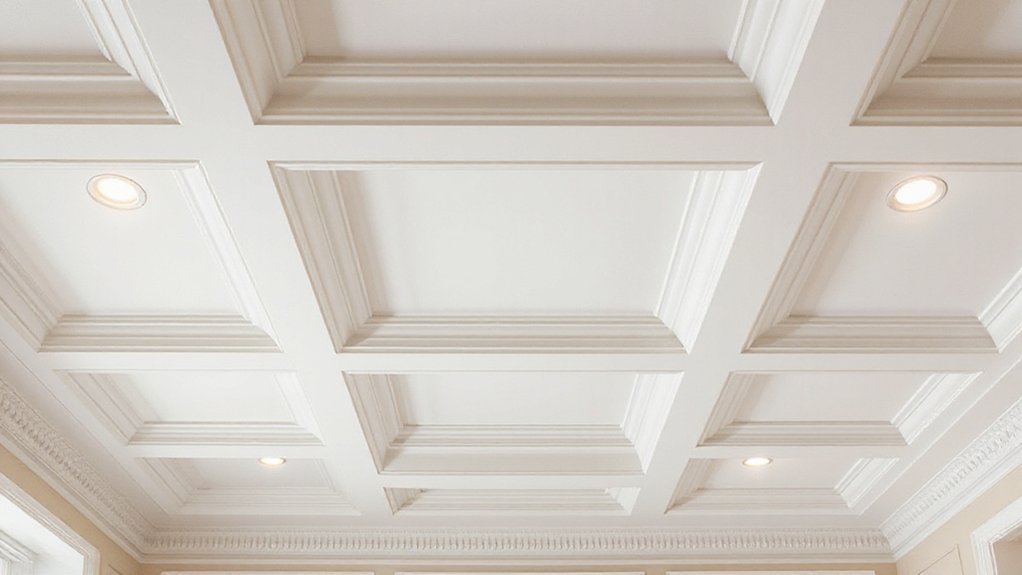
Coffered Ceilings: Classic Drama on a Budget
Coffered ceilings deliver classic drama without breaking the bank, turning flat ceilings into architectural focal points you’ll actually use. You’ll gain depth and character without a full remodel, and that sense of belonging comes from thoughtful texture and proportion.
To maximize impact, keep the coffers shallow and evenly spaced, so the room reads cohesive rather than busy. Use a lighter paint inside the panels to brighten the space and create contrast with the ceiling border.
If you’re concerned about ceiling height, align coffers with existing lighting and a ceiling fan to preserve airflow and scale. This approach respects budget and bandwidth, delivering a polished, timeless look.
Pair the ceiling with simple trim and let the architectural rhythm guide the room’s mood and function.
Exposed Beams: Structural Warmth Without Remodeling
Exposed beams bring immediate aesthetic impact, pairing rustic texture with architectural honesty. You’ll notice structural warmth that comes from visible joinery and wood grain, often without changing layout or adding bulk.
This approach emphasizes beam aesthetics and practical warmth as a design lever you can leverage for character and feel without a remodel.
Exposed Beam Aesthetics
- Highlight the beam silhouette with a matte finish, letting natural grain read as texture rather than distraction.
- Pair beams with practical details like ceiling ventilation to maintain air flow and comfort, while acoustic panels absorb echoes for a calmer room.
- Keep the palette cohesive—earthy tones or monochrome—so beams and walls feel intentional, not busy.
These choices create belonging through authenticity, ensuring your ceiling reads as intentional design rather than a retrofit.
Structural Warmth Benefits
Consider how exposed beams can add warmth to a space without major remodels: the wood’s natural tone and texture create instant coziness, making rooms feel curated rather than staged.
You’ll notice immediate ambience gains, because beams ground the ceiling with familiar, architectural character. This warmth isn’t fluff; it supports a sense of belonging, helping you feel anchored in the home you’re refining.
Beyond mood, exposed beams can improve ceiling acoustics by subtly diffusing sound reflections, especially in open-plan areas. They also contribute to structural insulation by reducing draft paths around attic seams when paired with proper sealing.
Ready-made character lowers the need for costly alterations, so you preserve budget and timeline while achieving a refined, lived-in effect that resonates with everyday comfort.
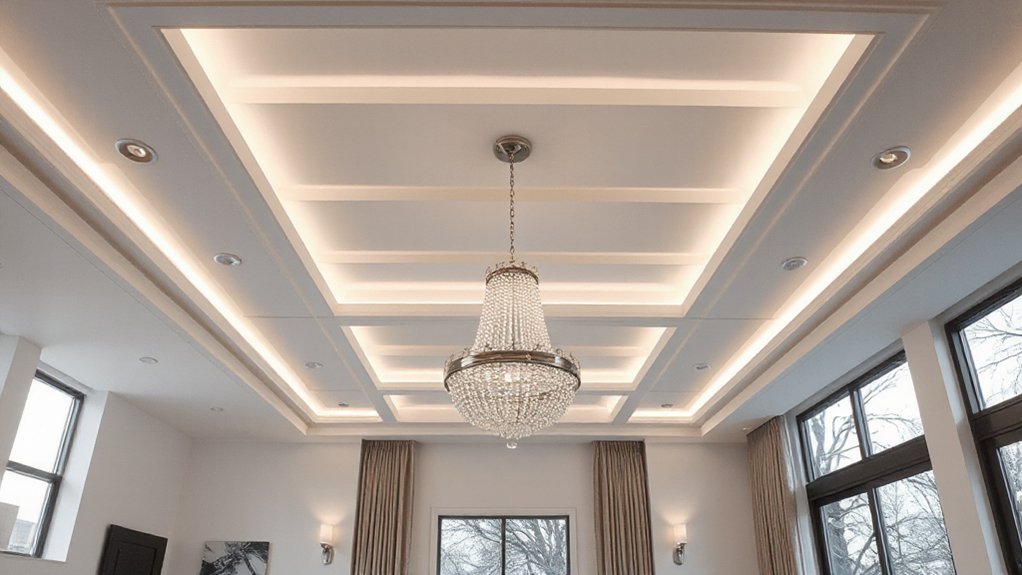
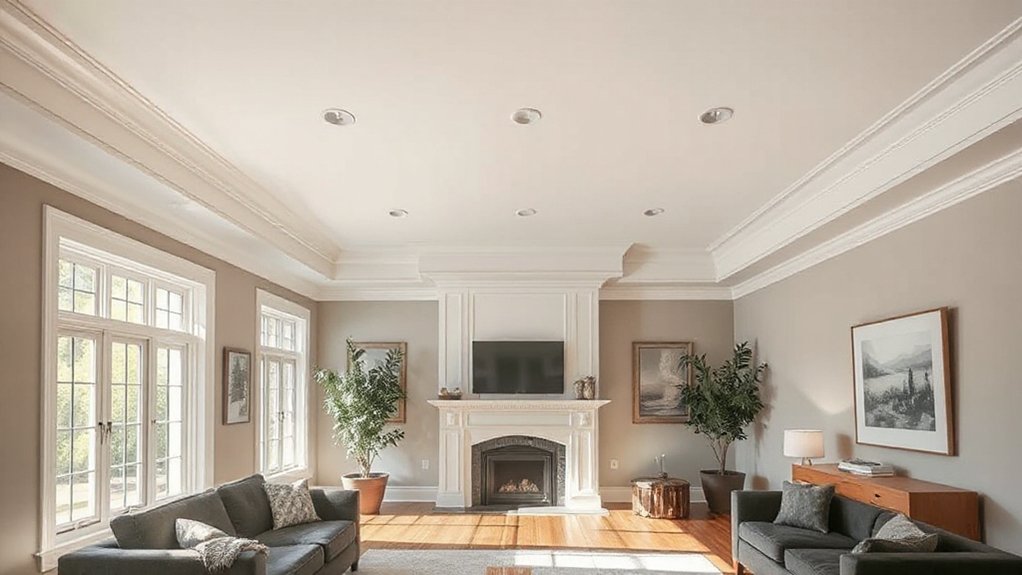
Tray Ceilings: Add Depth and Light
A tray ceiling adds instant depth and a touch of drama to any room, and it does so without a full remodel. You’ll gain height perception, while simple lighting accents boost ambiance. To maximize comfort, focus on practical details that matter.
- Install recessed lighting and layered LED strips to illuminate the tray’s edges, creating a soft glow without glare.
- Choose a neutral, matte finish inside the tray to minimize reflections and frame architectural depth.
- Prioritize Ceiling insulation and Ceiling ventilation during construction or retrofit to keep room temperatures even and air fresh.
This approach feels intentional and inclusive, inviting you to enjoy a well-balanced, refined space.
Painted Textures: Subtle Capes of Color and Pattern
Painted textures bring subtle layers of color and pattern to walls and ceilings without the heft of heavy ornament. You’ll use painted textures to create tactile depth, then refine with Color blending that harmonizes hues across surfaces.
Start with a base tone you love, and layer lighter or darker glazes to evoke soft depth without bulk. You’ll aim for Texture contrast, letting smooth fields meet gentle striations, specks, or soft stippling to catch light differently as you move through a room.
Keep it controlled: limit palette, vary only two or three tones, and avoid busy repeats. The result feels cohesive, inviting, and easy to live with. You’ll gain warmth and personality without overwhelming architectural lines or future changes.
Bold Color Statements: Ceiling Hues That Transform The Room
Bold ceiling colors can redefine a space, drawing the eye upward and anchoring the room’s mood. You’ll leverage color psychology to set atmosphere, then adjust ceilings for acoustic balance and comfort. Use bold hues strategically to highlight architecture or delineate zones.
- Choose a focal color for the ceiling in a room-wide palette, testing how it shifts perceived height and energy.
- Pair saturated tones with muted surroundings to maintain balance, boosting ceiling acoustics without sacrificing style.
- Apply restraint: limit bold color to one ceiling plane or feature area to preserve flow and belonging.
Bold hues foster confidence and cohesion, helping you feel centered and connected in your space.
White-On-White: Bright, Airy, and Minimalist
White-on-white creates an instantly breathable, expansive feel that complements minimalist sensibilities. You embrace clean lines, high reflectivity, and a calm ceiling that makes rooms feel larger.
To maximize this effect, emphasize uniform paint, smooth surfaces, and subtle shadows for depth. Ceiling acoustics matter here: you want sound actually softened without visually cluttering, so choose discrete panels or micro-perforations that blend with the whiteness.
For lighting, lighting automation streamlines the look—programs for warm, cool, and dimmed scenes keep the space versatile without visible fixtures. Keep trims minimal and coverage generous to avoid crowding ceilings.
A carefully calibrated balance of texture, brightness, and sound control helps you inhabit a serene, cohesive environment that feels welcoming and timeless.
Wood Slat Ceilings: Natural Texture and Coziness
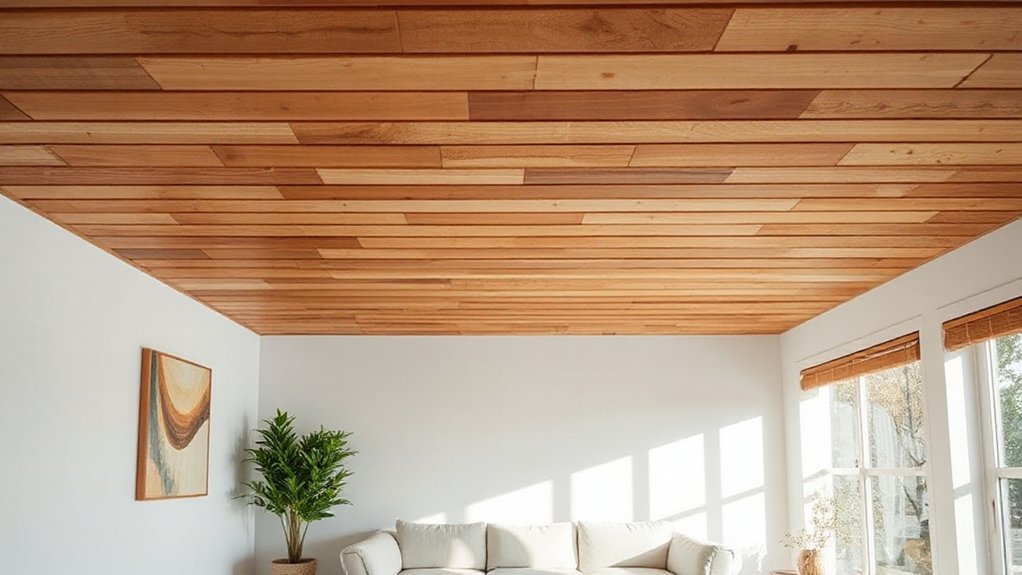
Wood slat ceilings bring natural texture and a warm, intimate atmosphere to any room. You’ll feel grounded as the wood’s grain adds depth, while the spacing creates subtle shadows that shift with the day’s light. This approach invites cozy textures and a welcoming vibe, making your space feel thoughtfully designed rather than decorated.
- 1) Choose Light or Medium tones to maximize brightness without losing warmth.
- 2) Vary slat spacing for visual rhythm and acoustic softness.
- 3) Seal with a matte finish to preserve natural wood and reduce glare.
Natural wood elevates your décor with clean lines and tactile interest, while still blending with other materials. It’s practical, durable, and easy to maintain, fostering a sense of belonging in every moment you spend beneath it.
Gypsum Board Planks: Modern, Seamless Lines
Gypsum board planks deliver a clean, uninterrupted surface that reads as modern and seamless. You choose gypsum board planks when you want a pure, uninterrupted ceiling line that enhances room proportions and light.
Install with tight joints to emphasize continuous planes, then finish with a low-profile trim for a seamless edge. This approach pairs well with practical needs like ceiling insulation and acoustic treatments, giving you better thermal comfort and sound control without visual clutter.
Use gypsum planks to hide wiring and mechanicals behind discreet channels, keeping the surface clean and tidy. Plan for consistent ceiling heights and avoid oversized panels that feel heavy in small rooms.
The result is a cohesive, scalable backdrop that supports future updates and a sense of belonging.
Coffin/Cove Lighting: Ambient Glow and Visual Interest
Coffin/cove lighting creates a soft ambient glow that elevates any ceiling design without overpowering the room. You’ll use hidden lighting tricks to hide sources and cast even, flattering light across surfaces.
Add visual interest with clever accents and layered tones to keep the eye moving without distraction.
Soft Ambient Glow
Ever wondered how a soft ambient glow can transform a space without overwhelming it? You achieve this by wrapping ceilings in gentle light that guides the eye without shouting. For cohesion, pick fixtures that echo your room’s shape and texture, like a ceiling fan with a dimmable, warm tone or a subtle ceiling mural that reflects the glow.
- Choose indirect sources: cove or recessed LEDs that wash walls softly.
- Balance with warm whites around 2700–3000K to foster belonging and comfort.
- Layer: combine ambient with a focused task light for flexibility.
This approach keeps the room inviting, practical, and visually calm, inviting you to linger.
Hidden Lighting Tricks
Choose light strips or concealed LEDs that run along crown or edge profiles, so the ceiling reads as a diffused halo rather than a shelf of brightness. Position lighting to highlight architectural lines while keeping glare at bay; aim for a 2000–3000K temperature for warmth that invites gathering.
Integrate practical elements like a ceiling fan or air vent within the concealed layout so function and ambiance coexist. This approach feels intentional and inclusive, signaling you belong to a thoughtful design community that values cohesion, comfort, and quiet elegance.
Visual Interest Elements
Ambient glow from coffin or cove lighting adds visual interest without bulk, highlighting architectural lines and creating a softened ceiling plane. You harness this effect to unify spaces like living and dining areas, guiding light without overpowering your decor. Focus on clean shadows, even illumination, and balanced brightness for a calm, cohesive vibe.
- Choose furniture arrangements that leave sightlines clear to the ceiling, letting the light wash over textures and contours.
- Pair window treatments that reflect or diffuse glow, creating depth and warmth without competing with the fixture.
- Integrate dimming controls to modulate ambiance for gatherings, work, or winding down, reinforcing a sense of belonging in your space.
Recessed Lighting and Layered Fixtures: Brightness With Purpose
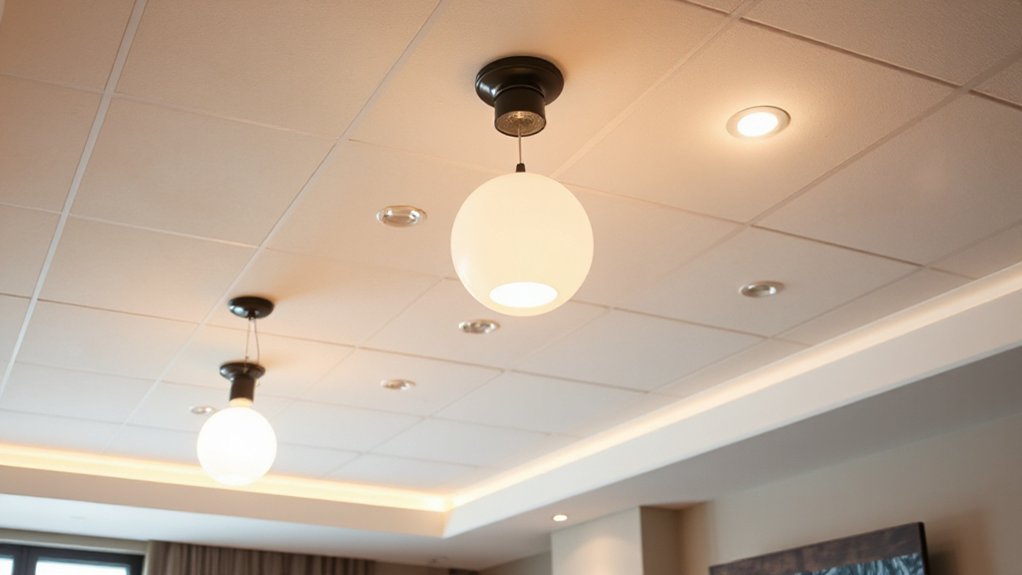
Recessed lighting and layered fixtures create a purposeful brightness that enhances both function and mood. You’ll design a layout that blends ceiling fixtures with task, ambient, and accent layers, so every zone feels intentional.
Prioritize ceiling acoustics by spacing cans to minimize glare and echo, selecting fixtures with low-profile housings that disappear when off. Use lighting fixtures that curb glare while delivering consistent color temperature, so rooms read cohesive and welcoming.
Aim for a layered plan: recessed downlights for general coverage, adjustable trims for flexibility, and subtle wall or shelf accents to draw interest without clutter. Pair dimmers with smart controls to shift from bright work light to cozy ambiance.
This approach fosters belonging, clarity, and practical comfort in any space.
Metallic Accents: Subtle Shine for Height Perception
Metallic accents can subtly lift ceiling height without dominating the room. You’ll gain a sense of airiness by using reflective surfaces that catch light from existing fixtures, creating vertical depth. To apply this strategically, choose finishes that balance warmth and polish, so the room still feels inviting.
- Use narrow metallic trim along crown moldings or door frames to reflect light upward without overpowering color.
- Add a small metallic panel or accent strip on the ceiling perimeter to boost perceived height while remaining understated.
- Introduce a reflective metal centerpiece, such as a pendant or chandelier, to draw the eye upward and unify textures.
Metallic accents, when used sparingly, deliver a cohesive glow that makes spaces feel larger and more connected.
Ceiling Murals and Wall-Integrated Art: Creative Focal Point
You can make the ceiling a bold focal point by choosing mural themes that echo the room’s function and mood. Consider wall-integrated art that extends or flows from nearby surfaces to create a cohesive vignette.
Start with practical decisions—scaling, color harmony, and mounting methods—to guarantee the mural enhances, not overwhelms, the space.
Ceiling Murals as Focal
Ceiling murals can transform a room by turning the ceiling into a dramatic focal point. When you choose ceiling murals, you create a shared sense of seasonless wonder and intentional design. Opt for artistic patterns that echo your space’s mood, from celestial skies to subtle botanical motifs. You’ll feel more grounded with a cohesive aesthetic that invites conversation and belonging.
- Start with scale: pick a pattern that fits the room’s dimensions and leaves breathing room.
- Coordinate colors: align mural tones with your trim and furniture for unified energy.
- Consider lighting: soft, indirect light enhances detail and depth without glare.
Ceiling murals, Artistic patterns, used thoughtfully, elevate your room into a personal retreat you proudly own.
Wall-Integrated Art Concepts
Wall-integrated art blends ceiling murals with wall design to create a unified, immersive focal point. You can achieve this by selecting a cohesive color palette and ensuring the motif flows across surfaces.
Begin with a central ceiling mural that anchors the room, aligning it with artwork on the walls for a seamless progression.
Consider practical installation details: plan lighting to highlight the art without glare, and use ceiling scaffolding or professional installers to maintain precision.
If you have a ceiling fan, coordinate blades and housing colors to integrate rather than interrupt the design.
Keep scale balanced; avoid busy patterns that overpower the space.
The result is a confident, inclusive feel where occupants recognize thoughtful craft and feel they belong.
Acoustic Ceilings: Style Plus Sound Control
Ever wondered how acoustic ceilings can balance style with sound control? You’ll discover how smart choices center comfort and aesthetics in every room. By pairing sleek visuals with practical performance, you create spaces that feel inviting and quiet at the same time.
Key moves include blending ceiling insulation for thermal and sound efficiency with tasteful finishes that complement your design. Use acoustic panels strategically to dampen echo without sacrificing light or height. Your goal is clarity, calm, and cohesion.
- Choose panels with color or pattern that reinforces your room’s palette
- Place insulation where it serves both warmth and sound control most
- Integrate hidden mounting for a clean, seamless look
Drop-Down Feature Grooves: Architectural Texture on a Budget
Drop-down grooves give you architectural texture without a big budget, so start by weighing budget-friendly texture options that still read as intentional design.
Try a few groove pattern ideas—from subtle, linear runs to bolder, staggered grids—to see what reads best in your space.
When it comes to installation tips for grooves, choose a practical approach: plan carefully, measure twice, and use the right materials and fasteners to keep the look clean and durable.
Budget-Friendly Texture Options
Looking for a budget-friendly way to add texture? You can shape ceiling character without breaking the bank by choosing simple, reusable textures and smart finishing. These options feel crafted, not gimmicky, and invite belonging through cohesive design.
- Paint-to-texture combos: apply flat paint with a subtle glaze or stipple for depth without major install costs.
- Lightweight studs or panels: add shallow, modular texture that’s easy to install and remove, aiding future updates.
- Plaster veneers or decorative skim: simulate richer surfaces with less material and mess, while improving acoustics.
Tips: plan around ceiling maintenance and insulation techniques to preserve performance. Use consistent lighting to highlight texture, and keep edges clean for a polished look.
Groove Pattern Ideas
Here are groove pattern ideas that stay budget-friendly while delivering architectural texture. You’ll create visual interest with simple, repeatable grooves pressed into the ceiling surface, aligning with your room’s symmetry and light.
Choose shallow channels for a subtle, modern vibe or deeper cuts for a bold, architectural statement. Coordinate groove spacing with the ceiling height to avoid overwhelm and preserve airiness.
Use consistent edge treatment to maintain a clean, high-end feel that makes your space feel inclusive and cohesive.
Pair grooves with practical essentials: plan for ceiling insulation and strategize ventilation solutions so airflow remains unobstructed and comfortable.
Keep materials lightweight and installable in stages to respect your budget while achieving a refined, curated look.
Installation Tips for Grooves
Achieving clean, repeatable grooves on a budget starts with precise planning and simple execution. You’ll secure a tight result by mapping groove spacing, choosing a shallow chamfer, and marking lines with a laser or chalk. This approach supports ceiling acoustics goals and makes lighting integration seamless, so fixtures sit cleanly without crowding textures.
- Plan groove density and alignment before any cut, then verify with a straightedge.
- Use a sharp router bit or paddle cutter, feeding steadily to avoid tear-out.
- Test small sections, adjust for consistency, and complete in defined passes.
Tip: keep cutting dust contained and wear eye protection. With disciplined steps, your budget grooves become a confident, cohesive feature that invites belonging and enhances room acoustics and lighting harmony.
Skylight Alternatives: Simulated Daylight for Smaller Rooms
When a full skylight isn’t feasible, simulated daylight can brighten small rooms effectively. You gain natural illumination without structural changes, using strategically placed fixtures and reflective surfaces.
Choose daylight-minted LEDs with high CRI to mimic natural light accurately, avoiding harsh, blue tones that feel clinical. Integrate ceiling panels or recessed troffers in a grid pattern to distribute light evenly, reducing shadows in tight spaces.
Wall mirrors and light-colored, matte finishes amplify brightness, making the room feel larger and more welcoming. Consider daylight simulation routines: programmable dimmers, sensors reacting to time of day, and warm-to-cool progressions to match outdoor conditions.
This approach builds belonging by making compact spaces feel open, alive, and thoughtfully designed.
Material Alternatives: Budget-Friendly vs. Premium Options
Material choices can shape both budget and impact, so start by separating basics from premium features. You’ll weigh Ceiling material and aesthetic options with clarity, choosing what fits your space and community vibe without overspending.
- Budget-friendly basics: gypsum or plaster, simple paint, and standard suspension—solid, quick, and easy to refresh.
- Mid-range upgrades: wood veneer panels or aluminum coil, tasteful texture, improved acoustics, lasting appeal.
- Premium statements: artisan plaster, metal ceilings, or custom panels delivering high-end texture and wow factor.
Focus on value, durability, and install ease. By balancing cost with perceived quality, you craft a ceiling that feels cohesive with your room and invites others to belong.
Color Coordination: How to Pair Ceilings With Walls and Floors
Color coordination ties your ceiling to the rest of the room, so start by pairing ceiling, wall, and floor tones with purpose. In practice, keep ceilings lighter than walls to lift the space, or match a bold wall color with a subtler ceiling to ground the look.
Consider the room’s lighting fixtures and how they reveal color shifts at different times of day. If you have generous ceiling height, you can tint the upper plane slightly warmer or cooler for mood without overwhelming the room.
For low ceilings, emphasize contrast through trim and clean lines rather than heavy patterns. Use a cohesive palette, then add texture through materials or finishes to reinforce depth while preserving a confident, welcoming atmosphere.
Installation Essentials: Planning, Tools, and Timelines
Getting a ceiling upgrade right starts with a solid plan: map your scope, select compatible tools, and set a realistic timeline that keeps the project on track. You’ll lock in essential steps, from measuring space to choosing components that support comfort and efficiency, like ceiling insulation and ventilation systems. Ready your workflow with practical routines and clear milestones.
- Plan the layout and permits, then confirm insulation, vents, and access points fit your room’s demands.
- Gather tools you can trust—knife, tape, stud finder, drill, level, and safety gear—prioritizing quality for lasting results.
- Schedule sequential milestones: prep, install, seal, test, and finish, allowing buffer time for inspections and adjustments.
Attach panels or finishes with precision, verify airflow, and optimize energy performance for lasting belonging.
Frequently Asked Questions
How Long Does a Ceiling Renovation Typically Take?
A typical ceiling renovation takes about 1 to 2 weeks, depending on scope and site conditions. You’ll plan around demolition, electrical checks for ceiling lighting, and any texture work.
If you’re adding intricate ceiling textures or new lighting runs, allow extra time for permits, inspections, and drying.
You’ll minimize disruption by scheduling trades thoughtfully and communicating clearly. Expect some dust and noise, but you’ll finish with fresh ceilings that feel coordinated and welcoming for your space.
What’s the Cost Range for Ceiling Upgrades?
You’ll typically see ceiling upgrades range from about $3 to $15 per square foot, with total installs often between $1,000 and $15,000 depending on materials and complexity.
To manage this, do a cost comparison and set a realistic budget. Budget planning helps you avoid sticker shock and keeps you in the room you love.
You deserve confident progress, clear choices, and a ceiling that feels like belonging—not just a project you finished.
Can Ceilings Affect Room Acoustics Significantly?
Yes, ceilings can profoundly affect room acoustics. You’ll notice clearer speech and less echo when you use soundproofing techniques and acoustic paneling.
Start with mass-loaded vinyl or dense tiles, then add absorptive panels at reflection points.
Consider diffuser elements for even sound distribution.
Keep doors and ducts sealed to avoid leaks.
You’ll feel more comfortable and connected as sound quality improves, helping everyone belong in a calmer, better-performing space.
Do Ceiling Changes Increase Property Value?
Ceiling changes can boost property value, especially when well-executed. You’ll see stronger appeal from buyers who notice quality, durability, and style.
Focus on ceiling materials that last and decorative techniques that feel timeless. You’ll maximize impact by pairing sound decisions with clean lines and proper lighting.
When you invest in durable ceiling materials and tasteful decorative techniques, you signal value, craftsmanship, and a sense of belonging that resonates with modern buyers.
Which Ceiling Design Suits Low-Ceiling Rooms Best?
A low ceiling suits light, simple ceilings best. You should use bright white or light neutrals and keep lines clean to visually lift the space.
Choose a slim, unobtrusive Ceiling material and avoid heavy textures. Use decorative patterns sparingly, like a subtle border or recessed panels, to add depth without crowding.
You’ll feel connected and grounded, while the room stays airy and cohesive. This approach favors belonging and practical, confident design.
Conclusion
You’ve got options that lift a room without lifting the budget. From dramatic coffers to cozy exposed beams, a tray or painted texture can redefine the space in days, not months. Choose materials and colors that echo your walls and floors, then plan with clear steps and a realistic timeline. Start with a simple demo, lock in lighting, and finish with a flawless coat. Your ceiling won’t just cover space—it’ll redefine the entire room—seriously, it’s transformative.