
To renovate for better accessibility, start with clear, measurable goals using universal design. Audit your space for step-free entries, wider doorways, reachable controls, and consistent layouts. Budget smart tweaks like 36-inch paths, adjustable furniture, and simple smart tech. Widen doorways, smooth thresholds, and plan straight, well-lit routes. In bathrooms, install grab bars and non-slip surfaces; in kitchens, use pull-out drawers and front-control appliances. Finish with high-contrast, low-glare finishes, good acoustics, and durable, safe materials. By tackling planning, permits, and resources, you’ll build an inclusive, comfortable home—more details await.
Set Accessible Renovation Goals With Universal Design
To set accessible renovation goals with universal design, start by identifying who’ll use the space and what tasks they need to perform. You’ll map activities to needs, prioritizing comfort, safety, and independence.
Define measurable goals, like doorways wide enough for a wheelchair, step-free entries, and accessible controls at reachable heights. Integrate smart home features that simplify daily tasks without adding complexity, such as voice-activated lighting, automated shades, and tactile indicators.
Align goals with community accessibility values, ensuring entrances, signage, and shared spaces support inclusion. Establish a realistic timeline and budget, assigning responsibilities and check-ins.
Document outcomes, so every decision reinforces belonging. Your plan should empower residents to participate, feel valued, and enjoy a safer, more usable home environment for all.
Audit Your Space for Universal Design Principles
Are you ready to verify that every space works for everyone? You’ll audit with universal design in mind, checking how people of all abilities move, see, and orient themselves.
Start by evaluating paths, thresholds, and reach zones for safe, simple navigation. Then assess color contrast and visual signage to guide changes and decisions at a glance.
Use clear cues, consistent layouts, and flexible fixtures to reduce confusion and effort.
- Map routes and identify barriers that hinder access
- Test lighting, contrast, and signage for readability
- Note adjustable features that empower independent use
- Prioritize areas needing clearer orientation and predictable flows
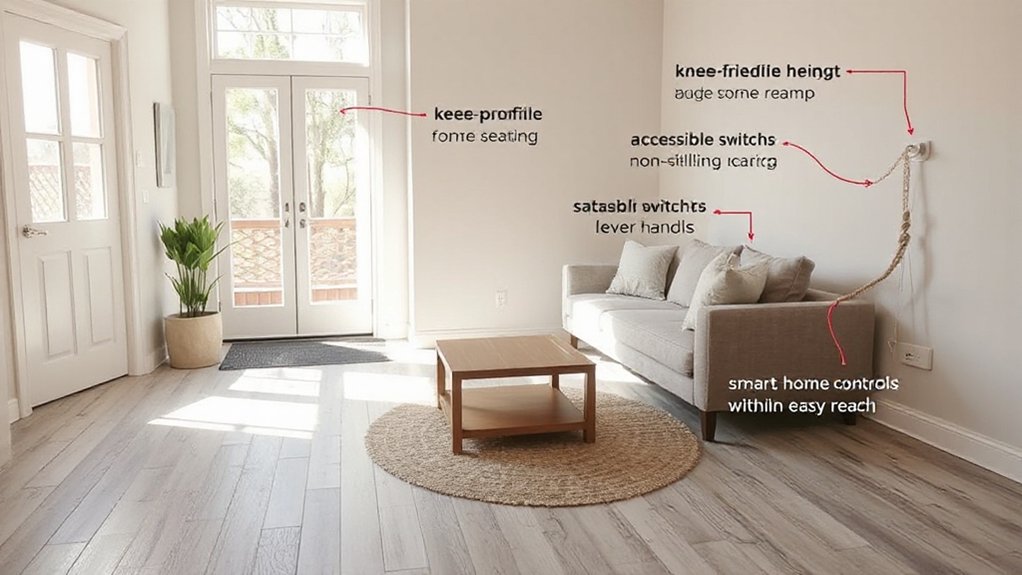
Budget-Friendly Layout Tweaks to Reduce Barriers
Budget-friendly tweaks can dramatically reduce barriers without breaking the bank. You’ll plan spaces that invite everyone in, quickly improving flow and safety.
First, center furniture and clear pathways to create at least 36 inches of turning space in living areas and halls. Use adaptive furniture that’s easy to adjust, like rise-and-fall tables or chairs with stable arms, to fit multiple needs without crowding.
Keep frequently used switches, outlets, and storage within reachable height, and group related tasks to minimize back-and-forth.
Install smart technology that’s simple to operate—voice commands or one-touch controls for lighting, climate, and media reduce effort.
Label spaces clearly and color-code edges for contrast. These tweaks build confidence, belonging, and everyday independence without pricey renovations.
Doorways, Thresholds, and Circulation: Widen and Improve Transitions
You can start by widening door openings to accommodate mobility devices and easier passage.
Aim for smooth threshold shifts and level changes that reduce trip hazards and improve wheelchair clearance.
Map clear circulation paths that guide users from entry to essential rooms without obstacles.
Widen Door Openings
Widening door openings is a practical, high-impact step for accessibility, especially in living spaces and bathrooms where tight doorways impede movement. You’ll improve flow, reduce obstacles, and create safer, more inviting spaces for everyone.
- Measure clearances and target sizes that fit your mobility needs and furniture layouts.
- Choose door frame adjustments or wall removals that preserve structural integrity.
- Replace hinges as needed to maintain smooth operation and door alignment, ensuring full swing clearance.
- After work, inspect for smooth passages and consistent thresholds to avoid tripping hazards.
Tip: document every change, keep hardware accessible, and coordinate with an accessible design plan to foster belonging and usability. door frame, hinge replacement
Smooth Threshold Transitions
Smooth threshold shifts guarantee safe, unobstructed movement as you enter and move through rooms. You’ll prioritize level, smooth progressions that minimize trip risks and maximize flow.
Start by auditing doorways: aim for zero-rise thresholds or ramps that match interior finishes, guaranteeing a gentle slope and consistent tread depth. In threshold design, preserve a cohesive aesthetic while meeting grip and slip-resistance standards.
Choose surfaces with non-slip textures and color contrast to guide foot placement without drawing attention. You’ll address circulation by aligning doors and hall widths to support wheelchairs and walkers.
You’ll install beveled thresholds where progressions occur between spaces. Finally, document measurements for builders to ensure transition accessibility is consistent, durable, and aligned with your home’s inclusive, welcoming design.
Clear Circulation Pathways
Clear pathways guarantee safe, unobstructed movement through entryways and rooms. You’ll widen doorways, smooth thresholds, and align circulation to minimize twists and gaps.
Focus on predictable turns, ample clearance, and clear sightlines so every user feels oriented and confident moving through the space.
- Widen doorways to accommodate mobility devices and easy navigation.
- Replace or bevel thresholds for smooth progressions and reduced trip hazards.
- Create straight, well-lit corridors with minimal obstructions and consistent flooring.
- Add accessible signage and tactile flooring cues to support orientation and safety.
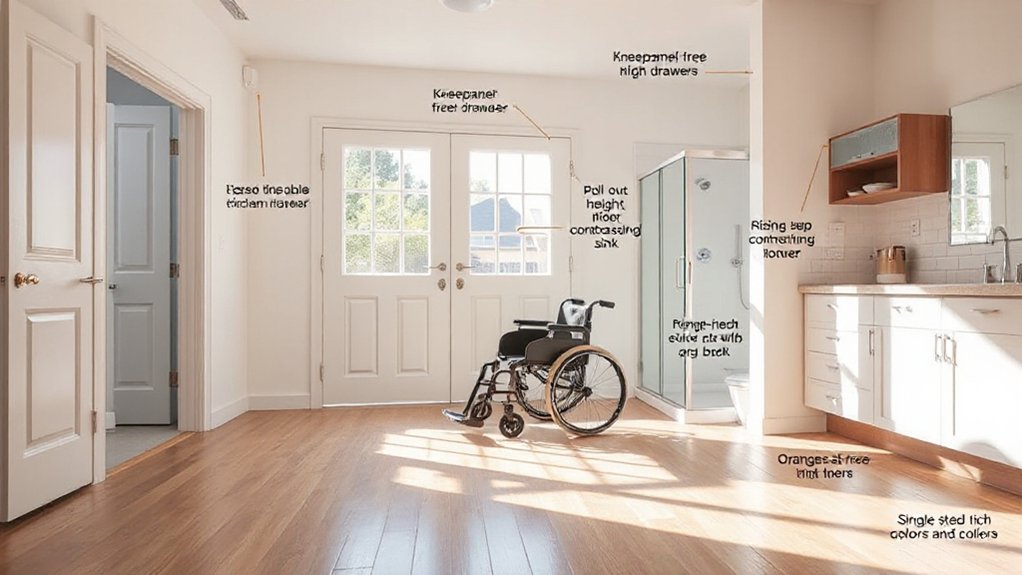
Safer Bathrooms: Grab Bars, Non-Slip Surfaces, and Reachable Fixtures
Safer bathrooms start with practical, easy-to-install safety features: sturdy grab bars, non-slip flooring or mats, and reachable fixtures. You’ll plan layout so essential controls are within easy reach, reducing twisting or stretching.
Focus on grab bar installation that supports transfers from toilet and tub without wobble; mount bars securely into studs or proper anchors at correct heights. Pair this with non-slip flooring to deter slips, choosing textures that stay comfortable when wet and are easy to clean.
Assure fixtures—toilet height, sink access, shower controls—are reachable from a seated position. Use contrasting colors for visibility, and label how-to-use steps for guests or family. This approach builds belonging, safety, and independence in every bathroom.
Kitchen Adjustments for Universal Usability
To make kitchens universally usable, start by designing with reach, adjustability, and stability in mind. You’ll create a space where tasks flow smoothly and everyone feels included, not imposed upon. Prioritize elements that reduce strain and boost confidence. Use smart appliances and ergonomic handles to simplify daily routines without sacrificing safety.
- Install pull-out drawers and adjustable shelves at varied heights for easy access from a seated or standing position.
- Choose induction or smooth-wrap zones with clearly marked controls, plus accessible height for front-facing use.
- Fit lever or push-button faucets and ergonomic handles on pots and cabinet doors to minimize grip effort.
- Place a reachable, multi-height trash and recycling station and ensure anti-slip floors for stable footing.
Finishes, Lighting, and Acoustics for Inclusive Comfort
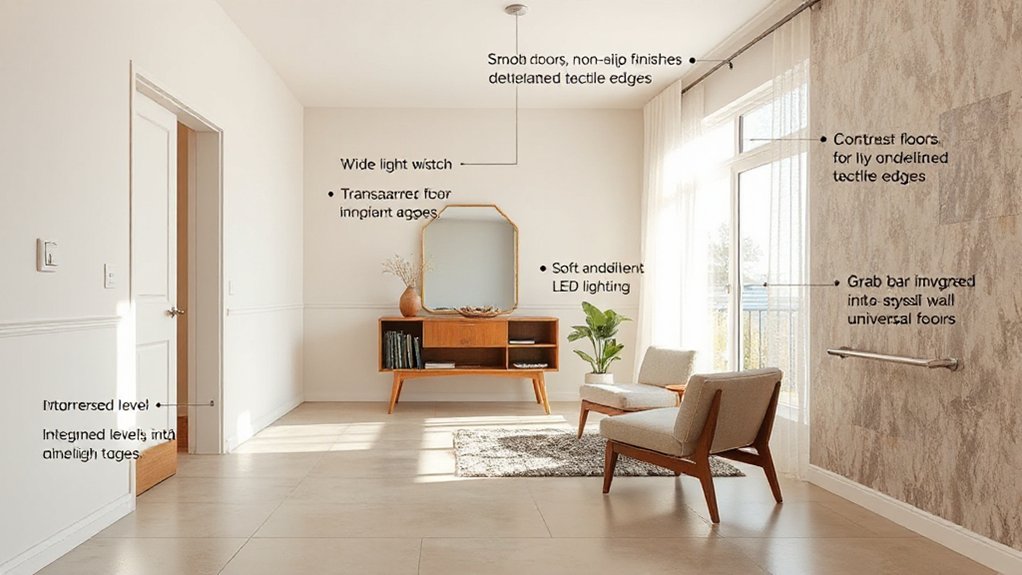
Start by choosing accessible light levels that are bright enough without glare, and layer lighting with dimmable controls for flexibility.
Make sure finishes are durable, safe, and easy to clean, so high-traffic areas stay visually calm and low-maintenance.
Prioritize quiet, comfortable acoustics by selecting sound-absorbing materials and minimizing echo, to support clear communication and a restful atmosphere.
Accessible Light Levels
Do you know how light, finishes, and acoustics affect daily comfort and accessibility? You’ll optimize accessible light levels by balancing finishes, lighting, and natural illumination. Prioritize placement, glare reduction, and even distribution to support wayfinding and safety.
- Install dimmable lighting controls and task lighting at counter height to promote independence.
- Use high-contrast finishes near switches and thresholds to improve visibility.
- Maximize Natural illumination with strategically clear or lightly tinted windows and appropriate window coverings.
- Minimize reflectance glare by selecting matte paints and non-slip floor surfaces that reduce unintended shadows.
These steps create inviting, inclusive spaces where people feel they belong and can navigate confidently.
Regularly test illumination at different times of day and adjust accordingly.
Quiet, Comfortable Acoustics
Begin with practical soundproofing techniques to reduce hallway noise, door squeaks, and equipment hums, selecting materials with high STC ratings appropriate to each area. Pair these with deliberate layout choices that minimize sound travel, like buffering partitions and quiet zones away from high-traffic doors.
Add acoustic paneling where reverberation harms speech clarity—install on walls and ceilings in meeting rooms, classrooms, and living spaces. Combine with soft finishes and strategic lighting to prevent cognitive fatigue.
The result: a calmer environment that supports belonging, focus, and inclusive comfort for everyone.
Durable, Safe Finishes
1) durable flooring that’s slip-resistant and easy to clean
2) safe wall finishes with low glare, washable surfaces, and tactile cues
3) integrated lighting strategies that reduce shadows and glare
4) durable, low-VOC paints and sealants for healthy air quality
Choose finishes that signal safety through contrast, texture, and simplicity. Prioritize durability, then aesthetics, ensuring durable flooring and safe wall finishes work together to create comfortable, accessible environments.
Planning, Permits, and Resources: A Renovation Roadmap
Planning, permits, and resources form the backbone of a successful renovation. You’ll map a practical roadmap by identifying accessibility goals, budgeting for surprises, and aligning timelines with contractor availability.
Begin with a clear scope: what changes enable inclusive access, e.g., ramps, wide doorways, reachable controls. Check local permit requirements early; secure approvals before ordering materials or demolition to prevent delays.
Build a trusted team—architect, engineer, and tradespeople—who understand accessibility needs and historical preservation where applicable.
Plan for material sourcing and sustainability, favoring durable, compliant options.
Track approvals, permits, and inspections in one checklist to stay accountable.
Maintain open communication with neighbors and residents to foster belonging.
Use this framework to balance historical preservation considerations with modern accessibility needs.
Frequently Asked Questions
How Long Does a Universal Design Renovation Typically Take?
A universal design renovation typically takes 6 to 12 weeks, depending on scope. You’ll manage design considerations, schedule dependencies, and stay on renovation timeline by coordinating contractors, obtaining permits, and confirming accessible features align with your needs and preferences.
What Is the Top Priority for First Accessibility Improvements?
Prioritize staircase modifications now, then bathroom upgrades, because safety and independence begin at your entrance. You’ll move confidently, feel included, and gain traction as you retrofit with sturdy rails, non-slip surfaces, and accessible controls throughout your home.
Can I Retrofit a Historic Home for Universal Design?
Yes, you can retrofit a historic home for universal design by balancing accessibility with preservation. Focus on accessible entry, doorway widenings, reachable controls, and adaptable bathrooms, while honoring Historic preservation requirements and key Design considerations for community belonging.
Do Lenders Offer Financing Specifically for Accessible Renovations?
Yes, lenders offer financing options for accessible renovations. You can combine rehab loans with grants; explore renovation grants and financing options tailored for accessibility, and compare terms to fit your budget while feeling supported and empowered.
Which Professionals Should Be Consulted Early in Planning?
You should consult a design-build team, an architect, and a licensed accessibility consultant early in planning. Focus on contractor selection and accessibility standards to guide cost, schedule, and compliance, ensuring you feel supported and included throughout the process.
Conclusion
You’ve got a clear path: set universal design goals, audit thoughtfully, and tweak layouts to reduce barriers. Widen doorways, curb thresholds, and upgrade bathrooms and kitchens for safer, more usable spaces. Choose finishes, lighting, and acoustics that comfort everyone. Plan smartly, secure permits, and lean on community resources. The result isn’t just a renovated home; it’s a living promise that accessibility grows with you. Remember: intention shapes space—design with inclusivity, and the home sustains every step.