
You probably don’t know how much differences in framing, like decoupling with resilient channels, can cut both airborne and impact noise in a basement. You’ll want a tight, layered strategy: dense mineral wool, a real mass barrier like mass-loaded vinyl, decoupled drywall, and damping compounds to soak vibrations. Start with sealing and layout, then combine materials for a complete system. There’s more to contemplate before you start, and what you choose next will shape every room’s quiet.
Dense Mineral Wool for Stopping Airborne Noise

Dense mineral wool is a top choice for stopping airborne noise in basements because its dense, fibrous structure absorbs sound before it travels through walls and ceilings. You’ll notice better isolation when you install it in stud bays or between joists, where its porosity traps mid-to-high frequencies efficiently.
Its rigidity minimizes vibration transfer, and you’ll find it resists settling over time, maintaining consistent performance. For practical results, pair dense mineral wool with a secure vapor barrier and proper framing to prevent gaps that undermine effectiveness.
When selecting materials, consider complementary options like fiberglass insulation for compact cavities and acoustic foam in targeted panels to tame reflective surfaces. Together, these components deliver a balanced approach to reducing chatter, footsteps, and appliance noise in finished spaces.
Mass-Loaded Vinyl: A Barrier for Sound Transmission
Mass-loaded vinyl provides a dense, flexible barrier you can install over walls and ceilings to curb sound transmission.
We’ll cover installation tips, how it impacts sound blocking performance, and its durability under basement conditions.
This will set a practical baseline for choosing, handling, and long-term use.
Installation Tips
Installing Mass-Loaded Vinyl effectively starts with proper planning: measure the space, select the right thickness, and prepare clean, dry surfaces so the barrier won’t peel or sag over time.
You’ll install MLV as a continuous sheet, overlapping seams by at least two inches and securing with corrosion-resistant staples or contact adhesive per manufacturer guidance. Avoid gaps behind outlets or along corners; use detailing tape to seal edges and maintain continuity.
Wear a respirator when cutting, and handle the material with clean, dry hands to prevent oils from interfering with adhesive.
Track budget considerations early, and compare prices per square foot rather than per roll. Be mindful of common soundproofing myths that undervalue fit and finish, and prioritize tight, gap-free installations for predictable results.
Sound Blocking Performance
Although mass-loaded vinyl (MLV) is heavy, it’s designed to block sound effectively by adding mass and reducing transmission paths, especially across walls and ceilings. You’ll notice its blocking tendency comes from damping airborne energy and disrupting flanking paths that commonly carry noise through cavities.
In practice, install tight, continuous sheets with minimal seams, use proper sealing, and pair MLV with resilient channels or decoupling to enhance vibration isolation. Don’t rely on MLV alone for all frequencies; mid- and high-frequency noise respond well, while very low frequencies benefit from added mass and strategic layering.
For ongoing control, consider soundproof curtains in adjacent spaces to reduce reflections, and ensure gaps around outlets and penetrations are sealed to sustain performance.
Material Durability
When you choose mass-loaded vinyl (MLV) for sound control, durability matters as much as performance. You’ll gauge material longevity by how well MLV resists tears, punctures, and abrasion from installation tools and movement in finished spaces. Its dense, flexible sheet shouldn’t crack with temperature shifts, so verify a vinyl formulation designed for buildings rather than short-term applications.
Environmental resistance matters too: check that the product remains stable under high humidity and occasional condensation common in basements. Look for a thick, knit-reinforced or foil-back design that resists mold growth and chemical exposure from cleaners.
Install with proper detailing to prevent edge fray, which can undermine durability. In long-term use, reliable MLV maintains its mass effect without sagging, preserving soundproofing performance.
Decoupling and Resilient Channels to Break Vibration Paths
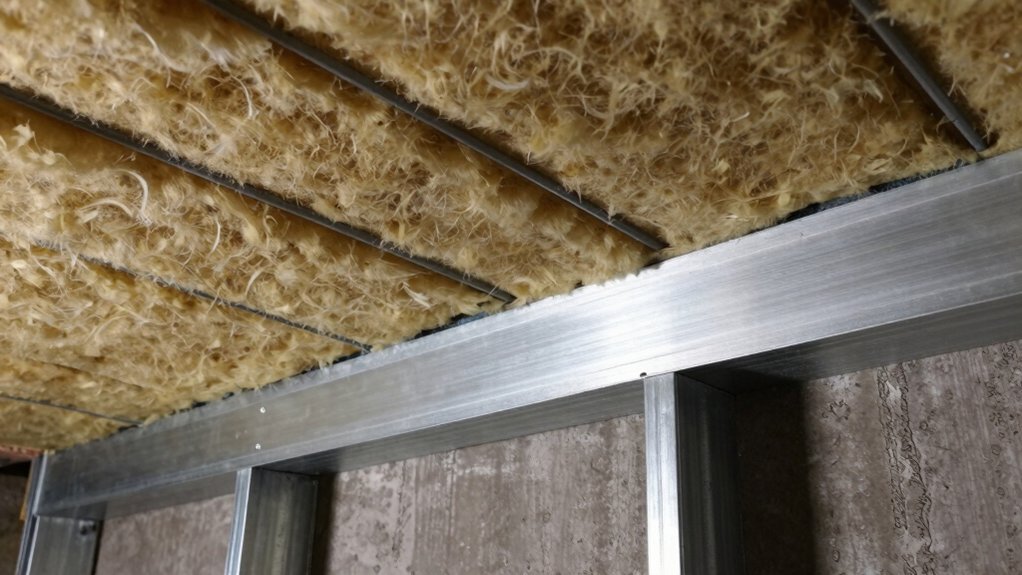
Decoupling and resilient channels break vibration paths by separating drywall from the stud frame, so sound can’t travel as easily through walls and ceilings. You install channels across framing to create a deliberate gap, then fasten drywall to the channels rather than directly to studs.
This structural decoupling disrupts radiant and impact noise transfer, reducing what you hear from adjacent spaces. Use screws long enough to reach the channel’s interior, not just the drywall surface, to maintain effective isolation.
The approach emphasizes vibration isolation by interrupting sound’s direct route, yielding clearer room quieting. For best results, maintain proper spacing and avoid over-tightening, which can collapse the float.
Combine with resilient channels in ceilings to further slow vibration paths. This method supports overall acoustic performance without changing room dimensions.
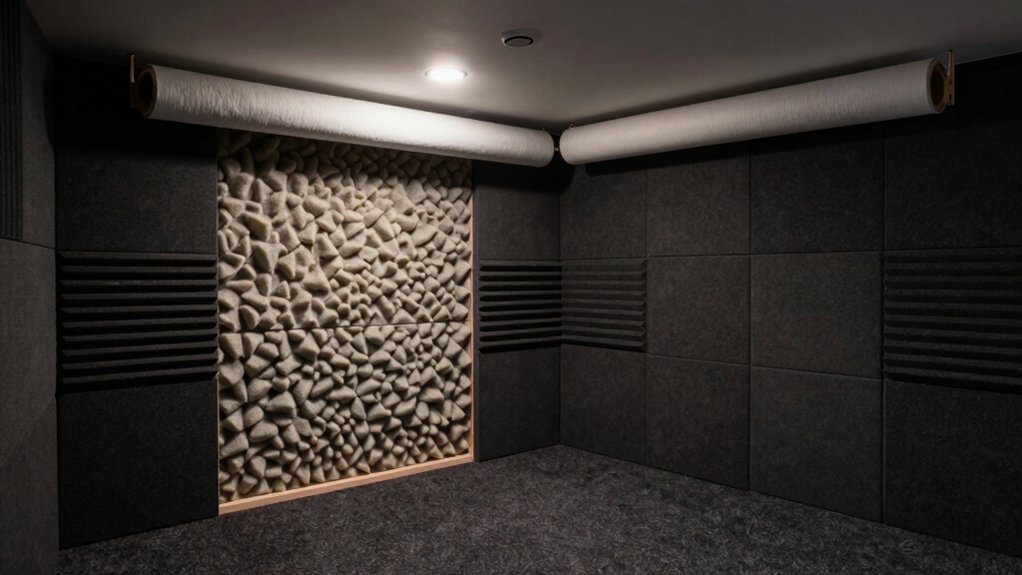
Acoustic Panels and Diffusers for Room Acoustics
With your walls decoupled to curb vibration, the next step is shaping how the room sounds through acoustic panels and diffusers. You’ll pick panels with appropriate NRC ratings to control flutter and reduce reflections, targeting first- and mid-frequency issues common in basements.
Place semi-rigid panels at primary reflection points: either side walls and rear wall, plus the ceiling if ceiling height allows. Diffusers scattered across the room break up standing wave patterns, enhancing sound diffusion without overdeadening.
Use a balanced mix: absorptive panels to tame echoes, diffusers to maintain liveliness for intelligibility. Avoid overuse that dulls room acoustics; aim for clarity and natural timbre.
Measure progress with a basic listening check and adjust placement as needed to preserve speech intelligibility.
Acoustic Sealants and Gaskets to Stop Leaks
You’ll start with proper Sealant Application Tips to guarantee a continuous, airtight seal where walls meet floors and seams around pipes.
Choose Gasket Material with the right flexibility and density to tolerate basement humidity, temperature shifts, and movement. Then test for gaps and resilience.
Implement Leak Prevention Techniques by inspecting joints, addressing any moisture sources, and planning for maintenance so your soundproofing lasts.
Sealant Application Tips
When sealing gaps in a basement, acoustic sealants and gaskets provide a tight, lasting barrier against air leaks and moisture. You’ll prep surfaces by removing dust, oil, and old caulk, then dry thoroughly.
Cut the caulk tube tip to a small opening for controlled bead size, and load the sealant evenly into a caulking gun. Apply continuous, consistent pressure along joints, keeping a steady bead without gaps. Smooth with a damp finger or caulk tool before skin forms.
For doors and windows, press gaskets firmly into frames and seal edges with appropriate backing. Use sealant application techniques that minimize air pockets, and allow cure times per manufacturer guidance.
Choose soundproofing adhesives compatible with your substrate, ensuring a durable seal that remains flexible and stable.
Gasket Material Choices
Choosing the right gasket material is essential for stopping leaks in basements, because the seal must stay flexible, resist moisture, and endure temperature swings. You’ll evaluate gasket material choices by compatibility with wall substrates, movement tolerance, and long-term durability.
Start with foam, but only where gaps are small and movement is minimal; switch to rubber or silicone for wider joints and higher moisture exposure. For acoustic efficiency, select gaskets that compress evenly and maintain a continuous seal around penetrations.
Confirm installation surfaces are clean and dry to prevent gaps. Soundproof gasket installation benefits from a bead or flange method that preserves elasticity while preventing tearing. Avoid over-compression, which traps moisture and creates gaps.
Document material specifications, expansion allowances, and installation tolerances for reliable, repeatable performance.
Leak Prevention Techniques
Gaskets and acoustic sealants are your first line of defense against basement leaks and sound intrusions. You’ll apply weatherproof gaskets around bulkhead doors, utility panels, and access hatches, ensuring airtight seams that reduce both seepage and vibration transmission.
Choose sealants with elastomeric properties for movement without cracking, and binders compatible with concrete, masonry, and drywall. Use caulk at joints, penetrations, and along wall-floor junctions to close capillary paths that moisture and sound ride through.
Pair these barriers with proactive ventilation strategies that prevent humidity buildup, and regularly inspect sealants for gaps or deterioration. Implement moisture control practices, such as sump checks and drainage maintenance, so the combined system remains effective over seasons and shifting foundations.
Drywall Upgrades and Layering for Mass and Damping
Drywall upgrades are a practical first step toward mass and damping in a basement. You’ll add mass to the assembly with layered drywall and reduce resonant motion by increasing stiffness.
Start with standard 5/8-inch gypsum boards to boost surface weight, then consider staggered or double-stud framing to break flanking paths. Make certain mechanical details are tight: use double-layer drywall on the room side for higher impedance, and caulk joints to seal gaps.
Integrate wall insulation within studs to dampen without sacrificing space, and choose soundproof drywall where you expect higher pressure. Pay attention to resilient channels or hat channels to decouple panels, lowering transmission.
Finish with precise seams and minimal penetrations to preserve mass and damping performance.
Impact Noise Solutions: Underlayment and Isolating Floors
To reduce impact noise from foot traffic and dropped objects, focus on underlayment and floor isolation strategies that sit beneath the finished surface. You’ll gain measurable benefits by selecting rigid or floating subfloor systems that decouple the structural path from the room above.
Choose products designed for vibration isolation, so footsteps and heavy taps don’t transfer through joists. Pair these with an underlayment that provides sound absorption to damp reverberations within the ceiling and floor layers.
Guarantee total thickness aligns with your door and threshold clearances, avoiding squeaks and binding. Install over a clean, flat subfloor to prevent gaps that compromise performance.
Use proper fasteners and adhesive tapes to maintain continuity across seams, enhancing overall impact reduction without adding unnecessary bulk.
Green Glue or Damping Compounds for Quieting
If you’re aiming to curb airborne and structure-borne noise, Green Glue and similar damping compounds offer a practical, high-velocity fix. These products are fed by a viscous layer between rigid boards, converting sound energy into tiny amounts of heat, reducing transmitted vibrations across walls and ceilings.
You’ll prioritize an airtight, continuous curtain of dampening—avoid gaps, seams, and missed studs that create leakage paths. For resonance control, apply the compound liberally at known high‑noise junctions, then seal with two layers of drywall for maximum spacing and mass.
In practice, damping compounds excel at vibration damping, softening peak responses without adding excessive stiffness. Use them where you need broad-spectrum quieting, especially in shared basements, laundry rooms, and home offices.
Comprehensive Basement Soundproofing: System Planning and Application
A comprehensive basement soundproofing strategy begins with a clear goals-and-scope evaluation, followed by a coordinated system design that aligns walls, ceilings, and floors for consistent attenuation. You map interfaces between spaces, selecting assemblies that address shared flanking paths and residual vibrations.
Prioritize a holistic approach: decouple framing, isolate mechanical runs, and specify membranes or resilient channels where framing touches structure. Plan ventilation and plumbing routes to minimize noise penetration, and treat any ducts with lined, baffled sections to reduce ventilation noise transmission.
Apply layered treatments methodically—dense barrier materials at critical planes, then absorption in cavities—to achieve uniform performance rather than spot gains. Validate with baseline measurements, adjust details, and ensure the finished system remains accessible for future service or upgrades.
Frequently Asked Questions
How Long Does It Take to Install All Basement Soundproofing Layers?
The installation timeline varies, but you’ll typically finish in 1–3 days, depending on space and prep. You’ll handle material preparation first, then layered assembly, ensuring seals and testing, with careful, precise joint work throughout the process.
Can Ceiling Noise Transfer Affect Upstairs Rooms Significantly?
Yes, ceiling noise transfer can substantially affect upstairs rooms. You’ll notice echoes of the same room’s chatter, so focus on ceiling insulation and decoupling to reduce noise transfer as a seasoned pro would advise.
Are There Eco-Friendly Options That Work Well?
Yes, eco-friendly options work well. Use eco friendly insulation and sustainable materials that reduce noise transfer, like recycled cellulose or mineral wool mixed with sound-absorbing boards. You’ll improve comfort while cutting environmental impact and costs.
Do Moisture and Mold Risks Impact Soundproofing Performance?
Yes, moisture and mold risks can compromise soundproofing performance. Prioritize moisture prevention and mold resistance in barriers, seals, and absorbers; keep humidity controlled, fix leaks promptly, and ensure vapor barriers remain intact to preserve effectiveness.
What’s the Cost per Square Foot for Full Basement Systems?
You’ll compare cost factors, estimate price ranges, and plan strategically, because full basement systems run from mid-range to premium, depending on scope. You’ll translate square footage into constraints, and you’ll gather price estimates before committing.
Conclusion
You’ve laid out the playbook for quiet basements, and now it’s time to perform. Think of the wall as a fortress orchestra: mineral wool, MLV, and damping lining each play a distinct note, decoupled by resilient channels to mute the tremors. Seal gaps like careful props, and finish with smart layers for both air and impact. When you orchestrate these parts together, you’ll hear the silence you intended—an allusion to stillness, made real.