
Tuckpointing restores the mortar joints between bricks, stopping moisture intrusion and preserving both appearance and structural integrity. You remove damaged mortar, shape the joints, and match color, texture, and hardness for compatibility. Look for signs like weathered joints, cracks after freeze–thaw cycles, and damp patches inside walls. Choose mortar type (hydraulic lime or Portland cement) based on climate and heritage needs, and use proper tools and safety gear. If you keep reading, you’ll uncover how to plan, execute, and maintain the work.
What Is Tuckpointing and Why It Matters
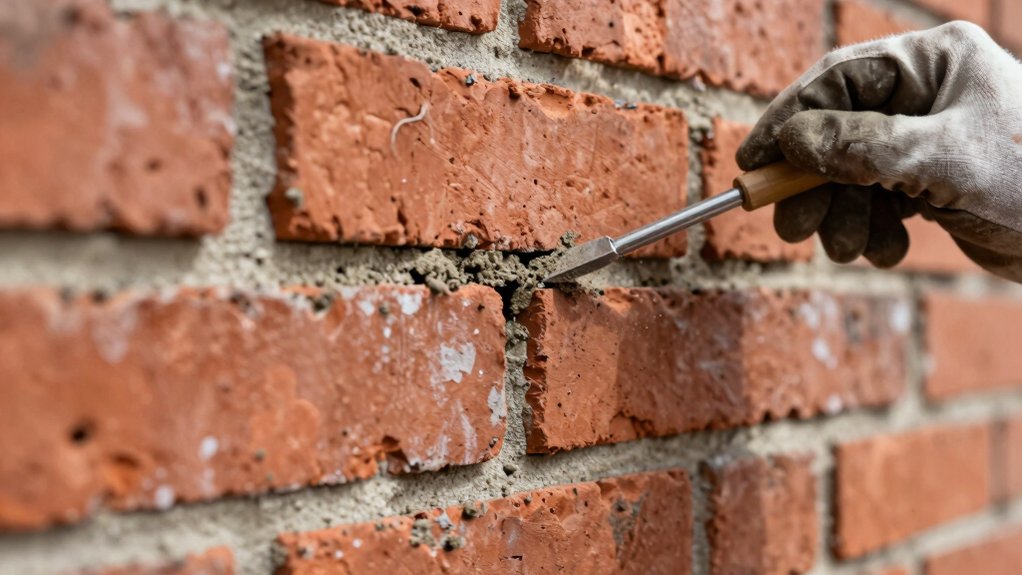
Tuckpointing is the process of repairing and restoring the mortar joints between bricks to restore structural integrity and prevent moisture intrusion. You perform this work to maintain the building’s longevity, curb deterioration, and protect interior finishes.
The method involves removing damaged mortar and applying new, correctly shaped joints, ensuring a tight, uniform facade. You’ll evaluate mortar hardness, color, and texture to match surrounding brickwork, then execute a controlled tuckpointing technique for durable seals.
This practice carries historical significance, reflecting evolving masonry standards and repairing methods across eras. It also supports cultural preservation by maintaining authentic appearances and preserving architectural character valuable to communities.
Implementing precise workmanship minimizes future maintenance cycles, reduces energy loss, and sustains property value. Your disciplined approach guarantees both performance and aesthetic integrity over time.
Signs Brick Masonry Needs Tuckpointing Now
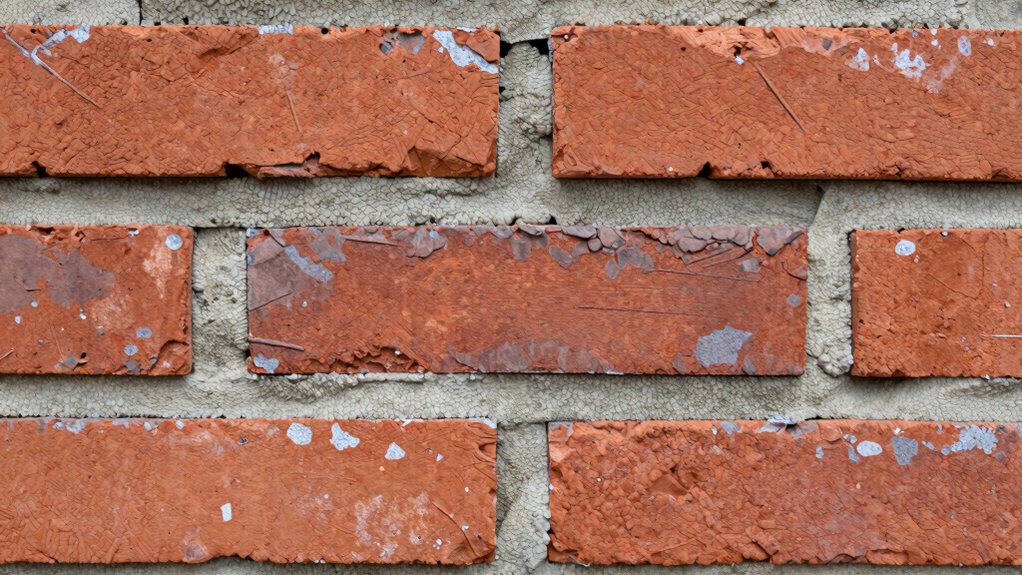
Brick masonry shows clear indicators that it’s time to tuckpoint. You’ll notice weathering on mortar joints, with cracks that widen after freezes and thaws. Receding mortar reveals brick cores, increasing moisture ingress and efflorescence on surfaces you can see. You may detect powdery dust on ledges or spalling along joints, signaling mortar failure rather than brick deterioration.
Shrinkage gaps produce hairline fissures that compromise airtightness and wind resistance, while damp patches inside walls point to compromised waterproofing. In historic structures, signaling needs for tuckpointing aligns with historical preservation goals, as restoring original joints preserves authenticity.
Beyond protection, timely tuckpointing offers aesthetic enhancement, restoring uniform mortar lines and clean profiles that reflect careful maintenance rather than neglect. Prioritize professional assessment to ensure durable, code-compliant repair.
How to Assess Mortar and Material Choices for Tuckpointing
Start by checking material compatibility, ensuring the mortar you choose matches the substrate in strength, porosity, and finish.
Consider the mortar type—hydraulic lime or Portland cement blend—based on climate, movement, and historic preservation goals.
Finally, assess a material match through aesthetic and performance lenses, weighing color, texture, and durability against the existing masonry.
Material Match Check
Evaluating material match is essential to a durable tuckpointing repair; the goal is to guarantee the new mortar harmonizes with the existing fabric. You assess composition, texture, and setting behavior before any mix is chosen.
Begin by comparing porosity and capillary rise, then examine aggregate size and color hue under controlled light. Check historical accuracy by matching historic binders or compatible cementitious systems, avoiding modern appearances that disrupt the facade’s narrative.
Document color consistency across joints, ensuring shading remains uniform as mortar ages. Factor weathering potential, efflorescence tendency, and absorption rate to predict long-term performance.
Finally, test a mock joint on a discreet sample area, observing curing, finish, and feathering compatibility with surrounding masonry to prevent abrupt passages.
Mortar Type Considerations
Mortar type selection directly shapes the durability and appearance of a tuckpointing repair. You evaluate mortar formulas by compatibility with brickwork, cohesion, and permeability, ensuring a balanced moisture profile.
Historical mortar analysis informs the stiffness and porosity you should expect when comparing past mixes to modern equivalents. Prioritize materials that match brick and substrate movement without trapping efflorescence or causing spalling.
Modern mortar formulas offer consistent performance, but you must validate aggregate size, lime content, and binder type for your wall’s climate and age.
- Assess historic properties to guide material choices
- Compare lime-based vs cement-based options for permeability
- Verify bond strength and detailing to prevent cracking
Tools and Safety Gear for a DIY Tuckpointing Project
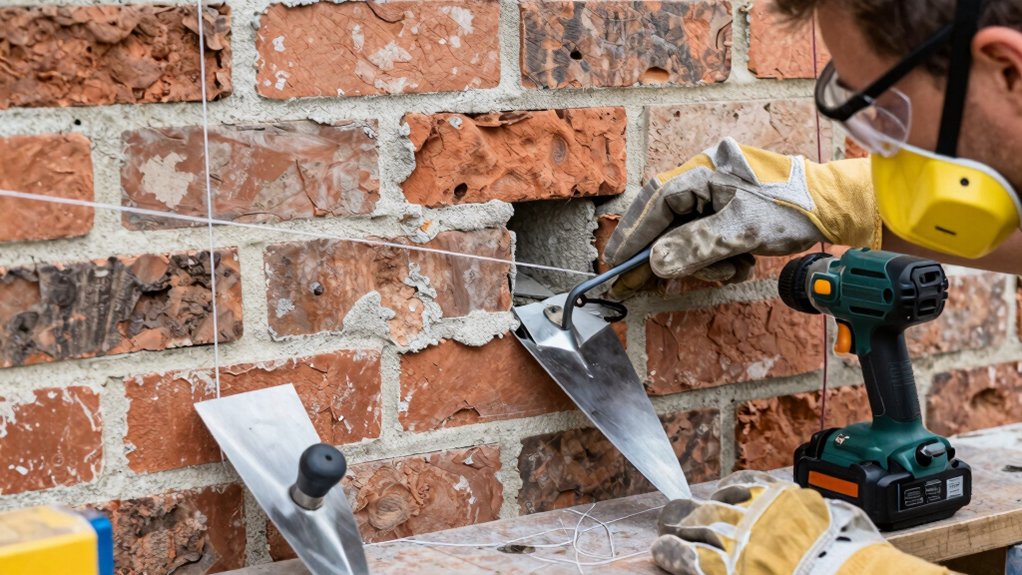
Tools and safety gear are essential for a DIY tuckpointing project, because proper instruments and protective equipment directly affect accuracy and safety. You’ll select hand tools like margin trowels, pointing chisels, and a hawk, paired with a grout bag or caulking gun for controlled application.
A grinder with a diamond blade handles damaged mortar, while a dust-collection capable sander minimizes airborne particulates. Personal protective equipment is non negotiable: gloves, eye protection, and a respirator shield you from particles and chemical exposure.
When working at height, elevated scaffoldings provide stable access and reduce fall risk, so secure setup and planking integrity matter. Keep a moisture barrier, brushes, and containment to manage debris and accidents, preserving masonry integrity and your working confidence.
How to Tuckpoint: A Complete Step-By-Step Guide
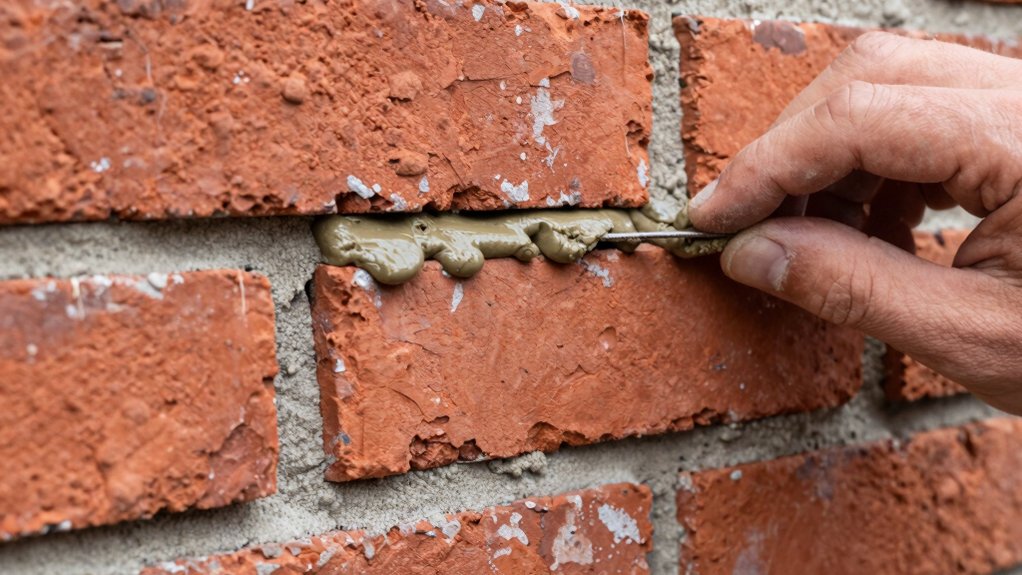
Tuckpointing starts with a clear assessment of the existing mortar joints: check for cracks, water intrusion, and loose or deteriorated mortar. Then plan replacement with the same mortar style and strength class.
You’ll prepare, mix, and test a batch to match color and texture, ensuring compatibility with historic materials. You’ll remove damaged mortar to a uniform depth, rinse joints, and allow drying before applying new mortar.
You’ll pack and sculpt joints for a tight, even profile, and cure under controlled conditions. Finally, you’ll seal surrounding brick to limit moisture ingress and restore appearance through brick cleaning and compatible tooling.
- Assess, plan, and prepare materials with historical restoration in mind
- Remove damaged mortar and clean joints before repointing
- Cure properly and verify color, texture, and seal integrity
Common Mistakes in Tuckpointing and How to Avoid Them
A common pitfall in tuckpointing is underestimating material compatibility and joint dynamics, which can lead to cracks, spalling, or bond failure after aging. You must assess mortar type, aggregate size, and climate exposure before cutting joints or selecting grout.
Misjudging bonding strength or moisture movement invites cracking and accelerated degradation, undermining durability. Avoid overtensioning joints, which can cause hairline splits and tile-like scaling.
Prioritize thorough brick cleaning to reveal sound substrate and prevent contaminant trapping that weakens adhesion. In historical preservation contexts, preserve original textures while achieving a cohesive, breathable mortar system.
Document substrate variability and test repairs on small sections first. Consistent workmanship prevents cold joints and efflorescence, ensuring lasting performance without compromising aesthetic integrity.
Seek compatible mortars and monitor joints periodically for early signs of distress.
Budgeting for Tuckpointing: Cost Factors and Timeline
Budgeting for tuckpointing requires a clear view of cost drivers and a realistic timeline, so you can allocate funds without surprises. You’ll base decisions on budget planning and cost estimation to prevent overages and delays.
Key factors include materials, labor intensity, scaffold access, and mortar mismatch repairs, each influencing price and duration. Scheduling should align with weather windows and supplier lead times to avoid idle contingencies.
- Assess material and labor rates, plus scaffold rental and waste disposal costs
- Forecast quantity through a masonry assessment and grout/mortar mix needs
- Build a phased timeline with milestone reviews and contingency buffers
Hiring Pros vs. DIY: Criteria to Choose
Choosing between hiring pros and DIY hinges on risk, skill, and consequences. You assess project complexity, mortar types, and access constraints to determine where errors matter most. If you lack masonry training, risks include structural harm and moisture intrusion, which could threaten historical preservation and long-term performance.
DIY can save money upfront, but mistakes often compound costs and downtime. When architectural aesthetics matter, professional crews measure weep holes, lime putty compatibility, and color matching with precision, ensuring uniform texture and hue.
For high-visibility facades or heritage sites, experts provide documentation, permit adherence, and code compliance. If you need quick, predictable results with warranties, hire pros.
If you’re tackling a small, non-structural spot and have relevant experience, DIY may be feasible with strict best practices.
Maintenance After Tuckpointing: Extending Life
Even after tuckpointing, proactive maintenance is essential to extend masonry life and protect your investment. You’ll monitor joints for hairline changes, schedule seasonal inspections, and use proper cleaning methods to avoid introducing moisture or damaging new mortar.
Regular upkeep reduces long-term cracking, spalling, and moisture migration, supporting historical preservation by maintaining authentic appearance and structural integrity. You’ll balance cleaning with products that minimize environmental impact while preserving mortar color and texture.
Detailed documentation of treatments, materials, and dates helps you track performance and plan future interventions.
- Schedule biannual inspections to catch issues early
- Use low-impact cleaners and breathable mortars to curb moisture
- Log maintenance activities to support preservation goals and resource planning
Troubleshooting: Cracks, Moisture, and Color Mismatches
After tuckpointing, cracks, moisture intrusion, and color mismatches often signal underlying issues that warrant prompt attention. You’ll assess whether cracks align with mortar joints or reveal structural movement, then determine if repointing or substrate repair is needed.
Moisture indicators—efflorescence, staining, or damp basements—signal flashing or drainage flaws that must be corrected to preserve structural integrity.
Color mismatches can indicate mismatched mortar types, premature curing, or improper curing conditions; verify material compatibility and curing history before proceeding.
Addressing these signals preserves structural integrity and supports long-term aesthetic improvements.
Document observations, test for hidden cracks, and monitor seasonal moisture cycles.
Plan corrective steps with precise material specifications, proper tooling, and curing protocols to minimize future cracking and preserve exterior uniformity.
Conclusion
You’ve learned the signs, the steps, and the costs, so you’re primed to decide with clarity. Tuckpointing isn’t just cosmetic; it shields your masonry from moisture, rot, and escalating repairs. With precise materials and proper technique, you’ll extend your brickwork’s life like a fortress repointed for the long haul. Stay disciplined: assess, plan, and measure twice before you cut once. When in doubt, call in a pro. Your walls deserve a durable, quiet defense.