

Start with a solid foundation assessment and fix any cracks, drainage issues, or moisture paths first. Plan a practical layout that encourages flow, accessibility, and clear zones for living, storage, and circulation, then budget with contingencies for floors, walls, insulation, HVAC, and lighting. Create a dry, cohesive shell by waterproofing and framing with moisture-resistant materials. Map electrical, plumbing, and HVAC early, then finish with thoughtful lighting, textures, and accents. If you keep going, you’ll reveal a complete, design-focused process.
Foundations to Consider Before You Begin Basement Finishing
Before you start finishing your basement, you must understand the foundation that will support everything above it. You’ll design with confidence when you verify the base is sound, stable, and ready for upgrades.
A thorough Foundation inspection reveals hidden cracks, moisture paths, and settlement risks that could disrupt your plans—address these early to avoid costly surprises later. Prioritize a solid base with proper drainage, waterproofing, and vented, clean spaces for equipment.
Then consider insulation options that pair efficiency with comfort, choosing between spray foam, rigid boards, or mineral wool based on your climate and budget.
Clear documentation from professionals helps your team feel included and aligned. With a dependable foundation and thoughtful insulation strategy, your basement becomes a welcoming, durable extension of your home.
Plan Your Basement Layout and Budget
Effective planning starts with a clear layout and a realistic budget. You’ll map zones first—comfort, storage, and circulation—to ensure flow and accessibility. Sketch a practical grid: ceiling height, egress, and electrical points guide where partitions land.
Next, price matters. Estimate costs for floors, walls, insulation, and a reliable HVAC or zones, then pad for contingencies. Align your plan with a cohesive style, choosing materials and fixtures that unify spaces and feel affordable.
Consider decorative accents early to define mood without overspending. When budgeting, assign separate lines for lighting options, ceiling treatments, and seating areas, so you can swap elements without wrecking the whole plan.
Finalizing your plan with a simple, scalable layout will save iterations and preserve your sense of belonging and pride in the finished basement.
Basement Waterproofing and Framing: Creating a Dry, Solid Shell
To create a dry, solid shell, start with a robust waterproofing strategy and precise framing plan that protect your basement from moisture while defining usable space. You’ll choose moisture barriers that align with climate and soil conditions, then install them behind walls and under floors to form a continuous defense.
Pair these with smart drainage details and proper slope away from the foundation. For framing, select framing materials that resist distortion and mildew, such as metal or treated lumber, and design for cross-ventilation and service access.
Keep lines clean and edges tight, so panels align and reveal a cohesive, resilient shell. This approach balances protection with a confident, welcoming aesthetic, inviting you to customize finishes without compromising stability.
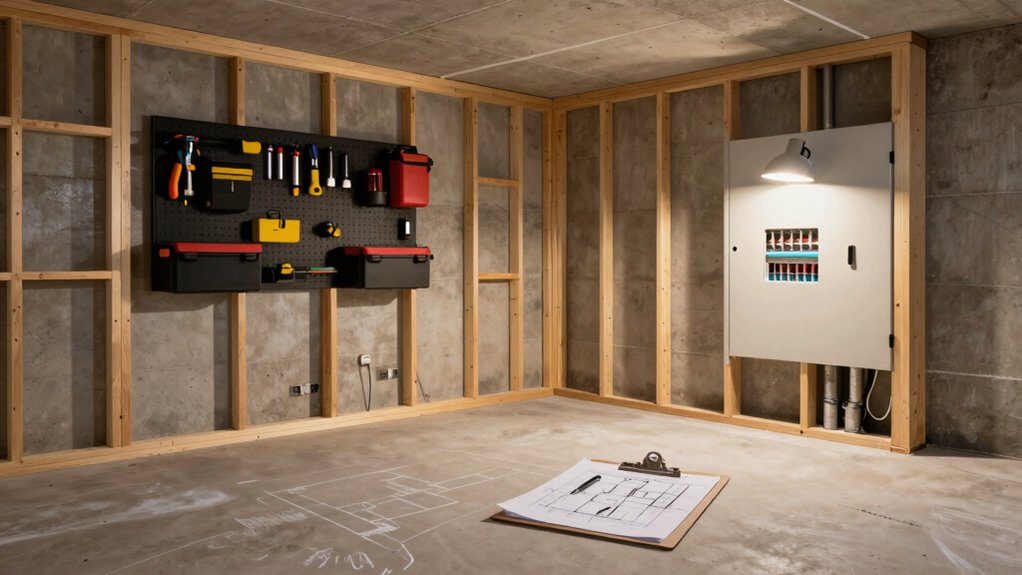
Basement MEP Essentials: Electrical, Plumbing, and HVAC
Electrical, plumbing, and HVAC form the backbone of a comfortable basement, and getting them right centers on clean layouts and accessible runs that minimize future headaches. You’ll map circuits, pipes, and ducts to avoid clashes, leaving room for reliable maintenance.
Plan basement lighting with layered options—ambient, task, and accent—to create an inviting, cohesive space. Prioritize efficient routing that keeps mechanicals accessible yet discreet behind finished walls.
Insulation matters: basement insulation improves comfort and energy use, reducing drafts around cold walls and pipes. Pair that with smart electrical placement for outlets, switches, and a future-friendly panel.
In short, design precise MEP pathways now, so your basement feels integrated, breathable, and ready for personalized zones without compromising longevity or aesthetics.
Finishing Touches and a Realistic Project Schedule
Finishing touches tie the project together, translating your layout into a cohesive, livable space with practical, lasting appeal. You’ll choose decorative accents that echo your color palette and materials, weaving texture and personality into every corner.
Plan a realistic project schedule by sequencing tasks logically: framing and drywall, insulation, then finishes, with buffer days for delays. Assign lead times for materials and set milestones that keep you accountable without pressure.
Lighting fixtures should complement both function and mood, from task lighting in workshop zones to ambient glow in living areas. Keep storage and cleanliness front and center, so seasonal steps don’t derail progress.
Communicate with contractors and household members to sustain momentum, ensuring your basement evolves into a welcoming, belonging-filled retreat.
Frequently Asked Questions
How Long Does a Basement Finishing Project Typically Take Start to Finish?
Most basement finishing projects take 4–8 weeks, depending on scope and permits. You’ll pace progress with precise planning, choosing basement insulation and lighting options that elevate space, while you feel confident, included, and design-focused throughout.
What Permits Are Required for Finishing a Basement in Most Areas?
You’ll typically need permits tied to building codes and safety regulations, depending on your area. Check with your local building department; you’ll gain confidence and belonging by ensuring compliant, safe design choices from the start.
Can I Finish a Basement Without a Real Contractor?
You can finish a basement without a contractor, but you’ll face DIY risks and contractor considerations. Plan carefully, obey codes, and prioritize safety, design cohesion, and lasting comfort to feel confident, connected, and part of a skilled, belonging community.
How Do I Handle Mold or Moisture Issues Before Finishing?
Address mold remediation first, then moisture prevention to protect your space. Identify sources, seal leaks, and improve drainage. You’ll design with confidence, ensuring air flow and ventilation, so you belong in a healthier, safer basement you actually enjoy.
What Is the Cost Range for a Basic Basement Finish?
You can expect a basic finish to run roughly $15,000–$40,000, depending on scope. Budget considerations and material selection shape costs; plan smartly, choose durable finishes, and curate spaces that make you feel at home and connected.