
Figure Out What’s Wrong (Fast)
Before you grab tools, isolate the failure by running a quick functional check: tilt the slats fully open and closed, then raise and lower the blind while you watch the headrail and bottom rail for uneven movement, binding, or slipping. Stop if cords jump, slats skew, or the rail drifts; that indicates a control, ladder, or lift issue. Next, verify mounting: push up and side-load the headrail to confirm brackets aren’t loose. Check for obstructions like a Decorative curtain rubbing the slats or cord. For safety, keep fingers clear of moving parts and don’t pull hard on jammed cords. During Window cleaning, note if water residue stiffened cords or warped slats. Finally, compare left/right cord tension; unequal pull points to a tangled lift path.
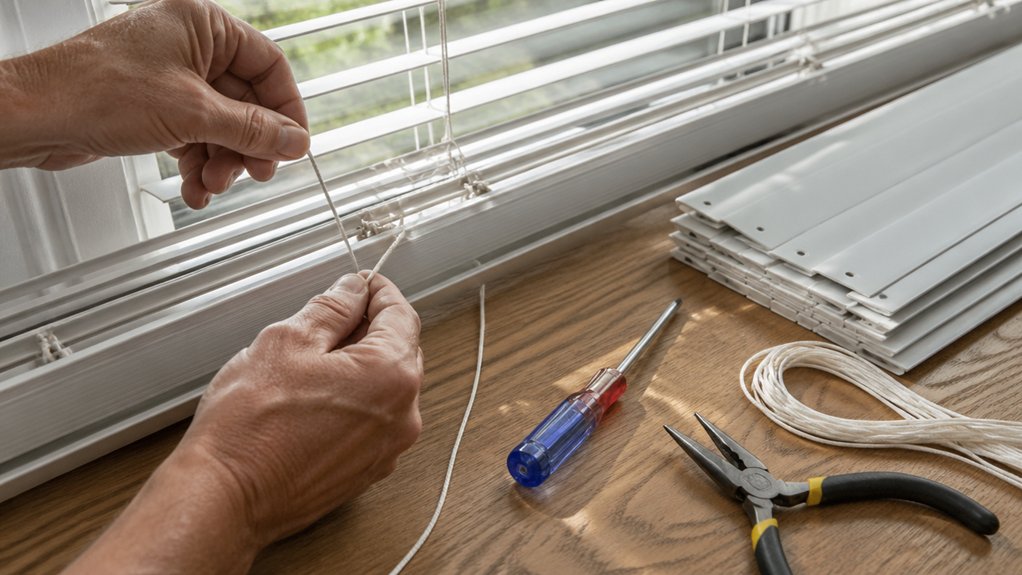
Tools and Parts for Venetian Blind Repairs
Before you start the repair, you’ll gather essential tools—screwdriver, needle-nose pliers, tape measure, utility scissors, and a level—and put on cut-resistant gloves to prevent injuries from sharp slats and brackets. Next, you’ll stage common replacement parts like lift cord, cord locks, ladder strings, tilt mechanisms, end caps, and mounting brackets so you’re not forcing damaged components back into place. Finally, you’ll verify sizes and compatibility against your headrail width and slat type, then set everything on a stable work surface to keep the blind aligned and the hardware controlled.
Essential Repair Tools
Five basics handle most Venetian blind fixes: a small Phillips/flat screwdriver, needle‑nose pliers, a tape measure, sharp scissors or a utility knife, and a lighter or fray‑check to seal cut cord ends. Unplug nearby powered shades, set a stable step stool, and wear cut‑resistant gloves before you start. Use the screwdriver to open headrail covers and snug loose fasteners; keep parts in a tray so nothing drops. Grip bent hardware gently with pliers, applying steady pressure to avoid snapping thin metal. Measure twice before trimming cord or ladder; cut cleanly, then seal ends to prevent unraveling. Add cleaning tips: vacuum with a brush and wipe with mild detergent so grit doesn’t jam mechanisms. For material choices, match tool hardness to aluminum, wood, or faux wood to prevent marring.
Common Replacement Parts
Once you’ve got your tools laid out and the headrail opened safely, you’ll usually find the real failure point is a worn or missing part rather than the blind itself. Start by checking lift cords for frays; replace with matching diameter cord and melt-cut ends to prevent unraveling. Next inspect ladder strings/tapes; swap any stretched rungs so slats hang level. Examine cord locks and tilt mechanisms: if the blind slips or won’t rotate, replace the lock, wand, tilt rod, or tilter as a unit. Verify slat clips, bottom rail plugs, and tassels are intact before rethreading. Wear gloves, keep fingers clear of springs, and support the headrail while testing. Finish with Cleaning tips and decorative ideas like new valance clips.
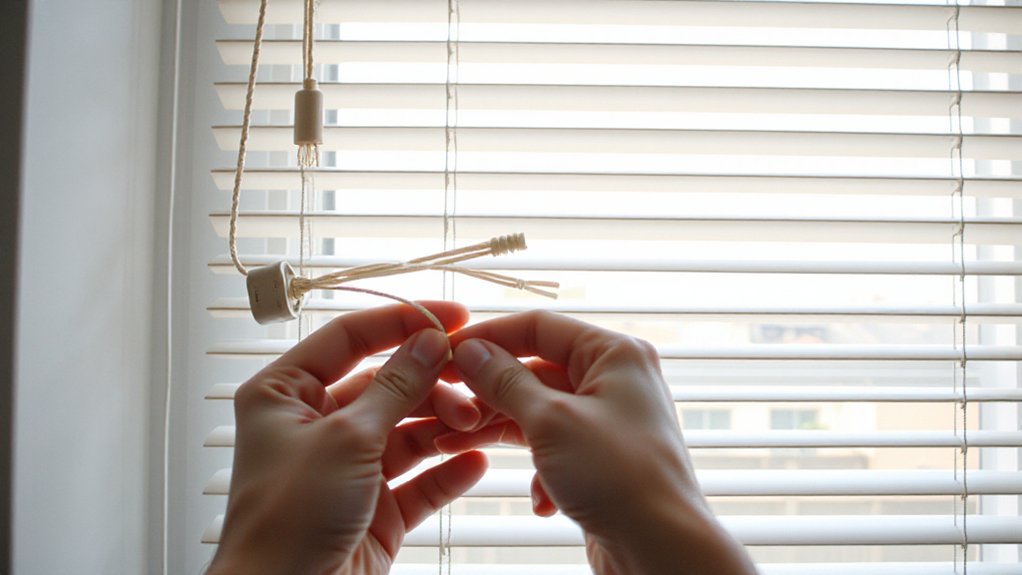
Fix Venetian Blind Lift Cords and Tassels
First, lower the blind fully, lock the cords, and remove the blind from its brackets so you’re not working under tension. Next, inspect the lift cords for frays or flat spots and replace worn cords by threading new cord through the headrail and ladder system, then tying secure, trimmed knots. Finally, reattach loose tassels or replace them by feeding the cord ends through the tassel and setting a stopper knot so the pull ends can’t slip back through.
Replace Worn Lift Cords
Although frayed lift cords and cracked tassels seem minor, they can jam the headrail, drop the slats unexpectedly, and cut your fingers, so replace them as soon as you see fuzzing, flat spots, or broken strands. Lower the blind fully, then remove it from the brackets. Unplug nearby cords, and wear cut-resistant gloves and eye protection. Open the headrail cover with a flat screwdriver, noting the cord path and lock position. Pull the old cord out through the ladder drums and bottom rail, then thread a matching-diameter replacement cord the same way. Tie a temporary stop knot, test lift and lock action, and verify equal lengths on both sides. Before reinstalling, follow cleaning tips: vacuum grit in the headrail. Skip decorative ideas until it operates smoothly.
Reattach Or Replace Tassels
If your tassels have slipped off or cracked, fix them right away so you don’t yank on bare lift cords and fray them further. Lower the blind fully, then lock the cords in the cleat to prevent sudden drops. Inspect the cord ends: if they’re mushroomed, trim 1/4 inch cleanly with scissors and melt synthetic tips lightly to stop unraveling.
To reattach, thread both lift cords through the tassel’s top holes or loop, then tie a tight double overhand knot below the tassel so it can’t pull through. Tug-test each cord separately. To replace, match hole count and cord diameter; choose compatible Tassel styles and decorative accessories that won’t add excess weight. Finally, cycle the blind up and down, watching for snagging or uneven lift.
Blinds Won’t Lift: Cord Lock and Headrail Fixes
When your Venetian blinds won’t lift, the problem usually sits in the cord lock or where the lift cords route through the headrail. First, lower the blind fully, then remove tension by holding the cords and easing them through the lock. Unclip the valance and open the headrail cover with a flat screwdriver, wearing cut-resistant gloves.
Inspect the cord lock: if the teeth are jammed with dust, brush them clean and perform a Cord lock adjustment by resetting the lock lever to its neutral position and verifying the cords seat evenly. Next, check cord guides and pulleys for binding or frayed cord. Apply a tiny amount of dry silicone for headrail lubrication; don’t use oil. Reassemble, then test lift slowly and stop if cords snag.
Fix Venetian Blinds That Won’t Tilt
Before you take the headrail apart, confirm the tilt system—not the lift system—causes the failure by lowering the blind a few inches and trying the wand or tilt cords with light, steady force. If it binds, lock the blind in place, wear gloves, and remove the valance and end caps. Support the headrail, then slide it off the brackets. Inspect the tilt mechanism: a stripped tilt gear, disconnected tilt rod, or jammed worm gear are common. Clear debris, then add a drop of dry PTFE lube; avoid oil. Re-seat the tilt rod fully into the gear and test rotation. Replace cracked gears with an exact match. Use Cleaning tips: vacuum grit first. For design ideas, choose a wand upgrade for smoother control.
Straighten Bent Slats and Realign Blinds
Although a slight curve can look like a hardware failure, you can usually restore Venetian blinds by flattening bent slats and squaring the ladder cords. Lower the blind fully, then wear gloves to avoid sharp edges. Remove the slat from the ladder by sliding it out sideways. Lay it on a flat surface and press it between two boards; add light, even weight for 5–10 minutes. For aluminum, massage creases with a plastic putty knife, working from the bend outward. Reinsert the slat, ensuring each ladder rung supports it evenly. Next, raise and lower the blind to check for skew. If it leans, gently tug the shorter ladder cord down to equalize spacing. Keep Decorative curtain accessories clear so they don’t snag, preserving your Window treatment styles.
Replace Venetian Blind Brackets and Mounting Clips
If your blind sags, tilts, or pops loose during operation, you likely need to replace a worn bracket or mounting clip. Lower the blind fully, lock the slats open, and remove the valance. Support the headrail with one hand while you release the tabs and lift it out.
For bracket replacement, unscrew the damaged bracket using a #2 Phillips, keeping fasteners out of reach of children. Check the wall or window frame for stripped holes; install anchors if needed. Position the new bracket level, predrill pilot holes, and tighten screws snugly, not over-torqued.
For Mounting clip repair, inspect each clip for cracks and spring tension. Snap in the new clip, then seat the headrail until it clicks. Test lift and tilt twice.
Frequently Asked Questions
How Do I Safely Clean Venetian Blinds Without Bending the Slats?
Close the blinds, support slats with one hand, and wipe gently with a microfiber cloth. Use Cleaning tips: vacuum brush first, then dampen lightly. Follow Safety precautions: avoid soaking, don’t twist, dry immediately.
Can I Shorten Venetian Blinds Without Cutting the Lift Cords?
Yes—you can shorten them without cutting lift cords; it’s insanely simple. Remove the bottom rail plugs, pull excess ladder/lift, perform blind adjustment, retie knots, tuck cords, reinstall plugs. If frayed, do cord replacement.
What’s the Best Way to Childproof Cords on Older Venetian Blinds?
Install cordless retrofit kits or cord tensioners for child safety; you’ll anchor cords high. Use cleats, winders, or breakaway connectors for cord management. You’ll remove loops, shorten excess, and test daily for slack.
How Do I Match Replacement Slats to My Blind’s Color and Finish?
Match slats by measuring width, thickness, curve; by sampling in daylight, in shade, under LEDs. Use Color matching via manufacturer codes, and finish blending via gloss tests. Wear gloves, test-fit one, then order.
When Should I Replace the Entire Blind Instead of Repairing It?
Replace the entire blind when the headrail’s bent, lift cords fray repeatedly, or multiple slats crack. For Blind maintenance, inspect mounts, tilt gear, and cord path. During Repair troubleshooting, stop if parts bind or sharp edges appear.
Conclusion
You’ve just turned a “total blind meltdown” into a quick, controlled repair. Double-check the diagnosis, then verify you’ve got the right tools and parts. Re-thread lift cords and secure tassels, test the cord lock inside the headrail, and confirm the tilt wand or gears engage smoothly. Straighten slats with gentle pressure, realign the ladder strings, and tighten or replace brackets and clips. Cycle lift/tilt five times. Keep fingers clear—those tiny parts can bite hard.