
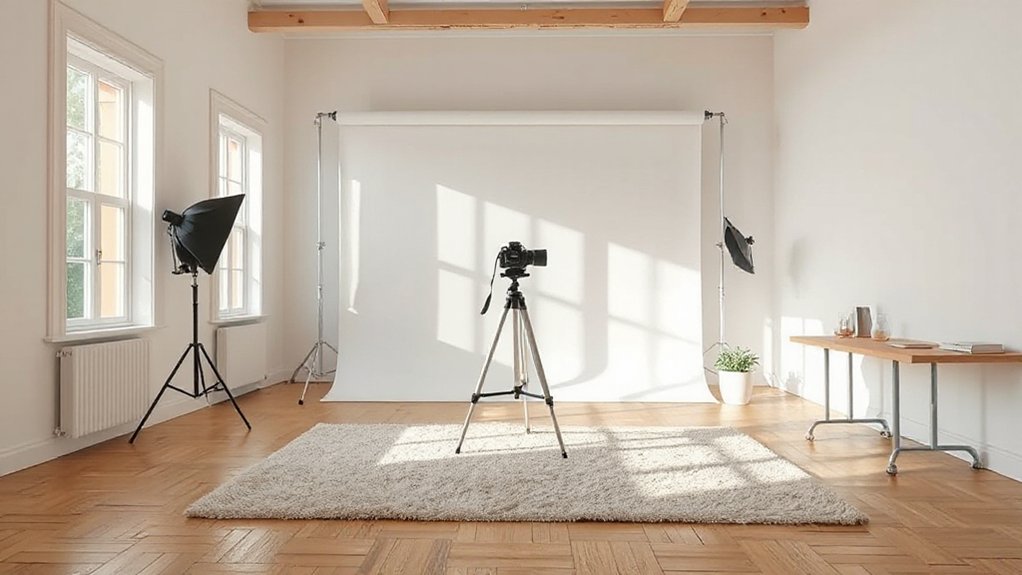
To prep a home for professional photography, choose rooms with consistent, controllable light and minimal distractions. Use even window exposure or strong artificial light, and position subjects near intermediate light sources to avoid glare. Declutter surfaces, define clean sightlines, and arrange furniture for balanced negative space. Set up diffuse lighting to soften shadows, lock camera settings, and document your setup. Color harmony matters: use a cohesive palette, test under your lighting, and label each setup for easy reproduction—you’ll discover even more tips as you continue.
Choose the Right Rooms for Photo-Ready Lighting
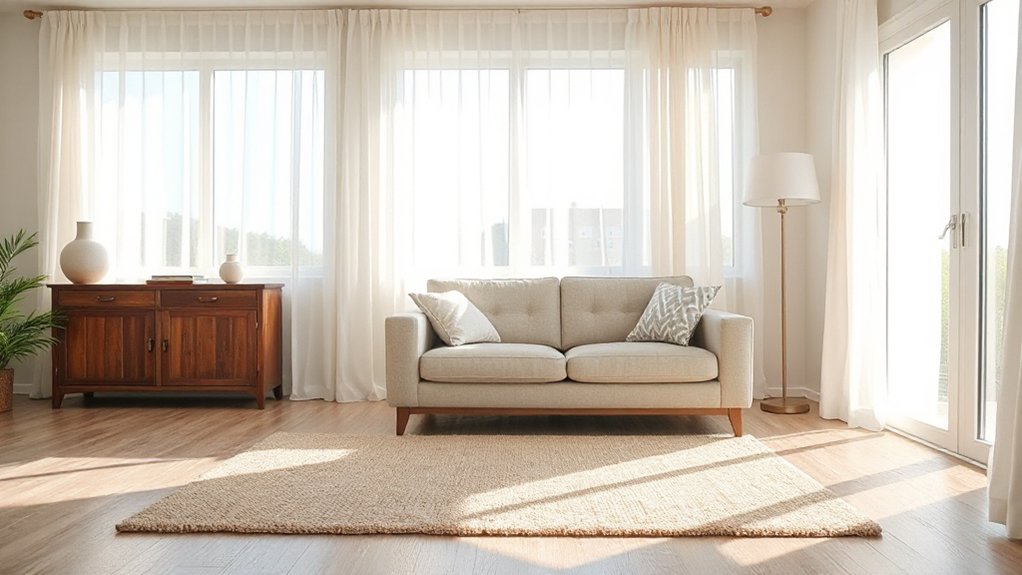
Choosing the right rooms sets the tone for effective photo lighting. You’ll select spaces with consistent, controllable light and minimal distractions. Prioritize rooms with even window exposure or strong artificial lighting to avoid harsh shadows.
Consider furniture arrangement to create clean sightlines and balanced negative space; low, uncluttered surfaces prevent reflections that degrade image quality. Position your subject near an intermediate light source, avoiding direct glare from windows or lamps.
Plan wall decorations to complement the scene without drawing attention away from the focal point. Test shots help you verify color balance and shadow detail before the shoot.
Guarantee doors and mirrors won’t catch reflections in the frame. By choosing thoughtfully, you establish a calm, cohesive backdrop that invites collaboration and belonging.
Master Natural Light: Timing, Angles, and White Balance
Natural light isn’t a fixed setting—it shifts with time and weather, so you adapt rather than chase a perfect moment. To master it, plan your shoot around steady windows: early morning and late afternoon offer the gentlest, most flattering light.
Position yourself to capture true color by facing the light at a slight 45-degree angle, avoiding direct glare. Check white balance on your camera and set a neutral or daylight profile to keep hues honest.
Monitor lighting intensity and adjust by moving subtly or using diffuse materials—curtains, sheer fabric, or a white reflector—to soften harsh spots.
Practice shadow control by mapping where shadows fall in each room and repositioning furniture if needed. This consistency builds confidence and belonging in your spaces.
Control Artificial Light for Consistent Results
Good lighting hinges on controlled artificial sources. You’ll create consistent results by assembling a reliable lighting setup before anyone enters the frame.
Position key lights to illuminate subject contours without harsh shadows, then add a fill light to soften contrasts.
Use diffusion to tame glare on reflective surfaces and keep color accuracy intact.
Set practical power levels and monitor color temperature, aiming for a neutral baseline (around 3200–5600K, depending on your environment).
Lock your camera settings once you’ve achieved even exposure across the scene, avoiding abrupt changes during shoots.
Keep manual focus and exposure, ready to adjust only when you change angles.
Document your lighting setup and camera settings so teammates can reproduce the same look in future sessions.
This clarity builds belonging through reliable, repeatable work.
Staging and Decluttering: Create Calm, Photogenic Spaces

Staging and decluttering brings calm to the frame by removing distractions and highlighting the space’s best features. You’ll create a sense of belonging by inviting viewers to recognize purpose in each area, not chaos.
- Optimize furniture arrangement to define pathways, heighten focal points, and balance scale
- Remove extraneous decor that competes with architectural lines or main furniture
- Clear visible surfaces, leaving intentional accents and a feeling of breathing room
- Implement scent elimination to avoid overpowering impressions and maintain neutrality
- Tidy closets and hidden storage to prevent distracting clutter in shots
Color Harmony and Backdrops: Palette Rules and Consistency
Color harmony guides every shot, so choose a cohesive palette and keep backdrops aligned with that tone to prevent jarring shifts or competing elements. You’ll create a sense of belonging by using consistent Color palettes across rooms and setups, avoiding abrupt color clashes.
Begin with a primary color and two supporting hues, testing under the lighting conditions you’ll photograph. For backdrop selection, pick textures and tones that complement furniture finishes and skin tones, not compete with them. Maintain uniform saturation and value to avoid distractions.
Label each setup, so others can reproduce the look easily. Limit patterns on backdrops to solid or subtle textures, reserving patterns for accents only. This disciplined approach speeds shoots and instills confidence in your clients and team.
Build a Shoot-Ready Workflow: Gear, Props, and Reflections
A well-organized shoot starts long before the camera clicks: assemble gear, props, and a plan to manage reflections so nothing slows you down. You’ll build a proven workflow that keeps you moving, minimizes repeats, and protects your gear.
Prioritize studio ergonomics: layout, lighting positions, and comfortable reach reduce fatigue and boost consistency. Regular equipment maintenance pays off in reliability and image quality.
Choose props that harmonize with your subject and backdrops, and tag them for quick retrieval. Document steps so teammates can follow and contribute.
Stay mindful of reflections with a simple control kit: flags, black wrap, and a diffusion option on standby.
- Define a repeatable setup sequence for speed and consistency
- Pre-check lighting, camera, and lens readiness
- Organize props by theme, size, and reuse
- Maintain a short, labeled gear checklist
- Establish reflection control as a routine
Frequently Asked Questions
How Do I Protect Fabrics From Color Casts Under Lights?
You protect fabrics from color casts under lights by using fabric protection sprays compatible with dyes and opting for neutral, low-UV lighting; test on a hidden seam, and maintain color preservation through mindful layering, masking, and temperature control for belonging.
What Noise Issues Appear in Dim Corners and How Fix Them?
In dim corners, you’ll notice digital grain and hiss from weak lighting; apply Soundproofing measures like door seals and acoustic panels, then use noise reduction techniques in post. You’ll belong by stabilizing tones and preserving intimate ambience.
Can I Photograph Reflections Without a Tripod and Still Stay Sharp?
Reflective surfaces reveal limits; you can, but hamper with handheld stability. You’ll keep sharpness by bracing elbows, using body as a tripod, and dialing a slower shutter, then embracing steadiness, patience, and shared purpose in your craft.
How Often Should I Calibrate Camera and Monitor During Shoots?
You should calibrate your gear daily on tight shoots, and establish a reliable calibration schedule for longer projects. This guarantees color accuracy, reduces surprises, and helps you feel organized, confident, and connected with your team throughout the process.
What Safety Steps Prevent Accidental Camera, Light, or Prop Hazards?
Safety steps safeguard space: secure stands, cables, and props, while you practice hazard prevention by labeling zones, covering lights, and unplugging gear when moving. You’ll feel secure, supported, and seen as you safeguard shoots with smart planning.
Conclusion
Below is a concise, practical conclusion that fits your constraints:
You’ll find that a calm, prepared home is your best collaborator. With well-chosen rooms, steady light, and minimal clutter, your spaces guide the lens rather than fighting it. Embrace gentle tweaks to timing, white balance, and backdrop choice, and you’ll avoid awkward surprises. A tidy workflow and smart gear habits subtly elevate results, leaving you with images that feel effortless, polished, and ready for prime time—without shouting for attention.