
Start by evaluating barriers in your current home and set a practical accessibility goal. Prioritize wide entry doors and step-free routes on every floor, using flush thresholds and gentle ramps with a 1:12 slope. Plan durable, slip-resistant floors, continuous handrails, and clear sightlines. Improve outdoor access with level paths, good lighting, and inviting seating. Budget-smart changes include upgrading lighting, non-slip surfaces, and accessible storage. Hire specialists who understand universal design, then maintain features for lasting safety and ease. You’ll learn more as you continue.
Assess Barriers in Your Current Home
Start by walking through your home with a critical eye, noting every obstacle that makes daily tasks harder. You’ll map choke points, door widths, ramps, switches, and lighting gaps, then rank them by how much they affect daily living. This isn’t about perfection; it’s about clarity, so you know where to begin.
Observe how everyday routes feel—from threshold to kitchen to bathroom—and mark spots that slow you down or cause discomfort. Consider not just interior barriers but how exterior landscaping and entry approaches shape access.
The goal is practical improvements that support comfort and belonging, not perfection. Focus on tangible fixes: widen doorways, adjust heights, improve grip, and simplify layouts.
This assessment informs feasible, inclusive upgrades that honor home aesthetics while supporting effortless, independent living.
Set a Practical Accessibility Renovation Goal
After evaluating barriers, you’re ready to set a practical accessibility renovation goal that fits your space and daily routines. Begin with a clear outcome: what changes will enable safer, independent living without overhauling your whole home.
Prioritize actions that yield measurable benefits in the next 6 to 12 months. Define success with specific criteria: doorway widths, threshold ramps, and reachable storage, plus a plan for resilient, low-maintenance components.
Budget realistically, allocating a separate line item for accessibility improvements. Consider how garden landscaping and outdoor paths integrate with indoor access, ensuring safe transitions from house to yard.
Tie each goal to energy efficiency benefits—better insulation, lighting, and smart controls reduce ongoing costs. Review quarterly, adjust timelines, and celebrate small, steady progress toward lasting belonging.
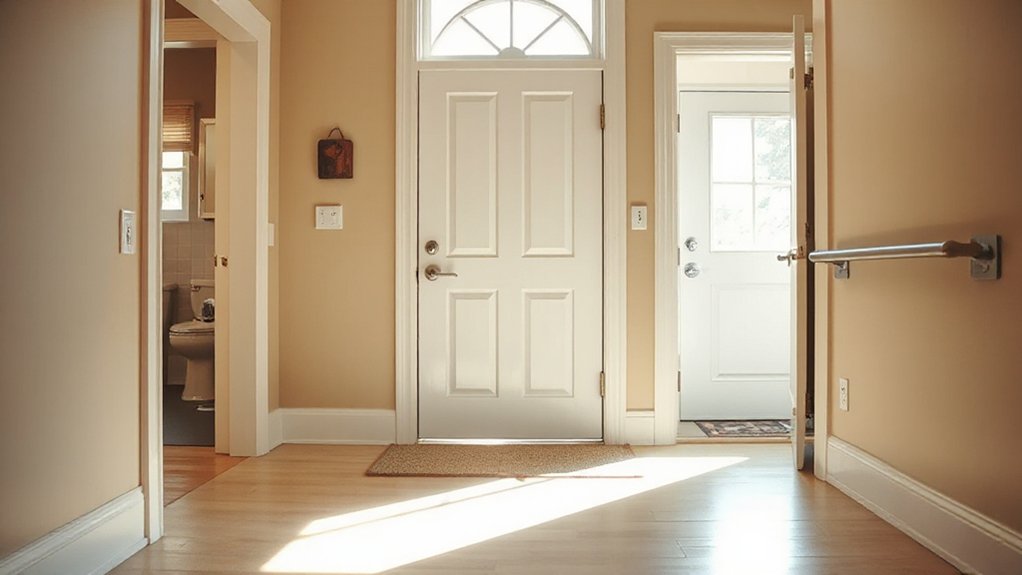
Prioritize Wide Entry Access and Doorways
You’ll start by choosing wide doorways that meet standard widths and allow easy passage for wheelchairs and walkers.
Plan clear path navigation with minimal turns and obstacle-free routes, using thresholds that are level or recessed.
Consider threshold accessibility tips to reduce tripping hazards and improve entry efficiency.
Wide Doorway Standards
Wide doorways are essential for accessibility, so you should plan openings that accommodate wheelchairs, walkers, and assistive devices without compromising safety. To meet Doorway width targets, measure clearances at the doorway frame and hinge side, then choose a consistent, obstruction-free pass-through.
Use a minimum width of 32 inches for interior doors and 36 inches for primary entryways when possible, adjusting for door swing and trim. Confirm entry clearance remains uncontested by furniture or permanent fixtures, and account for doorway thresholds with beveled, low-profile transitions.
Consider pocket or sliding doors in tight spaces to preserve flow. Label and maintain these standards for consistency, so every resident feels welcome and confident navigating the home.
Prioritize clear, actionable steps that reinforce belonging.
Clear Path Navigation
Prioritize smooth surfaces, door thresholds under half an inch, and lever handles for ease. Inside the garden gate, plan entryways that connect living spaces to outdoor areas seamlessly, supporting daily routines and social presence.
Gardening tips and landscaping ideas become part of your accessibility strategy, shaping welcoming exteriors as well as interior flow. Keep light switches reachable, mats secure, and signage clear, so everyone feels they belong and can participate fully.
Threshold Accessibility Tips
Threshold accessibility starts at the threshold itself: aim for wide entry access and doorways that accommodate wheelchairs and walkers without prompting detours. You’ll remove thresholds or replace them with a flat, beveled changeover, then widen door frames to at least 32 inches clear width. Check hinge placements and door swing so you don’t trap hands or hinder mobility aids.
Seal gaps to reduce drafts, yet maintain easy push/pull operation. Install lever handles for intuitive use, and consider pocket or sliding doors where space is tight.
Plan garden pathways that approach doors smoothly, with firm, non-slip surfaces. For safety and comfort, add stair lighting at every step and low-contrast edges to guide steps without startling you. This creates belonging through practical, accessible design.
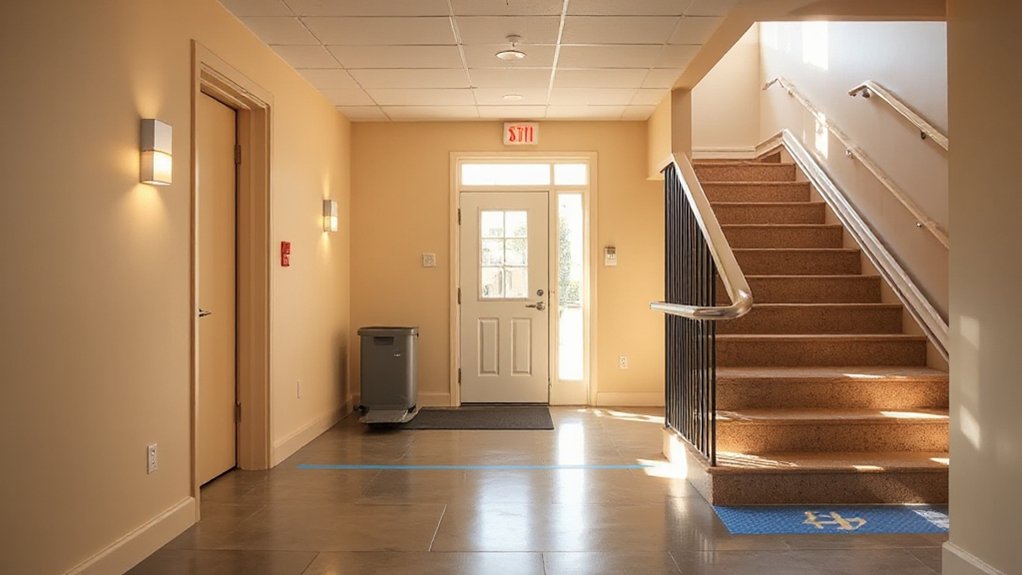
Create Step-Free Routes Through Every Floor
You’ll map clear floor changes, so you don’t trip or misstep as you move between rooms. Plan ramp and threshold design that’s smooth and removable where needed, keeping every route genuinely step-free.
Then prioritize vertical circulation by coordinating stairs, elevators, and platforms to guarantee seamless, accessible movement on every floor.
Clear Floor Transitions
If you’re remodeling for accessibility, prioritize surface continuity to create step-free routes on every floor. Clear floor progression means you pick flooring that mates flush with adjoining surfaces, minimizes thresholds, and reduces trip hazards. Choose consistent thicknesses, use seamless connections at doorways, and avoid changes in direction that create gradient pulls for wheelchairs.
Opt for wide, smooth planks or sheet goods that tolerate rolling assessments and are easy to clean. Guarantee subfloor flatness within strict tolerances and use butt joints or gentle ramps where needed, not abrupt steps.
Consider Decorative flooring and Artistic finishes that hide seams while staying durable and slip-resistant. Confirm matching grading and underlayment across rooms to maintain stability, safety, and a sense of belonging throughout your home.
Ramp and Threshold Design
Need to minimize bumps and gaps on every floor? Start with universal, smooth progressions between rooms. Choose ramps with a gentle slope (prefer 1:12 or flatter) and consistent running lengths to prevent sudden changes in grade.
Attach handrails on both sides, sturdy and continuous, to guide confidence and balance. Guarantee landings are wide enough for turning, especially near doors.
Select threshold materials that tolerate wear, resist moisture, and conceal joints; install low-profile thresholds or ramped entries where gaps exist. Use non-slip surfaces and contrasting edges to aid navigation.
Verify code-compliant dimensions and load ratings, plus easy door-to-ramp access across thresholds. Prioritize repeatable, step-free routes that connect living, kitchen, and bathroom zones, fostering belonging through predictable, safe movement throughout the home.
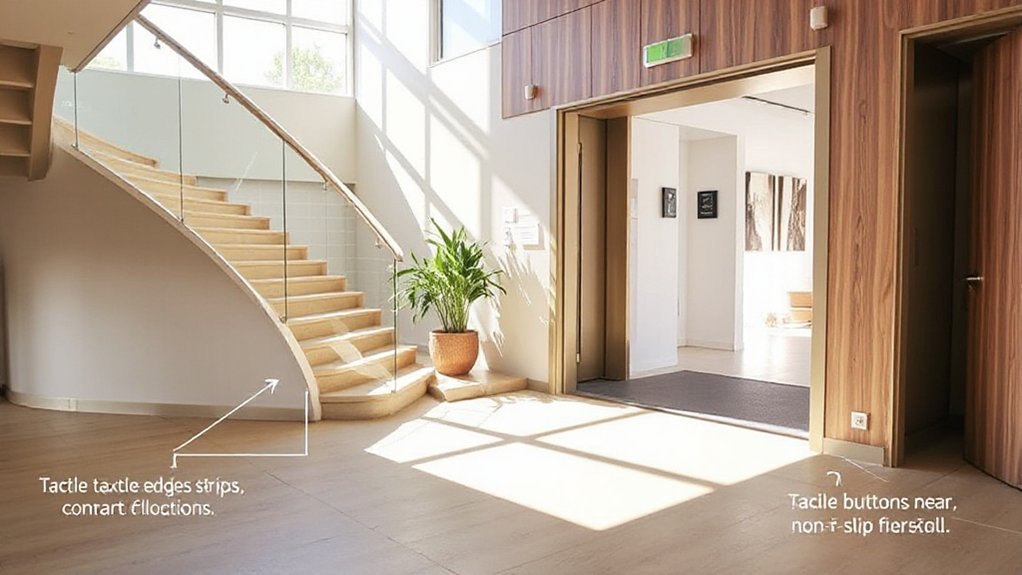
Vertical Circulation Planning
How can you guarantee stair-free movement across every level? Start with a clear vertical plan that prioritizes universal access. Map every floor’s core zones and identify where circulation bottlenecks occur.
Choose elevator systems as the backbone for long-range vertical travel, ensuring shaft placement minimizes travel distance and maximizes reach to key rooms. Pair elevators with stair lifts on primary stair cores for flexible, quick alternatives during maintenance or peak traffic.
Design door widths, landings, and turning radii to accommodate wheelchairs and mobility aids without turning pedestrians into bottlenecks. Install continuous handrails, contrasting edge markings, and consistent lighting to reduce missteps.
Regular maintenance schedules and simple remote diagnostics keep systems reliable, so every floor stays truly accessible for every occupant.
Design Doorways That Glide or Swing Open Wide
To guarantee easy access, design doorways that glide or swing open wide enough for a wheelchair, walker, or cart to pass smoothly. Prioritize clear widths, minimum 32 inches (prefer 34–36) for a comfortable turn and seal around doorjambs to reduce turbulence.
Choose hardware you can reach from a seated position, and consider automatic or low-resistance hinges for smoother operation.
Plan threshold management to minimize tripping and glare; use flush thresholds or beveled transitions, and ensure even floor surfaces on both sides.
- Doorway design goals: wide, level, and smooth access from room to room
- Threshold management: flush or low-profile thresholds with ramps where needed
- Hardware considerations: reachable, spring-assisted or automatic options for effortless use
Plan a Clear, Non-Slip Circulation Path
Position common rooms to share one central corridor, then place connections at level or ramped entries, with clear sightlines and ample turning space. Use contrasting edge color on floors to guide footfalls without shouting for attention.
Keep clutter off main paths and install sturdy handrails where needed. Decorative accents and aesthetic enhancements should be subtle, purposeful, and accessible, reinforcing wayfinding without creating hazards.
Test paths with real users, adjust bottlenecks, and document clear, easy-to-follow routes for everyone in the household.
Improve Lighting for Safer Navigation
Boost ambient illumination to reduce shadowed areas and improve safety as you move through spaces.
Clearly define wayfinding cues—consistent signage, contrasting colors, and tactile indicators—to guide you at every turn.
Maximize night lighting with motion-activated, energy-efficient options that illuminate key paths without glare or disruption.
Enhance Ambient Illumination
Good lighting is essential for safe navigation through your renovated space. You’ll optimize ambient illumination by layering light sources, balancing warmth and clarity, and aligning them with daily routines.
Use dimmable fixtures to adapt to tasks and moods, ensuring even coverage in halls, entries, and predictable pathways. Favor ambient lighting that blends with natural illumination from windows, reducing glare and shadows that trip up footing.
Select high-contrast wall colors and reflective surfaces to boost perception of depth and space. Maintain consistent color temperature across rooms to foster familiarity and belonging as you move through the home.
- Soft, diffuse ceiling lights that eliminate harsh shadows
- Wall sconces positioned to guide entryways and corners
- Timed or motion-activated accents near stairways and passages
Define Clear Wayfinding
Clear wayfinding relies on intuitive lighting cues that guide you safely through every space. You’ll define a straightforward path using consistent luminance and contrast, so you instantly recognize entry points, corridors, and exits.
Install signage signage at key junctions—color-coded, high-contrast, and placed at eye level—to reinforce your route without glare. Pair these with visual cues, like floor markings or wall-mounted indicators, that harmonize with the lighting scheme and don’t overwhelm the eye.
Use dimmable, warm-toned fixtures along travel corridors to reduce startle responses and fatigue. Guarantee stairways, ramps, and thresholds have illuminated edges for continuous visibility.
Test with real users, revise positions, and document standards so everyone feels confident orienteering the space. This approach builds belonging through predictable, safe navigation.
Maximize Night Lighting
- Entryway glow that marks thresholds without overwhelming the senses
- Stair and ramp lighting with clearly lit treads
- Corridor illumination that eliminates dark pockets and guides movement
Choose Ergonomic Hardware and Fixtures
When you choose ergonomic hardware and fixtures, you should prioritize comfort, reach, and ease of use to support accessibility.
Start with lever handles on doors and faucets, which reduce grip strain and improve control for all users.
Opt for lower, reachable heights for switches, outlets, and thermostats, and choose rounded, smooth-edged shapes to minimize pinching.
Choose ergonomic fixtures that offer good tactile feedback and consistent operation, avoiding hard-to-turn knobs.
Prioritize hardware selection that uses color contrast and clear labeling for visibility.
Install pull-down shelves and adjustable grab bars where appropriate, ensuring safety without sacrificing style.
Select durable materials, easy-clean finishes, and universal designs that invite participation.
This approach strengthens belonging through thoughtful, practical choices.
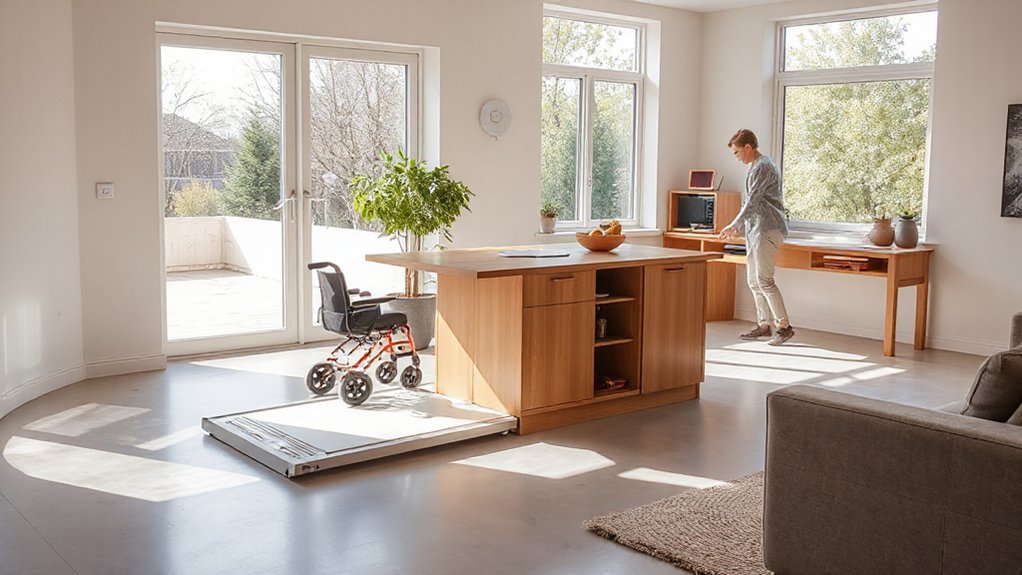
Implement Kitchen Accessibility Upgrades
Implementing kitchen accessibility upgrades starts with a practical plan that targets the tasks you perform most often. You’ll design a kitchen that reduces reaching, bending, and twisting, so daily routines feel natural and inclusive.
Start with clear zones for prep, cooking, and cleanup, then adjust height, reach, and lighting to match your needs. Prioritize mobile accessibility and intuitive controls, keeping essential items within easy reach.
Focus on Kitchen ergonomics and Appliance placement to minimize strain and maximize safety. Use durable, non-slip surfaces, and ensure contrast for visibility.
- Define prep, cook, and tidy zones with reachable storage
- Position appliances for easy access and safe operation
- Install adjustable work surfaces and task lighting
This approach builds confidence, comfort, and belonging in your daily kitchen.
Adapt the Bathroom for Safety and Independence
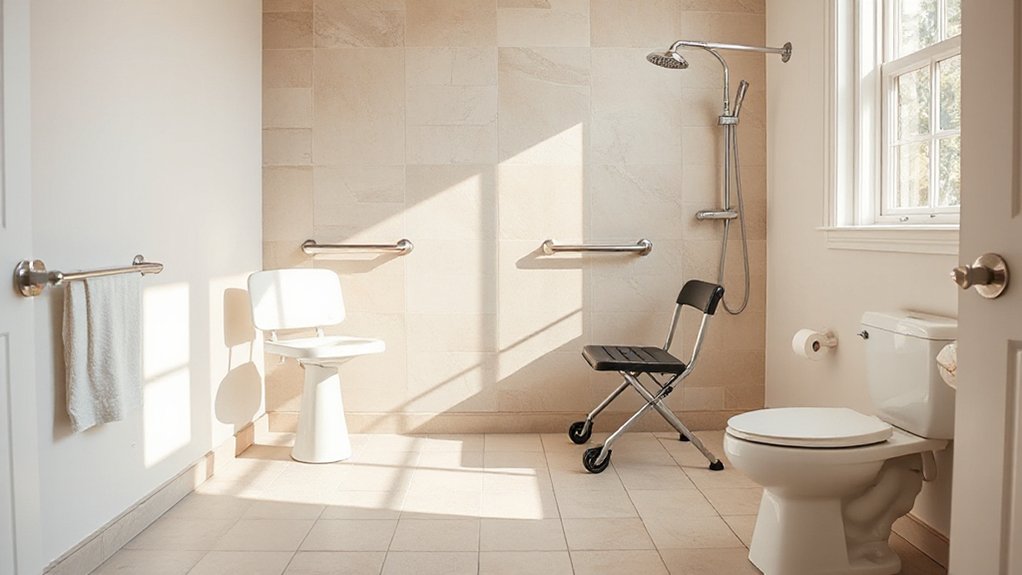
Think through Accessible Shower Design to reduce slips and build confidence, then outline grab bar placements that support transfers and stability.
Consider placing grab bars at key heights and locations, and choose a shower layout that accommodates a chair or bench for safety and independence.
Start with practical checks: non-slip floors, reachable controls, and a simple, ADA-friendly layout that you can customize as needs evolve.
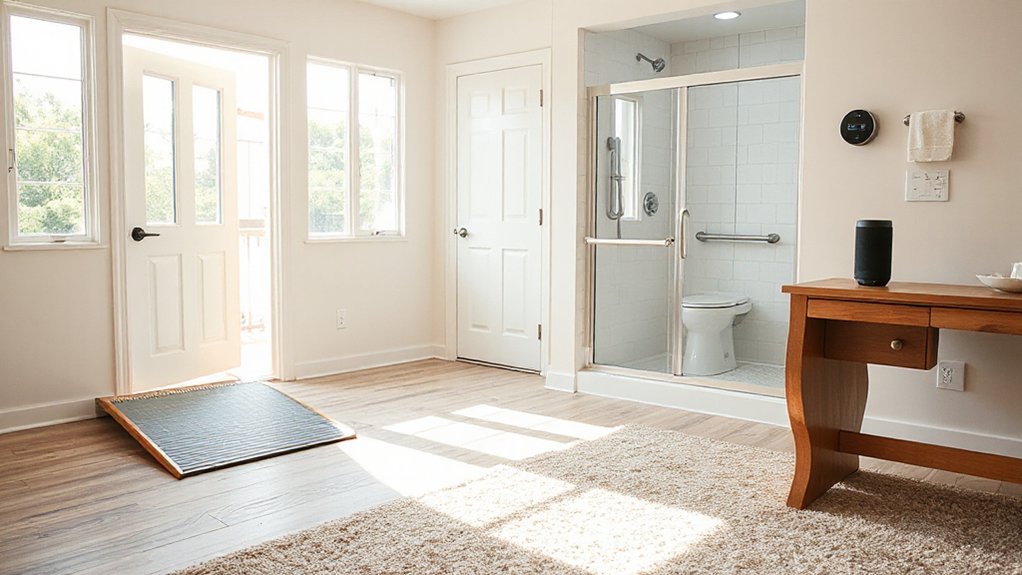
Accessible Shower Design
Ever wonder how to transform a shower into a safer, more independent space? You’ll design a barrier-free shower with a low threshold, non-slip flooring, and a handheld shower head for flexibility. Choose wide entry access and seating options that fit your space, so you move confidently without rushing.
Install lever taps and a thermostatic valve to prevent scalds while keeping water control simple. Emphasize Smart home features for lighting, temp alerts, and adjustable setups that adapt as needs change.
Use Eco friendly materials that resist mildew and are easy to clean, like recycled glass tile and low-VOC grout. Prioritize accessibility without sacrificing comfort, so every moment in your day feels calmer and more connected.
- Barrier-free entry with seating and a handheld shower
- Low-maintenance, eco-friendly finishes and non-slip surfaces
- Simple controls, thermostatic safety, and smart lighting integration
Grab Bar Placement Guide
Where should grab bars go to maximize safety and independence in a bathroom? You place them where you transfer in and out of the tub or shower, near the toilet, and along the shower wall for stability during standing.
Measure knee height and hip height to determine ideal positions, then install securely into studs or with appropriate anchors.
In showers, position vertical bars beside the entry and a horizontal bar across the back wall for support when stepping in and out.
On the toilet, mount a grab bar at a height that lets you stand without twisting.
Choose corrosion-resistant materials, non-slip grips, and consider symmetry for comfort.
This layout boosts bathroom safety and reinforces your sense of belonging and confidence. grab bar placement supports everyday independence.
Eliminate Thresholds and Smooth Floor Transitions
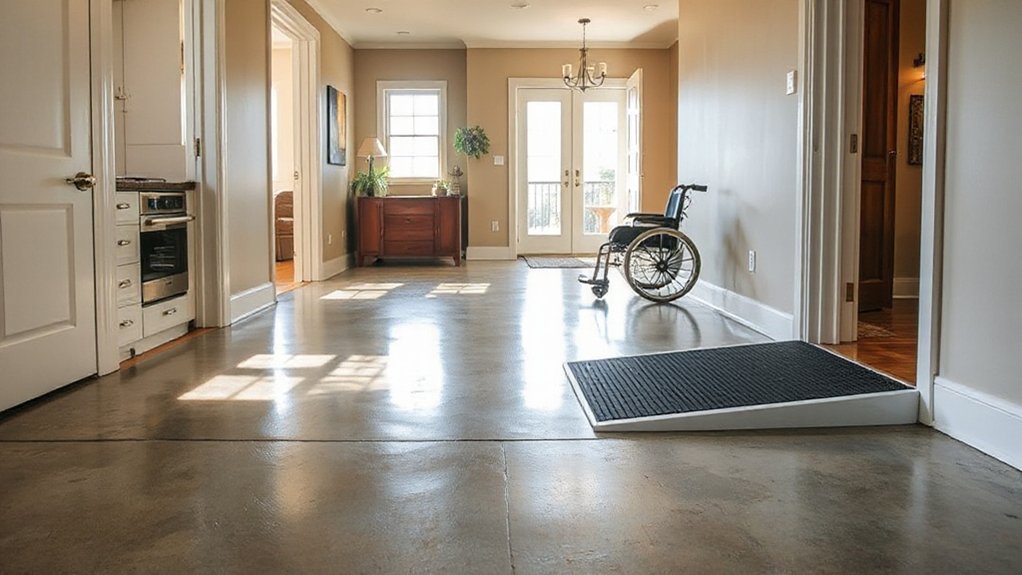
Eliminating thresholds and smoothing floor shifts eliminates trip hazards and simplifies navigation, especially for wheelchairs, walkers, and strollers. You create safer flow by choosing continuous surfaces, aligning doorways, and using flush progressions. This effort fosters belonging, showing you value clarity, dignity, and independence in every room.
Threshold elimination improves access to kitchens, baths, and living areas, while a smooth floor progression reduces resistance and effort during everyday movement. Plan gradual changes that respect structure, acoustics, and moisture control, and document measurements for contractors. Your attention to detail delivers reliable, repeatable results that people notice and appreciate.
- Seamless entry from room to room with level thresholds
- Flush thresholds at doorways and entry points for uninterrupted movement
- Consistent surface materials to minimize changes in traction and height
Threshold elimination, Floor progression
Integrate Smart, Easy-To-Control Tech
Integrating smart, easy-to-control technology lets you manage accessibility upgrades without complicating daily use. You’ll select simple, reliable smart technology that enhances safety, like motion-activated lights, voice-enabled helpers, and programmable scenes for different routines.
Focus on control systems that feel natural: one app, clear icons, and fast responses. Avoid overloading switches or devices; aim for centralized, intuitive hubs that invite everyone to participate.
Install hardware with labeled buttons and accessible interfaces, ensuring devices work offline if Wi-Fi drops. Test routines with household members to confirm they feel confident and included.
Create a short, printed guide for guests and caregivers. Keep power and data security in mind, updating firmware when prompted. Your home stays welcoming, efficient, and genuinely easier to move through.
Choose Scalable Storage at Reachable Heights
Choose scalable storage structures that you can adjust as needs change. You’ll set up accessible, modular solutions that grow with you, keeping daily tasks smooth and frustration-free.
Prioritize reachable heights so items stay within easy reach, reducing bending or stretching. Build a system that labels clearly, so everyone can find and return belongings quickly.
Choose materials that are sturdy, easy to clean, and lightweight to reconfigure over time. Plan for future needs by selecting adjustable shelving, depth-compatible bins, and wall-mounted panels that add or remove storage without major work.
Your goal is a calm, organized home where belongings support independence and inclusion.
- Adjustable shelves at eye level with clear dividers
- Wall-mounted, freestanding, and modular units for flexible layouts
- Labeling and color-coding for quick recognition
Plan for Future Mobility Needs and Flexibility
Building on your scalable storage approach, plan now for how mobility needs might change and how your space can adapt. You’ll map possible scenarios—daily commuting, visitor access, caregiving, and emergency routes—and design around flexibility. Use modular layouts: removable partitions, adjustable counters, and clear floor paths.
Prioritize non-slip surfaces, accessible entry thresholds, and one‑handed operation zones near key controls. Institute mobility planning that anticipates device shifts, from walkers to wheelchairs to seated scooters, with switchable docking, charging corners, and easy room passages.
Document future proofing strategies in a simple plan, so updates stay organized and affordable. Build in predictable staging for renovations, so your home remains welcoming, inclusive, and resilient as needs evolve. Your space, evolving with you, supports belonging.
Use Lighting and Color Contrast for Vision Aids
If you want vision aids to work reliably, start with lighting and color contrast that guide the eye where it matters most. You’ll implement simple, effective measures that reduce guesswork and increase safety. Use direct lighting on key pathways and high-contrast edges to define stairs, doorways, and furniture. Prefer warm, neutral wall tones with sharp foreground colors for critical controls.
- Lighting techniques: place task lights at eye level, avoid glare, and keep even ambient brightness.
- Color contrast: pair dark floors with light risers and use bright levers or knobs on doors.
- Signage clarity: matte backgrounds with bold, high-contrast text for easy reading.
This approach creates a cohesive, welcoming space where everyone feels confident guiding the eye through daily tasks.
Optimize Sound and Acoustics for Easier Communication
Start with solid sound isolation to minimize external noise and echoes that hamper conversation. Choose acoustic materials and room layouts that absorb or diffuse sound, focusing on clear speech paths and reduced reverberation.
Consider practical tweaks like door seals, bass traps, and furniture placement to support easier communication.
Sound Isolation Principles
Sound isolation is essential for clear communication in an accessible renovation. You’ll focus on minimizing sound transfer between rooms, so conversations stay private and cues are easy to follow.
Implement practical steps like sealing gaps, choosing solid-core doors, and decoupling walls where feasible. Use measured approaches to reduce noise without overhauling spaces you’ll reuse daily.
Track progress with simple checks: test doors, run a quick sound pass, adjust seals, and confirm improved clarity.
- Seal gaps with acoustical caulk and weatherstripping to cut airborne noise
- Install solid-core doors and staggered studs or resilient channels for better wall decoupling
- Use floor and ceiling isolates, thresholds, and resilient mounts to lower footstep and impact noise
Focus on soundproofing techniques and noise reduction methods that you can apply now.
Acoustic Material Selection
Choosing the right acoustic materials makes the renovation instantly more usable for communication. Start with surfaces that absorb sound where conversations occur most: living rooms, kitchens, and communal areas.
Select wall panels, ceiling tiles, and soft flooring with appropriate NRC ratings to dampen reverberation without muffling voices. Prioritize breathable fabrics for seating and furnishings that reduce bounce and improve clarity during talks.
Consider furniture arrangement to create intimate speaking zones and reduce line-of-sight reflections between TV, speakers, and conversation nooks.
Use door seals and threshold gaskets to limit hallway noise intrusion.
Balance aesthetics with function: warm tones, textures, and colors that invite collaboration.
Plan a phased implementation to manage costs, and test with real living routines to verify noise reduction meets daily communication needs.
Room Layout Optimization
To optimize room layout for easier communication, arrange seating and focal points to minimize echo paths and maximise direct line-of-sight between talkers and listening spots. You’ll clarify conversations by grouping chairs in a gentle arc, avoid parallel walls, and place a primary speaking area near sources of natural light.
Keep pathways open and use rugs, cushions, and soft furnishings to absorb sound without deadening warmth. Align interior decor and color schemes to cue focus: lighter tones reflect, while accent colors highlight key zones.
Consider a removable screen to tailor acoustics for gatherings. Test speaking from different seats and adjust chair angles for comfort and belonging.
- Seat layout that promotes eye contact and clear hearing
- Strategic textiles and color accents to reduce echo
- Flexible furniture to adapt for activities and flow
Improve Outdoor Access and Garden Usability

Improving outdoor access starts with clear, level paths and sturdy, slip-resistant surfaces that you can trust in all weather. You’ll plan width, turning space, and smooth connections between indoors and outdoors, so you feel confident moving with a mobility aid or stroller. Use durable materials, like textured concrete or permeable pavers, and edge by the garden to prevent trips.
Prioritize lighting at entrances, steps, and parking, paired with tactile indicators for accessibility. For garden usability, implement raised or accessible planting beds and seating zones that invite rest and social moments.
Consider outdoor landscaping workflows that reduce maintenance, and install simple irrigation controls to protect plants without extra effort. Coordinate maintenance routines and adapt as needs evolve, fostering belonging and independence.
Budget-Smart Accessibility Improvements
If you’re aiming for effective accessibility on a budget, start with high-impact, low-cost changes that you can implement quickly. You’ll gain momentum by prioritizing practical fixes that feel welcoming and inclusive.
Focus on entry paths, lighting, and storage to reduce stumbling hazards and create confidence for every visitor. Incorporate simple gardening tips that keep outdoor spaces accessible and enjoyable without extra upkeep, and add basic security measures that don’t complicate daily routines.
The goal is to make every step predictable and safe, so you can invite neighbors and loved ones with ease. Use existing door thresholds, non-slip mats, and wider turn spaces whenever possible, keeping both function and comfort in mind.
- Seal uneven thresholds and improve lighting at entrances
- Add non-slip mats and clearly labeled switches
- Plan storage that’s reachable from a seated position
Gardening tips, Security measures
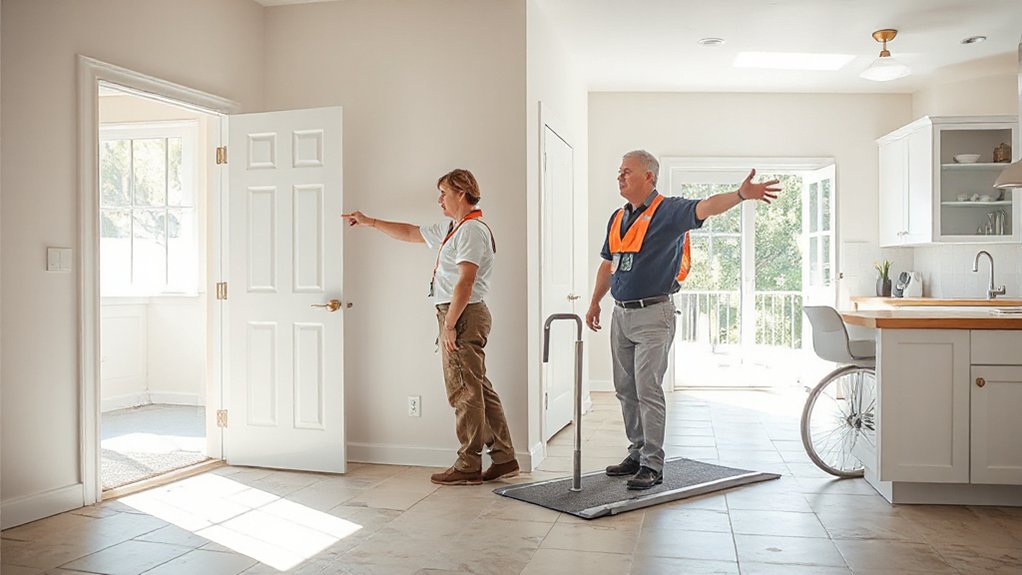
Hire the Right Professionals and Contractors
Finding the right professionals and contractors is essential to the project’s success, so start by defining your accessibility goals and budget before you shop.
You’ll want firms with proven experience in universal design, ADA compliance, and safety-minded layouts. Ask for portfolios and references, and verify licenses and insurance before signing anything.
Communicate your priorities clearly—doorway widths, ramp access, non-slip surfaces, and kitchen/workspace reach.
Request detailed quotes with timelines, milestones, and contingency plans, then compare not just price but responsiveness and problem-solving approach.
Bring two concrete visuals, such as Garden lighting plans or a Paint color concept, to initialize conversations.
Schedule site visits together, and insist on on-site measurements.
Choose a team you trust to collaborate openly and honor commitments.
Maintain Accessibility Features for Lasting Function
To keep accessibility features working effectively, establish a simple, ongoing maintenance plan you can actually follow. You’ll inspect daily-use components, note wear, and fix issues before they become barriers, so everyone feels included in the home’s rhythm. Schedule seasonal checks for doors, thresholds, and ramps, and keep an easy-to-access repair kit. Focus on garden pathways and outdoor lighting, ensuring clear passage and safe visibility at all times.
Train household members to report concerns promptly, and keep contact information for trusted contractors handy. Your plan should balance practicality with dignity, supporting independence and belonging for everyone who lives or visits.
- Regularly sweep and level garden pathways, removing obstructions and testing surface grip
- Test outdoor lighting, replace bulbs promptly, and install motion or dusk-to-dawn sensors
- Log fixes and adjustments, updating the plan as needs evolve
Frequently Asked Questions
How Much Is a Typical Home Accessibility Remodel Cost?
Typically, a home accessibility remodel costs $25,000 to $85,000, depending on scope. You’ll apply Universal design principles, integrate Smart home features, and prioritize durability, safety, and comfort so you feel you belong in every space.
Can Accessibility Upgrades Affect Home Resale Value?
Yes, accessibility upgrades can boost resale value, especially when you highlight practical interior design and technology integration, making spaces safer and more usable for everyone, which buyers perceive as inclusive, modern, and value-adding for daily living.
Which Renovations Are Required for Renters Vs Homeowners?
Renters typically rely on landlord-approved fixes, while homeowners pursue permanent changes. Focus on Rental modifications at the property and Tenant accommodations, prioritizing grab bars, threshold-free paths, and reachable switches. You’ll document requirements, timelines, and accessibility-compliant safety steps.
How Long Does a Full Accessibility Renovation Take?
Can you imagine a smoother path? A full accessibility renovation typically takes 6–12 weeks, depending on scope. You plan with universal design, coordinate trades, and install adaptive technology to guarantee lasting, inclusive functionality for everyone living there.
Do Lenders Offer Funding or Grants for Accessibility?
Yes, lenders offer funding or grants for accessibility, including assistive technology projects, but you’ll need to align with legal requirements and show practical, actionable plans that demonstrate belonging for tenants and visitors.
Conclusion
You’ve got a clear path: assess barriers, plan practical goals, and widen access where it matters most. Prioritize step-free routes, easy doors, and smooth passages between indoors and out. Budget smartly, hire qualified pros, and maintain what you install. With steady action, your home becomes a dependable ally, not a barrier. Think of accessibility as a sturdy bridge you build one measured plank at a time—each improvement brings you closer to every room, every moment, without hesitation.