

To prepare for a RICS survey, you should methodically organize access and documents, identify defects, and guarantee essential information. Start by clearing pathways, labeling rooms, and removing obstructive furniture so inspectors can move freely and note conditions. Document boundary lines, drainage, damp, and structural concerns, and ensure roof, boiler, and electrical details are accessible. Tidy surfaces, improve lighting, and de-clutter for clear assessment. Have deeds, permits, warranties, and manuals ready. If you keep going, you’ll learn more actionable steps and checkpoints.
What a RICS Survey Looks For: Key Faults and Deficiencies

A RICS survey targets the condition, safety, and value implications of a property, focusing on defects that could affect structure, drainage, moisture, and services. You’ll see how it prioritizes masonry integrity, timber safety, and damp control, with attention to patterns that signal concealed issues.
Structural repairs may be flagged when load paths or connections show weakness, requiring professional assessment or remediation.
Interior lighting is evaluated for adequacy and potential hazards, since illumination reflects usability and safety in daily living.
The report also notes drainage faults, ventilation sufficiency, and moisture migration that could undermine finishes or promote decay.
You’ll understand how service routes—gas, electrical, plumbing—meet current standards, and where upgrades are advisable.
Informed context helps you decide on repairs, budgeting, and timing with confidence.
How to Organize Rooms for Quick Access
To guarantee quick access, map high-traffic routes through each living space and keep entrances unobstructed.
Prioritize Clear Pathways First, removing furniture that constrains movement and labeling key zones for easy navigation.
This streamlined layout supports efficient inspections by guiding reviewers through the most critical areas without detours.
Streamline Room Access
Streamlining room access begins with a clear, functional layout that prioritizes frequently used paths. You optimize entry points, door swing clearances, and transitional spaces to reduce hesitation. Focus on place-and-use logic: place furniture to direct flow, avoid obstructions, and preserve sightlines for quick orientation.
You’ll balance furniture arrangement with scent management to maintain a neutral, welcoming environment during assessment. Keep core zones accessible from central hubs, minimizing detours and redundancies. Enforce consistent surface heights and aisle widths to support examiner movement and data collection.
Maintain calm lighting and minimal clutter to reinforce precise observations. Align storage so items remain nonintrusive yet reachable.
- Prioritize high-traffic routes
- Manage furniture to guide flow
- Guarantee clear door swing zones
- Balance scents and cleanliness
- Keep surfaces uncluttered and accessible
Clear Pathways First
Clear pathways are non-negotiable for a rapid, accurate assessment. You’ll optimize spaces by prioritizing direct routes from entry to key areas, reducing travel time and measurement variance.
To achieve pathway clarity, remove clutter that obscures doorways, thresholds, and sightlines. Move bulky furniture only if it won’t damage fabrics or finishes, leaving rooms immediately traversable.
Guarantee walkways are free of cords, rugs, and loose hardware that could trip or skew observations. Tidy storage zones so inspectors can access electrical panels, plumbing returns, and structural corners without obstruction.
Conduct a quick sweep to identify obstacle removal opportunities, then address them before the surveyor arrives. Clear, deliberate organization demonstrates control, invites confidence, and supports precise data collection under time constraints.
Improve Lighting for Accurate Assessments
Maximize natural light to reduce shadowing and improve the accuracy of assessments, ensuring key areas are clearly visible at typical survey times.
Use task lighting to supplement ambient light where precise observations are needed, focusing on work surfaces, corners, and fixtures.
This combination minimizes glare and enhances detail, supporting consistent, objective findings.
Maximize Natural Light
To guarantee accurate assessments, prioritize ample natural light by optimizing window exposure and minimizing obstructions that cast shadows or dull brightness. You’ll maximize visibility by evaluating room layouts, glazing quality, and potential glare, ensuring consistent daylight throughout the survey window.
- Assess window orientation and sizing for optimal daytime illumination
- Minimize obstructions from furniture or curtains that create shadows
- Choose window treatments that preserve brightness and reduce glare
- Consider skylight installation where vertical windows underperform
- Schedule daylight-sensitive measurements to align with peak natural light
This approach fosters precise observations, reinforces professional confidence, and reinforces a sense of shared standards.
Use Task Lighting Effects
Task lighting should be chosen to illuminate details without altering color perception or creating harsh shadows. You’ll refine inspection accuracy by balancing ambient lighting with targeted task illumination, ensuring every surface reads true to its condition.
Avoid relying on a single light source; instead, layer fixtures to reduce glare while highlighting textures, finishes, and elevations. Position lights to flank observers’ lines of sight, preventing shadow artifacts that obscure critical features.
Use adjustable, cool-to-neutral color temperatures to maintain neutrality across rooms and materials. Calibrate intensity at eye level, not overhead, so you can assess finish variations reliably.
Document lighting setups, noting lumens and color rendering indices, to support consistent evaluations. This approach fosters confidence, precision, and belonging within the survey process, aligning professional standards with practical, predictable results.
Ambient lighting enhances context; task illumination delivers exacting assessment.
Decluttering and Key Documents to Prepare
Decluttering before a RICS survey sharpens the appraisal by guaranteeing access to structural elements and utilities, while organizing key documents accelerates inspectors’ work. You’ll create a focused environment that supports precise evaluations and reinforces confidence in the process.
By integrating storage solutions and clutter reduction, you communicate care, reduce distractions, and streamline the visit. Prioritize essentials, remove nonessential items, and label what remains for rapid reference. Prepared documents reinforce transparency and foster a cooperative dynamic with the surveyor.
- Storage solutions: use closed boxes and labeled folders to categorize plans, warranties, and property details
- Clutter reduction: clear surfaces and walkways to reveal access points and utilities
- Documentation: assemble recent tax bills, permits, and equipment manuals
- Organization: create a central binder for quick retrieval
- Accessibility: guarantee entry paths and utility meters are unobstructed
RICS Survey: Key Structural and Mechanical Checks to Do Beforehand
With the groundwork from decluttering and document prep in place, you should now focus on the key structural and mechanical checks that a RICS survey will scrutinize.
You’ll assess structural integrity by examining visible beams, walls, and foundations for cracks, tilts, and movement indicators, noting patterns that signal dampness or settlement.
Inspect timber elements for woodworm, rot, or insect damage, and verify roof framing alignment and parapet stability.
Move to mechanical systems, confirming boiler age, fuel type, and safe venting; check hot-water delivery, under-sink pipes, and radiator performance.
Guarantee electrical devices and consumer units appear intact, with clear access to panels.
Document limitations or repairs, and prepare to discuss maintenance histories with confidence, reflecting a professional, belonging-forward approach that reinforces trust and clarity.
Access Arrangements and On-site Safety During the Survey
Access arrangements must be established before the survey begins to guarantee unobstructed access and a safe working environment. You should anticipate movement, controls, and supervisor visibility to minimize disruption.
On-site safety relies on clear roles, documented access restrictions, and adherence to safety protocols. You’ll benefit from disciplined procedures that reduce risk and assure accurate measurements.
Maintain a vigilant mindset, promptly reporting hazards and securing pets or valuables.
- Define designated access routes and entry points
- Confirm notification of all occupants about timing
- Establish PPE requirements and hazard awareness
- Enforce access restrictions around fragile or sensitive areas
- Schedule continuous monitoring and emergency procedures
Low-Effort Improvements That Boost Perceived Condition
Low-effort improvements can considerably influence how a property’s condition is perceived during a survey. You can achieve measurable impact with targeted, inexpensive steps that signal overall maintenance without restructuring.
Begin with tidy surfaces: remove grime, polish hardware, and touch up scuffed paint to create immediate visual cohesion.
Prioritize lighting: bright, even illumination reduces shadows that mask wear and enhances perceived cleanliness.
Address minor defects decisively—tighten hinges, seal gaps, and replace frayed seals—so the calendar of maintenance is evident, not anticipated.
Incorporate decorative enhancements and aesthetic upgrades that communicate care, such as cohesive color schemes, aligned shelving, and purpose-driven decor.
These choices reinforce a narrative of ongoing upkeep, reassure the surveyor, and yield a stronger perceived condition without extensive disruption or cost.
How to Prepare Listed or Boundary Issues You Own
If you own listed or boundary issues, addressing them upfront clarifies what’s within your control and what may require consent or cooperation from neighbors or authorities. You should identify owned items, confirm legal boundaries, and document existing conditions to reduce ambiguity during the survey.
Approach boundaries with precision, noting any encroachments or shared access points that could affect valuations or schedules. Prepare to discuss ownership limits, responsibilities for maintenance, and any consent requirements for alterations.
This proactive stance demonstrates reliability, fosters trust, and supports efficient validation of boundary concerns by the surveyor.
- Clearly map and label boundary lines
- Document listed issues and current condition
- Verify ownership and access rights
- Note any consent or permits required
- Prepare a concise timeline of actions taken
Tend Plants, Moisture, and Hazards Before the Survey

To prepare for the survey, you must address plants, moisture, and hazards that could skew findings or trigger additional recommendations. You’ll assess plant maintenance routines, pruning overgrowth, and unobstructed access to walls and utility meters.
Remove or trim aggressive vegetation that encroaches on foundations or drains, reducing hidden damp seams and critter access.
Implement moisture control measures—check for condensation, roof leaks, or damp patches, and remedy promptly to prevent misleading readings.
Clear trip hazards, unsecured cords, and loose floor coverings to ensure safe inspection conditions.
Document any recent plant removals or moisture interventions, so the surveyor understands prior actions and limitations.
Your disciplined upkeep reinforces credibility, supports precise conclusions, and fosters confidence in the overall assessment.
Exterior Condition and Its Impact on Interior Findings
Exterior condition directly shapes interior readings, because exterior defects and materials influence moisture ingress, thermal performance, and structural behavior that the surveyor must interpret from inside. You assess how wear, sealant failures, and material aging create hidden patterns—evidence the interior should reveal, not disguise.
Your focus tracks exterior maintenance and landscaping impact on ongoing performance, guiding you to interpret damp, cold spots, or bulges as systemic signals rather than isolated faults.
- Exterior maintenance informs moisture risk and heat loss
- Landscaping impact alters drainage and soil moisture near foundations
- Seals and cladding age indicate future boundary performance
- Weather exposure shapes material degradation rates
- Evidence from outside clarifies interior readings and priorities
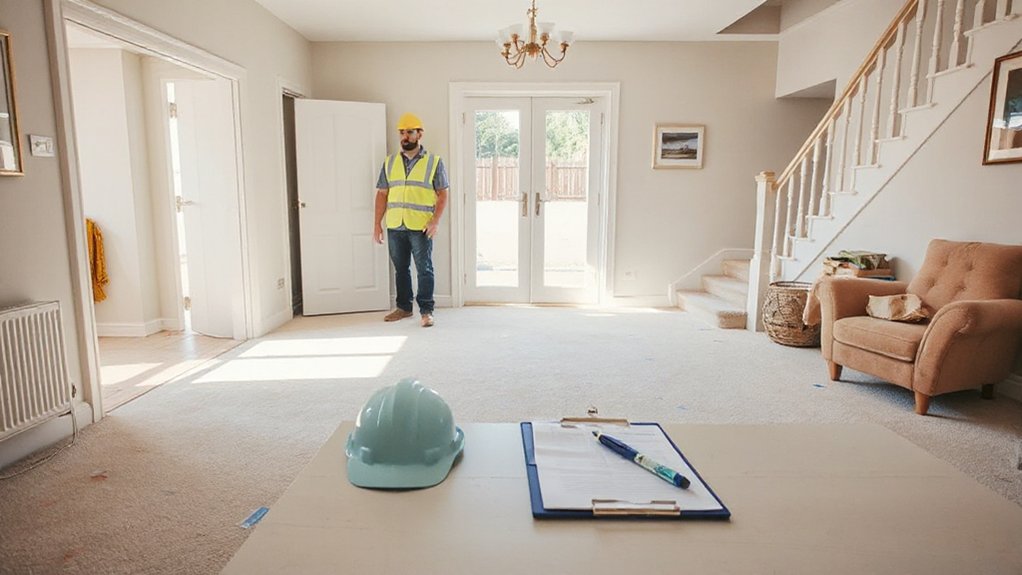
Survey Day Checklist
On survey day, you should start with Pre-Survey Room Prep to guarantee spaces are accessible and free of obstructions.
Verify Access and Arrangements so the assessor can reach key areas without delays, and confirm any required permissions or notices in advance.
Have Documentation On Hand ready, including floor plans, property details, and prior reports, to support a precise, efficient assessment.
Pre-Survey Room Prep
- Interior lighting: verify even illumination, minimize glare, and show lamps or fixtures clearly.
- Declutter: remove excess personal items to reveal true surfaces and proportions.
- Clear pathways: keep walkways unobstructed for safe, efficient inspection.
- Surface visibility: wipe fingerprints and dust from counters, shelves, and fixtures.
- Room labeling: guarantee doors, radiators, and outlets are easy to identify for reference.
This approach reinforces belonging through transparency, precision, and thoughtful presentation.
Access and Arrangements
Access on the day of the survey hinges on clear coordination and strict adherence to access protocols. You’ll confirm appointment windows, key arrangements, and entry routes in advance, minimizing disruption to your household.
Guarantee exterior paths are tidy and well-lit, with clear access to the primary method of entry. Communicate any access limitations or preferred meeting points to the surveyor, and designate a single point of contact for contingencies.
Inside, you’ll provide unobstructed routes to areas likely to be inspected, while preserving safety and privacy. Maintain consistency between stated arrangements and on-site reality, avoiding last‑minute changes.
Note that garden landscaping and interior decor should be stable and representative, free from alterations that could skew assessment. This disciplined approach reinforces professional confidence and a sense of belonging within the inspection process.
Documentation On Hand
To guarantee the survey proceeds smoothly, have all relevant documents organized and readily accessible on the day. Your approach should emphasize digital documentation where possible, while preserving hard copies for reference. Prepare a concise bundle that supports the inspector’s scrutiny and fosters confidence in the process.
Include records that corroborate property features, history, and compliance. Consider incorporating virtual walkthroughs to pre-screen areas and reduce on-site delays. Your checklist should balance thoroughness with clarity, ensuring items are easy to verify during the survey.
Maintain consistency in labeling, dates, and versions to prevent confusion. This disciplined preparation reinforces belonging within the appraisal community and demonstrates professionalism.
- Property deeds and title documents
- Recent surveys, plans, and consent notices
- Product warranties and invoices
- Digital documentation backups and access points
- Virtual walkthroughs and supplementary notes
Post-Survey Documents and Next Steps

After the survey wraps up, you’ll receive the official report and any accompanying schedules or appendices. Review these documents promptly to confirm scope, findings, and any clarifications you need.
Compare the results with your pre-survey notes to identify discrepancies or emphasis areas, and note any required follow-ups or remedial actions.
Prioritize recommended actions by impact and feasibility, and set realistic timelines.
Prepare a concise summary for stakeholders, including contractors or agents, so everyone understands obligations and expectations.
Maintain a clear record of decisions, costs, and changes.
Consider practical applications at home—like refining Home decor choices or updating Gardening tips based on structural or moisture insights.
Use the report to support informed decisions and confident, collaborative progress.
Frequently Asked Questions
How Long Does a RICS Survey Typically Take?
A RICS survey typically takes two to four hours, depending on property size and complexity. You’ll experience a thorough property valuation and home inspection process, ensuring precise findings and confidence you belong to informed, trusted professionals.
Do I Need a Surveyor for Electrical Certificates?
Around 80% of homes fail electrical safety checks on first inspection, so you’ll want professional oversight. Yes, you need a surveyor for electrical certificates to meet Certification requirements and guarantee ongoing safety for your household and property value.
Can I Stay During the Survey?
Yes, you can stay during the survey, but plan for occasional access pauses. You’ll balance Tenant access with Privacy concerns, ensuring surveys proceed smoothly while you remain nearby, engaged, and feeling respected by the process.
Will the Survey Affect My Insurance?
Yes, it can affect insurance. You should expect Insurance implications to prompt coverage adjustments, so review policy terms, disclose survey findings, and coordinate with your insurer; this helps you maintain accurate coverage and belonging within your protection network.
What Fees Are Charged for Re-Inspection?
Clear, precise costs: re-inspection fees vary, typically a follow-up service charge plus travel, if applicable. You’ll face the re inspection process promptly, with cost estimates provided upfront, so you plan confidently and feel assured belonging throughout.
Conclusion
To prepare effectively, you’ll audit every room, organize gear, and clear pathways, while testing lights, trim clutter, and document faults. You’ll secure access, verify moisture signs, and tidy exteriors, then align schedules, notes, and receipts. You’ll anticipate inspector queries, present evidence concisely, and confirm warranties, permits, and recent works. You’ll maintain consistency, accuracy, and calm, ensuring readiness, reducing delays, and boosting reliability, credibility, and confidence for a precise, efficient, and actionable survey outcome.