
To illuminate garden paths, start with foundations: plan wiring, use low-voltage cables, conceal cables, and place a weatherproof transformer in a sheltered spot. Combine layers for safety and mood—path lights for guidance, bollards or uplights for texture, and occasional accent spots on key plants. Choose warm hues (2700–3000K) with high CRI, and aim for even brightness with no glare. Test at dusk, adjust beam angles, and keep maintenance easy with durable, weatherproof fixtures; more tips await.
Foundations for Garden-Path Lighting

Foundations set the stage for safe, reliable garden-path lighting. You’ll align components with purpose, ensuring consistency and ease of use as you design.
Begin by evaluating path width, grade, and adjacent plantings to minimize glare and shadows that disrupt landscape aesthetics. Choose lighting that complements your home’s architecture and the yard’s rhythm, not overpower it.
Plan for subtle, layered illumination—path lights at intervals, low-profile bollards near entrances, and concealed uplights for texture.
Prioritize durability and maintenance, selecting fixtures with weather resistance and easy bulb access.
Consider plant integration: fixtures should won’t-bruise shrubs or roots, and lighting should reveal form without harming growth.
With thoughtful integration, your path becomes inviting, coherent, and welcoming for every visitor who arrives home.
Safety and Mood: Define Your Path’s Purpose
Define your path’s purpose first: decide whether it’s for safe navigation, ambient mood, or a blend of both.
Assess light levels to guarantee visibility without glare, then adjust to suit the intended use.
Consider how mood—through color temperature, contrast, and fixtures—supports safety while inviting you to linger.
Define Path Purpose
A clear path purpose guides both safety and mood, so start by identifying why you’re lighting the route and what feel you want to create. You choose purpose to shape design decisions, from brightness to color temperature, ensuring every fixture serves a concrete goal.
Consider safety needs, like even illumination for footing, and mood goals, such as a welcoming glow at entry points. Your plan should reflect plant compatibility and seasonal variations, pairing lighting with nearby flora so sequences feel intentional, not random.
Define the route’s rhythm—where to emphasize texture, where to guide sightlines. Assign zones: daytime utility, evening ambiance, and progression moments. With a clear purpose, you’ll create a cohesive, belonging-friendly garden path that responds to seasons and supports growth.
Assess Light Levels
To assess light levels effectively, start with a quick walk along the path at the times you’ll use it most and note where footing looks dim or harsh.
Next, map where illumination must guide steps and where accents support safety without glare. Prioritize even coverage over bright hotspots, and check progressions between lit and dark zones.
Consider energy sources and maintenance needs: solar panels should face unobstructed sun, and decorative lanterns must deliver consistent color and intensity.
Choose fixtures that blend with your garden’s character while keeping paths legible. Test your setup at dusk and after rain to catch reflections and shadows.
This approach builds confidence, guarantees safe navigation, and reinforces a welcoming, connected outdoor space.
Create Mood Safety
You’ve assessed where light is most needed; now shape how that lighting feels as you walk your path. Define your path’s purpose with purpose-driven lighting that communicates safety and welcome. Use layered illumination to guide steps without glare, creating a calm, moonlit ambiance that helps you breathe easy and belong.
Keep routes clearly defined with low, even brightness along edges and gentle accents at crossings. Position safety signage where it’s easily seen, not hidden by foliage or shadows. Choose color temperature that feels natural, avoiding harsh blue tones near seating or entry points.
Test at dusk and after rain to confirm visibility and mood align. Consistency in cues—lamps, pathogen-safe switches, and signage—fosters confidence, trust, and daily comfort.
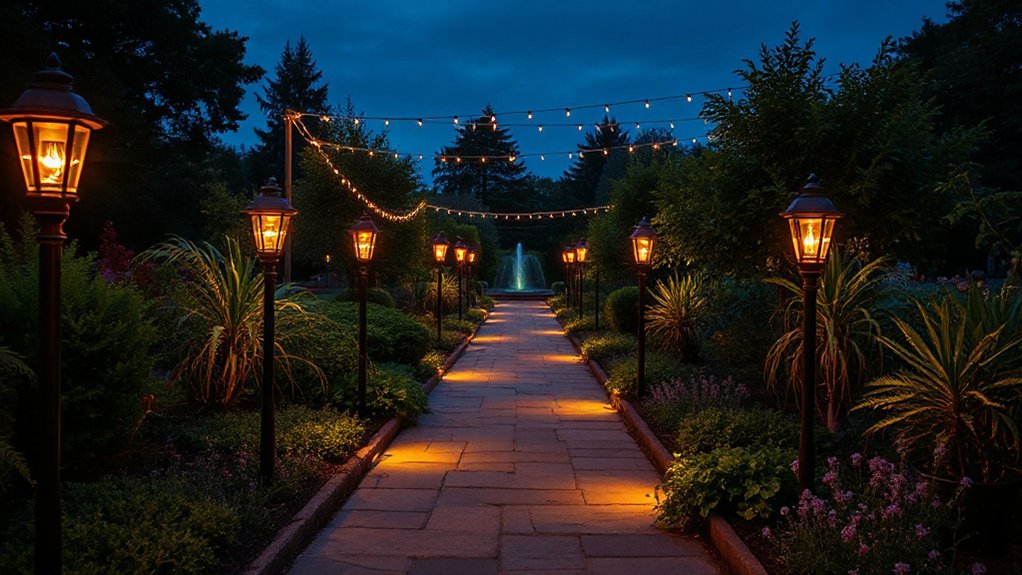
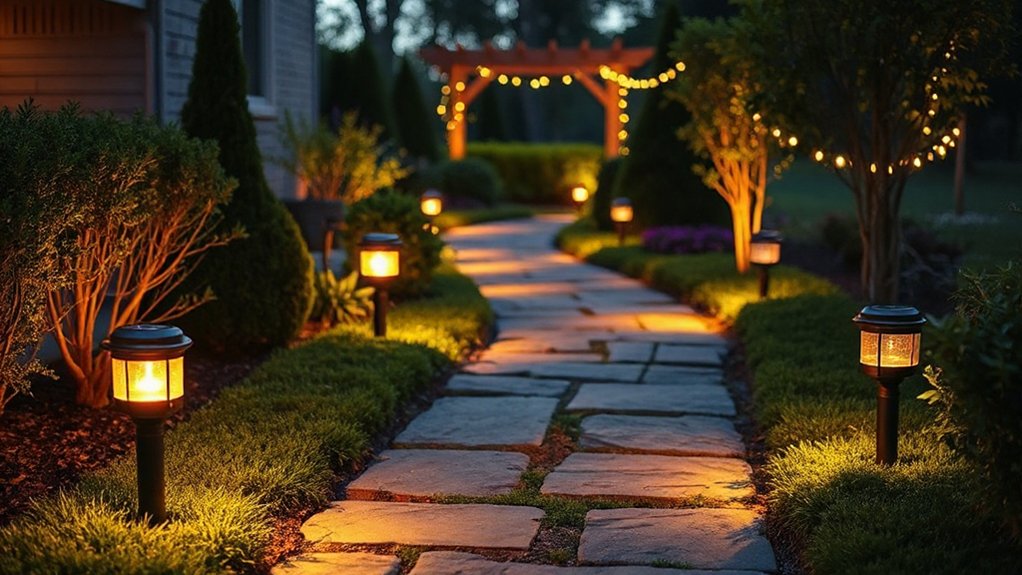
Path Lighting Fixture Types
Path lighting fixtures come in several practical types, each with its own strength for guiding you along a garden path. You’ll choose based on visibility, maintenance, and mood.
Stake lights offer reliable, low-profile guidance, ideal for straight runs and tight budgets.
Bollards elevate your sense of arrival, sharing broad illumination without glare.
Directional spotlights accent key features and improve safety around bends.
Post-mounted lamps deliver classic charm with even spacing and consistent brightness.
Deck-mounted options blend into seating areas while extending usable path after dusk.
For sustainability, consider Solar options that charge in daylight and illuminate evenings without wiring.
Vintage fixtures bring timeless character, pairing with brick or stone paths for social warmth.
Whichever you pick, guarantee even spacing and proper shielding to minimize glare and maximize comfort.
Layering Light: Ambient, Task, and Accent

Layering light is the smartest way to shape both function and mood along your garden path. By combining ambient, task, and accent layers, you create a coherent, welcoming glow that guides steps and reveals texture.
Use layering techniques to balance brightness with shadows, avoiding glare and gaps. Plan light placement for smooth progressions from lawn to gravel, highlighting edges and plant silhouettes while keeping paths clearly visible.
- Ambient glow that softly defines the space without overpowering features
- Task lighting at key stepping points to illuminate footing and hazard-free travel
- Accent accents that draw attention to focal plants or architectural details
This approach fosters belonging, helping guests feel guided and cared for as they explore your path.
Planning Wiring, Power, and Weatherproofing
Start by planning your wiring routes and routing options so you can access power without clutter or trip hazards.
Guarantee weatherproofing and protection measures are in place from the outset, including suitable enclosures and sealants for outdoor components.
Keep the system simple, accessible for maintenance, and rated for exterior use to withstand rain, temperature changes, and moisture.
Wiring Considerations and Routing
If you’re wiring garden path lighting, plan the route upfront to minimize visible hardware and guarantee reliable power. You’ll map a single path from the power source to the fixtures, using low-voltage cable and quick-connects to simplify future tweaks. Keep runs short, with loops for accessibility, and avoid crossing plant beds where roots could damage wiring.
Choose discreet conduit and bury shallowly where permitted, then label each segment for easy troubleshooting. Align lighting with garden design and plant integration, so fixtures complement colors and shapes rather than compete with them.
Position transformers in sheltered locations and use weatherproof connectors to assure durability. Regularly test connections after pruning or redesigns to maintain safe, consistent illumination.
- A winding route tucked along edges, blending with borders
- Concealed cable corralling pebbles and mulch for a soft, integrated feel
- A compact transformer tucked near an outlet, protected yet reachable
Weatherproofing and Protection Measures
Weatherproofing and protection start with the wiring plan you already laid out. You’ll choose components rated for outdoor use, using a weatherproof enclosure and GFCI protection where required.
Seal all connections, conduit runs, and junction boxes to prevent moisture intrusion, and keep cables elevated off damp surfaces.
Plan for solar integration where possible, selecting fixtures with compatible IP ratings and shaded mounting to maximize efficiency.
Use low-voltage systems to reduce shock risk and simplify weatherproofing, and install root- and weed-resistant trenching to protect buried conductors.
Account for wildlife considerations—prefer sealed fixtures and predator guards to discourage nibbling or nesting near wiring.
Label circuits clearly, test under rain simulations, and document maintenance intervals to sustain safe, reliable illumination.
Plan by Path Material and Length
Planning your path by material and length helps you set a practical lighting plan from the outset. You choose materials that guide lighting needs, from gravel to pavers, aligning fixtures with surface visibility and safety.
Measure length to determine fixture quantity and spacing, ensuring even pathway illumination without glare. Consider embedded LEDs for slim profiles or bollards for a punctuated rhythm along straight or curved routes.
Material contrasts influence mood and accessibility, so pick colors and textures that complement your garden lighting design while maintaining a cohesive look with surrounding borders.
- Gravel paths glow softly with diffuse uplight, inviting step-by-step flow
- Paver routes benefit from low-profile LEDs set between joints for seamless pathways
- Decked or wooden edges require shielded lighting to protect materials and eyes
These choices nurture belonging and confident, purposeful navigation, every evening. Pathway illumination.
Color Temperature and Light Quality for Gardens
Color temperature sets the mood and readability of your garden at night, so pick a temperature that suits each area’s function. In paths, aim for 2700–3000K for warm, inviting edges, and 3500–4100K where you need better visibility without harsh glare.
Color temperature influences perceived color and depth, so choose warmer tones near seating and cooler tones along progressions. Light quality matters just as much as color temperature: look for high CRI to render foliage and stone accurately, and guarantee even distribution to avoid hot spots.
Use layered lighting—path LEDs for guidance, uplights to sculpt trees, and low bollards for safety—creating a cohesive feel of belonging. Quality fixtures reduce glare, extend reliability, and elevate your garden’s night-time experience.
Budget-Smart Ways to Elevate Your Path
You can elevate your garden path without breaking the bank by choosing budget-friendly lighting options that still shine. Consider DIY pathway enhancements that add personality—think simple accents, repurposed materials, and easy-to-install fixtures—while keeping safety in mind.
Pair these with energy-saving illumination ideas to maximize shine per watt and minimize ongoing costs.
Budget-Friendly Lighting Options
To stretch your budget without sacrificing impact, start with affordable options that deliver reliable illumination and easy installation. You’ll find practical choices that blend with your landscape while keeping costs low, yet they still offer a sense of welcome and belonging.
- Solar lanterns along the path glow softly at dusk, creating garden art in motion and requiring no wiring.
- LED stakes line the curb with crisp, energy-efficient light that nudges wildlife attraction without glare.
- Clip-on battery LEDs tuck under railings or steps for targeted visibility and flexible placement.
Choose durable finishes and warm color temps to feel inviting and cohesive.
With these budget-friendly options, you’ll boost safety and ambiance while respecting the garden’s natural rhythm.
DIY Pathway Enhancements
Add simple, smart upgrades that boost function without breaking the bank. You’ll keep the path safe and inviting with affordable, DIY tweaks.
Choose low-voltage LED fixtures for predictable brightness and long life, and place them to illuminate edges without glare.
Use weatherproof containers for garden art along the route to create focal points that feel intentional, not cluttered.
Integrate plants along the border by selecting compact, drought-tolerant varieties that tolerate occasional shade from lights.
Combine soft uplighting with satiny path markers to guide steps and emphasize texture.
Simple timers or smart plugs keep energy use steady, while you still control ambiance.
For a cohesive look, mirror colors in garden art with foliage tones, and guarantee plant integration enhances rather than obstructs the walkway.
Energy-Saving Illumination Ideas
Smart, budget-friendly lighting upholds safety and charm without breaking the bank. You’ll reduce costs by choosing energy-smart options that still illuminate paths clearly and invitingly.
Focus on solar alternatives for daytime charging and automatic dusk-to-dawn operation, so you never fumble for switches.
Combine efficiency with aesthetics using decorative fixtures that blend into garden scenery while delivering sufficient brightness.
Plan placement to minimize waste and maximize coverage, guiding travelers along the path with gentle, consistent glow.
Prioritize durable housings and sealed components to weather the elements without frequent replacements.
You’ll feel connected to your space, knowing every step is lit thoughtfully and sustainably.
- solar alternatives for daytime charging and auto operation
- decorative fixtures that enhance garden ambiance
- smart placement for efficient, consistent illumination
Step-by-Step Installation: From Plan to First Glow
With a solid plan in hand, you’ll start by marking the path and choosing the right lighting near the route. Begin by laying out fixtures that mirror your garden design values: low glare, warm color, and even spacing.
Run mains or solar cables, keeping them tidy and protected, with a clear access point for maintenance. Install stake lights at shoulder height to illuminate edges without blinding you, and tuck low-voltage uplights to highlight texture along borders.
Test each unit before burying cables, ensuring uniform brightness and color temperature. Align fixtures with plant integration, avoiding leaf-damage and ensuring growth won’t obscure beams.
Secure transformers, weatherproof housings, and timers, then perform a final walkthrough at dusk to confirm first glow patterns and pathway safety.
Troubleshooting Common Path Lighting Issues
Path lighting problems are common, but most can be traced to a few predictable culprits and fixed quickly. You’ll troubleshoot by checking power, bulbs, and wiring first, then assess placement for color contrast and plant integration.
Confirm transformers deliver steady voltage, replace burned-out lamps, and reseal connections to prevent corrosion. If lights glare or wash out, tweak beam angles and color temperature to maintain legibility along the path.
- Visual balance: adjust fixtures so light guides the eye without harsh hotspots, allowing textures to breathe.
- Plant integration: prune or relocate greenery that steals light, using low-profile sensors near plant edges to avoid shade gaps.
- Color contrast: choose lamps that heighten pathway stones and edging, improving depth perception.
With these steps, you restore safety, ambiance, and belonging.
Frequently Asked Questions
How Long Do Garden-Path Lights Typically Last Outdoors?
Typically, your garden-path lights last 2–5 years for battery-powered options, depending on usage. With LED durability and proper care, you’ll enjoy longer lifespans. Battery lifespan and LED durability influence replacements; you’ll feel secure, connected, and efficient outdoors.
Which Lighting Controls Maximize Energy Efficiency and Mood?
You maximize energy efficiency and mood by using motion sensors and dimmer switches. You’ll conserve power, extend fixtures’ life, and tailor brightness as you approach, creating a welcoming, belonging-ready ambiance that’s practical, responsive, and confidently controlled.
Can Solar Path Lights Work in Shaded Areas?
Yes, solar path lights can work in shaded areas. Choose shade-tolerant fixtures and optimize solar panel placement to capture any available light, then position fixtures to illuminate paths without glare or crowding your space.
Are There Safety Rules for Wiring Near Water Features?
Yes—you should follow strict electrical safety; near water features, use water resistant wiring and GFCI protection. Coincidentally, your peace of mind depends on approved outdoor fixtures, proper clearance, and regular inspections to keep everyone belonging and safe.
How to Maintain Lighting Fixtures Without Damaging Plants?
You can maintain lighting fixtures without harming plants by using plant safe cleaning methods and choosing durable fixtures. Wipe gently, avoid harsh chemicals, and inspect regularly for wear to guarantee fixture durability while preserving garden health and your sense of belonging.
Conclusion
As you plan and install, the path will answer back with quiet signs—shadows, warmth, a rhythm underfoot. You’ll find safety in the glow, mood in the amber hue, and purpose in every beam that leads you forward. Keep your wiring tight, your fixtures durable, your timing precise. And when the last stake holds steady and the first night breeze brushes the yard, you’ll sense the truth: illumination isn’t merely light; it’s a doorway you’ve created, one step closer to wonder.