

Choose the Right Grout for Slate Tile
Before you mix anything, how do you choose a grout that won’t stain or scratch your slate? First, measure your joint width: use unsanded grout for joints up to 3 mm, and a fine sanded grout for 3–10 mm, as it boosts grout durability. Next, check the slate finish: riven, textured tiles hide minor haze, while honed slate shows it, so pick a low-bleed, polymer-modified grout. Then set your performance target: in UK wet zones, choose a grout rated for showers, with mould resistance and low water absorption. Finally, decide on colour options using a test board; dark grout can frame tiles, light grout highlights variation. Buy one batch to match.
Decide If You Should Pre-Seal Slate Tile
Although slate looks tough, you should decide on pre-sealing based on how porous and textured your tiles are, because grout pigment can lodge in the surface and leave shading. Test first: drip clean water onto a spare tile; if it darkens within a minute, it’s absorbent and a pre-seal is sensible. Next, feel the face; deep clefts and riven texture trap grout, so sealing benefits include easier cleanup and more even colour. For honed or dense slate, you can often skip pre-sealing, but still test for staining with a dab of grout on an offcut. For Surface preparation, verify tiles are fully dry, dust-free, and free of site residues before you apply any slate-safe impregnating sealer, per UK manufacturer guidance.
Prep Tools and Mix Grout for Slate Tile
Once you’ve confirmed whether you’ll pre-seal, set up the right kit and mix your grout to a controlled consistency so it packs joints cleanly without smearing into slate texture. Gather a rubber float, two buckets, measuring jug, paddle mixer, margin trowel, grout sponge, microfibre cloths, and clean water; wear gloves and knee pads.
Choose grout colour under the room’s lighting, then dry-blend powder to even pigments. Add water to the bucket first, then sprinkle grout in while mixing at low speed to avoid air. Aim for a thick, peanut-butter mix that holds ridges. Let it slake 5–10 minutes, remix briefly, and don’t retemper with extra water. Note temperature and humidity, as both affect grout curing time.
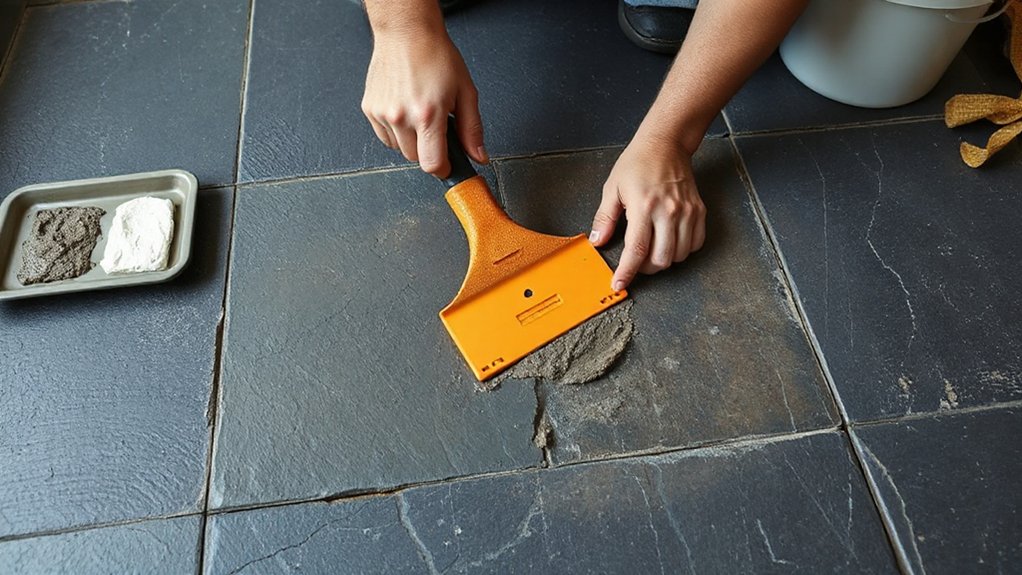
Pack Slate Tile Grout Joints Evenly
Mix your grout to a peanut-butter consistency so it holds on the float without slumping, then work small sections at a time. Pack the joints in thin layers, pressing firmly on each pass to drive grout fully into the gaps. Finish by tooling and compacting each joint evenly with the edge of the float, keeping your pressure and angle consistent across the slate.
Choose Proper Grout Consistency
How do you know you’ve got the grout consistency right for slate? You’ll see it holds a ridge on your float, yet slumps slightly after a second. Start with the manufacturer’s water ratio, then mix with a paddle in a bucket for two minutes. Aim for a thick, creamy paste, not pourable. Let it slake for five minutes, then remix briefly without adding extra water. For colour matching, use the same water volume each batch and keep ambient conditions steady. If it’s too stiff, you’ll drag joints and risk pinholes; too wet and you’ll weaken grout durability and increase staining on porous slate. Test on a spare tile: it should pack cleanly and wipe without smearing.
Pack Joints In Layers
With the grout at a thick, creamy paste, start filling the slate joints in controlled layers so you don’t trap voids. Load a small amount onto your float and press it across the joints at a shallow angle, working diagonally to the tile edges. Aim for joint filling in 1–2 mm lifts rather than forcing the full depth at once, especially on riven slate. After each pass, scrape off excess from the tile faces and immediately reapply to low spots. Keep your working area to about 1 m², so the mix doesn’t skin over in British indoor conditions. Continue layer packing until the joints are consistently full, with no shadow lines or pinholes visible. Check edges and corners for hollows.
Tool And Compact Evenly
Once you’ve packed the joints to full depth, tool and compact them straight away so the grout keys into the slate texture and cures dense. Use a rubber grout float held at roughly 45° and drag diagonally across the joints to avoid pulling material out. Then run a jointing tool or a dampened pointing iron along each line, applying firm, even pressure to compress the grout and smooth high spots. Keep your profile consistent, especially on riven slate where uneven edges can telegraph. Wipe lightly with a barely damp sponge, shaping rather than washing, and rinse often to prevent haze. Check colour matching as it firms up; over-wetting shifts shade. Let joints stiffen before final buffing, then plan grout sealing once fully cured to reduce staining.
Do the First Cleanup Without Washing Out Grout
After the grout has firmed up to a dull, slightly rubbery finish, start your first cleanup by removing excess from the tile face without flooding the joints. Hold a grout float nearly upright and drag it diagonally across the slate to lift ridges and smears; this is controlled grout removal, not re-spreading.
Dampen (don’t soak) a clean sponge in cool water, then wring it hard until it feels barely wet. Wipe lightly in one direction, rinse, wring again, and rotate to a fresh face each pass. Keep your bucket water clean; change it early rather than later. Aim for minimal pressure so you don’t pull grout from the joints, especially on riven slate. Finish with a barely damp microfibre wipe to reduce haze.
Tool Joints, Protect Edges, and Fix Low Spots
Once the grout’s started to firm up, you’ll run a grout jointer along each line to compress and shape the joints to a consistent profile. You’ll keep the tool tight to the joint so you don’t nick slate edges, and you’ll wipe the blade frequently to prevent dragging grit across the face. Where you spot low joints, you’ll pack in fresh grout immediately, re-tool, then feather the edges so the repair bonds cleanly.
Shape Joints With Tools
While the grout’s still workable, run a grout float or jointing tool diagonally across the slate to compress and shape the joints, then switch to a slightly damp sponge to refine the profile without dragging material out. Focus on joint shaping by packing each line to a consistent depth, keeping your passes light and repeatable. For tool selection, use a rubber float for wider joints and a narrow jointing tool for tight lines or riven textures. Work in 1–2 m² sections so the grout doesn’t skin over in the UK’s variable indoor humidity. Rinse your sponge often, wring it hard, and wipe at 45° to the joints. If you see pinholes, re-tool immediately, then re-sponge once. Finish by feathering edges clean.
Protect Edges And Low Spots
Because slate edges chip easily and riven faces hide hollows, protect the arrises as you tool the joints and correct any low spots straight away. For Edge protection, run a damp sponge diagonally, not along the edge, and keep the tool’s nose off the tile by working from the centre of the joint. Use light pressure and short pulls; don’t scrape dried grains across the slate. If you must tidy a corner, use a soft nylon detailing brush, not a metal scraper.
For Low spot correction, inspect against raking light. Where grout sinks, re-pack fresh mix immediately, then re-tool to the same profile. Wipe again with a barely damp sponge, leaving joints slightly proud to cure flush.
Seal Slate Tile and Grout After Curing
After the grout has cured, how do you lock in that finish and protect porous slate from stains? First, confirm cure time on the grout bag (typically 24–72 hours) and ensure the surface is fully dry. Vacuum dust, then wipe with a barely damp microfibre cloth and let it air-dry.
Next, choose a breathable impregnating sealer rated for Natural stone; if you want colour enrichment, select one offering colour enhancement. Apply with a foam brush or short-nap roller, working in manageable sections. Keep slate and grout evenly wetted for the stated dwell time, then buff off all residue with clean cloths to prevent hazing.
Apply a second coat if specified. Avoid foot traffic and water for 24 hours, and reseal as needed.
Frequently Asked Questions
How Long Should I Wait Before Walking on Newly Grouted Slate Tile?
Wait 24 hours before light foot traffic; wait 72 hours for full cure. Keep slate dry. Use cleaning methods: wipe haze with damp sponge. Apply sealing techniques after curing, per UK grout instructions.
Can I Grout Slate Tile in Cold or Humid Conditions?
Yes, you can, but keep it controlled: below 5°C grout may take 2× longer. Step 1: warm the room. Step 2: reduce humidity. Step 3: plan Slate sealing and Grout color options accordingly.
What’s the Best Way to Remove Grout Haze From Textured Slate?
Use cleaning techniques: wait 24 hours, dry-buff, then scrub with pH-neutral cleaner and nylon brush, rinse, and microfibre-dry. If haze persists, use mild grout remover. Apply sealant options: penetrating sealer, UK.
How Do I Repair Cracked or Crumbling Grout Lines Later?
First, you’ll rake out weak grout—don’t rush—then vacuum, mist, and pack fresh mix. Match grout color, tool joints, wipe lightly, then cure. Finally, apply sealing techniques: seal grout lines, edge-check, recoat.
Is Sanded Grout Safe for Slate Mosaic Sheets With Narrow Joints?
Yes, but only if joints are 3mm or wider; otherwise use unsanded. Test first. For colour matching, mix consistently. Pack grout diagonally, clean gently. Finish with grout sealing after curing, following UK manufacturer guidance.
Conclusion
Now you’ve grouted your slate like laying mortar between cobbles on a wet British lane. Let it firm up, then give a light first wipe with a barely damp sponge—don’t flood the joints. Re-tool lines, scrape edges clean, and top up any low spots before it cures. After the full cure, seal both slate and grout in thin, even coats. You’ll lock in colour, block stains, and keep floors shipshape.