
To renovate for better layout flow, start by mapping your space and tracing typical entry-to-zone routes, noting bottlenecks, sightlines, and door swings. Define daily use and group areas into public, semi-private, and private zones. Use data to guide decisions—36-inch clearances, direct sightlines, and warm-to-cool color shifts to cue movement. Prioritize open pathways, functional passages, and storage efficiency while budgeting for low-cost, high-impact tweaks. Ready to apply practical steps that reveal even more improvements?
What Layout Flow Is and Why It Matters

Layout flow describes how people move through a space and how rooms relate to one another in use. You measure movement paths, sightlines, and transitional gaps to identify friction points.
Flow isn’t abstract: it guides door placement, corridor width, and furniture layout to minimize detours. You’ll prioritize clear routes from entry to primary zones, and guarantee each room supports its intended function without crowding.
Use data to justify changes—foot traffic estimates, door swing arcs, and clearance spaces—so decisions feel grounded and repeatable.
Consider decorative accents and aesthetic boundaries to subtly guide movement without feeling forced. A well-planned flow reduces confusion, speeds tasks, and fosters belonging by aligning space with how occupants actually behave, not just how you imagine them.
Map Your Space to See How People Move
Start by mapping every room and doorway on a simple floor plan, then trace typical paths from entry to key zones. You’ll plot traffic corridors, noting distance, turns, and chokepoints as you walk the space in your mind and on paper.
Record which rooms people pass through, where they pause, and how doors open into sightlines. Use this data to adjust layouts, aiming for direct, intuitive routes that minimize backtracking.
Consider garden aesthetics when guiding movement toward outdoor views or passages, and use color psychology to cue destinations with calming or energizing tones.
This deliberate mapping reveals opportunities to improve flow before moving walls or furniture, creating a cohesive, inclusive environment where every resident feels seen and connected.
Identify Bottlenecks That Slow You Down
To spot bottlenecks, pull your mapped data back into real-world symptoms: where people slow, hesitate, or backtrack. You’ll look for recurring friction points in circulation paths, door widths, and traffic density across zones.
Track wait times, shift distances, and decision moments where choices stall progress. Link these delays to physical cues—misplaced furniture, narrow corridors, or misaligned sightlines—that force pedestrians to pause.
Prioritize fixes with measurable impact: reconfiguring layouts, widening routes, or consolidating services to shorten trips. Test changes with quick walkthroughs, then quantify improvements in flow, dwell time, and user satisfaction.
When you plan, consider garden landscaping as a cue for progression and exterior color schemes to orient movement, reinforcing a natural, inclusive rhythm.
Define Daily Use: Which Rooms Do What
You’ll start by mapping daily space allocation to your routines, noting how much square footage each activity needs and when it’s busiest.
Then, evaluate traffic flow to guarantee corridors, doors, and transitions minimize passes through sensitive zones like bedrooms and workspaces.
Finally, define functional room roles with clear purposes—kitchen as meal zone, living area as gathering and work, and bathrooms as priority nodes—to drive layout decisions that support consistent daily use.
Daily Space Allocation
Track daily activity data—meals, work, rest, and entertaining—and adjust zones to minimize transit time and fatigue. Prioritize clear boundaries: kitchen work zones adjacent to dining, workspaces near natural light, and bedrooms tucked away from noisy public areas.
Consider outdoor landscaping as an extension of living space, aligning access points with indoor rooms for seamless gatherings. Optimize storage by assigning lockers, bins, and cabinets to each zone, reducing clutter and improving efficiency.
Plan maintenance routines and seasonal shifts to sustain consistent daily rhythm and belonging.
Traffic Flow Considerations
Where should traffic hubs live to minimize fatigue and wait times? Think of daily routes from entry, kitchen, bathroom, and bedrooms as a network. Prioritize direct paths between high-use rooms and primary storage zones, reducing backtracking.
In practice, set clear hubs near the home’s busiest circulation nodes, so you’re never crossing long corridors with heavy items. Evaluate peak times, then adjust door placement, thresholds, and sightlines to shorten detours.
Outdoor landscaping should align with exterior egress to shorten outdoor-to-indoor movements during handover moments, while Storage optimization keeps closets, pantries, and laundry adjacent to related zones.
Document observed bottlenecks, test revised layouts, and measure improvements in travel distance and time. A data-driven approach builds belonging by delivering predictable, comfortable flows for every household member.
Functional Room Roles
How should you assign daily use to each room to maximize efficiency and comfort? Start by defining core functions: kitchen for prep and meals, living area for gathering and work, bedrooms for rest, baths for hygiene, and utility spaces for storage and laundry.
Allocate primary traffic routes to minimize cross-flow, grouping related activities to reduce trips. Assign at-a-glance color schemes and decorative accents that reinforce function: warm, inviting tones in living zones; cool, clean palettes in kitchens and baths; soft neutrals in bedrooms to promote rest.
Consider daily rhythms—early mornings, after-work routines, and weekend gatherings—so zones align with peak needs. Prioritize visible storage and task lighting in each room.
Document roles, then validate with residents for a sense of belonging and ownership.
Create a Zone Plan: Public, Semi-Private, Private
To design a clear zone structure, start by mapping your home into three interconnected areas: Public, Semi-Private, and Private. You’ll implement a zone plan that supports purpose-built flows, minimizing cross-traffic and interruptions.
Begin with Zone differentiation: identify high-activity spaces (entry, kitchen, living) and shield quieter ones (bedrooms, study) from noise. Use spatial segmentation to position rooms with doorways, thresholds, and buffer zones that cue movement and boundaries.
Assign each area a dominant function, then validate with daily routines and occupancy data. Confirm sightlines prioritize safe navigation without eroding privacy.
Document clear access rules for guests and family. Revisit the plan after renovations to verify ongoing efficiency and belonging. This approach aligns layout with habits, creating predictable, comfortable transitions that reinforce community.
Light, Sightlines, and How They Guide Movement
Light paths should guide your movement, with clear routes from entry to key zones to reduce hesitation and improve flow.
Sightlines establish spatial rhythm, creating predictable pauses and focal points that help occupants orient themselves quickly.
Use natural light as wayfinding—bright stairs or hall niches can cue changeovers and reinforce intended paths without extra signage.
Light Pathways Guide Movement
Even with careful planning, the flow of a space hinges on how light travels and what sightlines you preserve. When you position windows, doors, and openings to channel daylight and views, movement feels intuitive rather than awkward.
You’ll map light pathways across rooms to minimize shadows in work zones and maximize morning glow in living areas. Track how daylight shifts with seasons and how glare is reduced with shade strategies.
Use color psychology to influence perceived orientation—cool hues for calm, warm tones for activity—while ensuring progressions stay visually cohesive.
Align furniture arrangement to paths where traffic naturally converges, avoiding obstructive silhouettes.
In practice, document measurements, test layouts, and iterate until illumination supports confident, comfortable circulation.
Sightlines Create Spatial Rhythm
How do sightlines shape the rhythm of a space, guiding movement with precision and intention? You design sightlines to create predictable pathways, aligning focal points along a clear visual sequence. Visual hierarchy guides attention: a main vista leads to a grounded anchor, while secondary lines branch to related zones, reducing hesitation and boosting flow.
You use color contrast strategically—darker thresholds at junctures, lighter tones where openness is needed—to reinforce depth and direction. Entrances, corridors, and rooms are positioned so viewers can scan from one area to the next without abrupt stops.
Measure sightline lengths and angles, then test with your intended users. The result is a cohesive tempo: well-timed viewpoints that feel intentional, inclusive, and easy to navigate.
Natural Light As Wayfinding
Natural light shapes how people move through a space as powerfully as any built-in cue. You’ll notice daylight zones guiding circulation more reliably when you align windows, skylights, and door openings with primary activity areas.
Use natural illumination to create intuitive paths: brighter progressions near kitchens and entryways cue where to go, dimmer zones reduce clutter and missteps.
Assess sightlines from key vantage points—hallways, thresholds, and open-plan nodes—to guarantee visibility without glare. Data shows occupants favor routes that are consistently lit and free of abrupt contrasts, so balance artificial lighting with daylight to maintain perceived safety and flow.
Label routes softly with light patterns, not signs, so belonging feels organic, not enforced. This approach increases efficiency, comfort, and a sense of welcome.
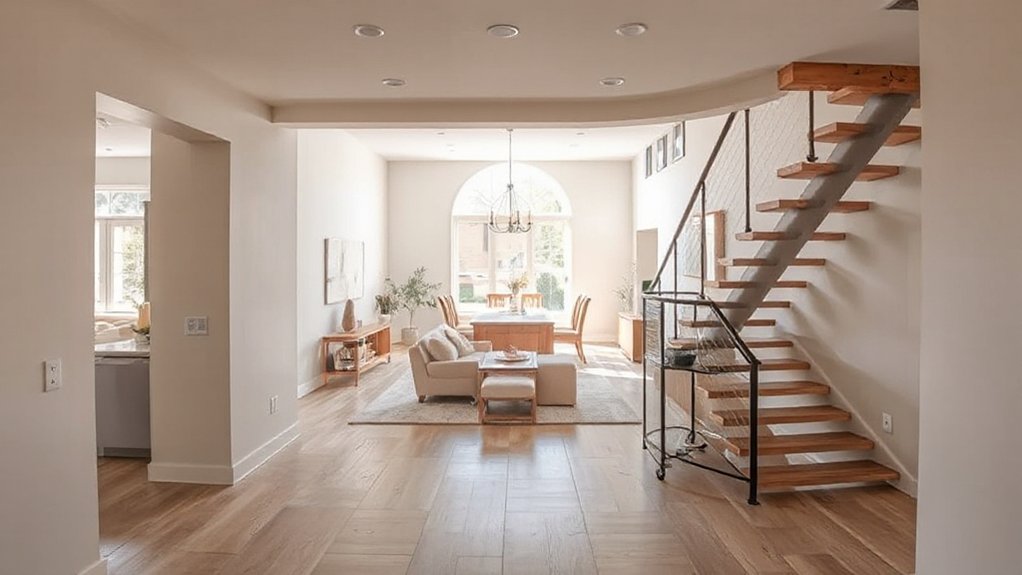
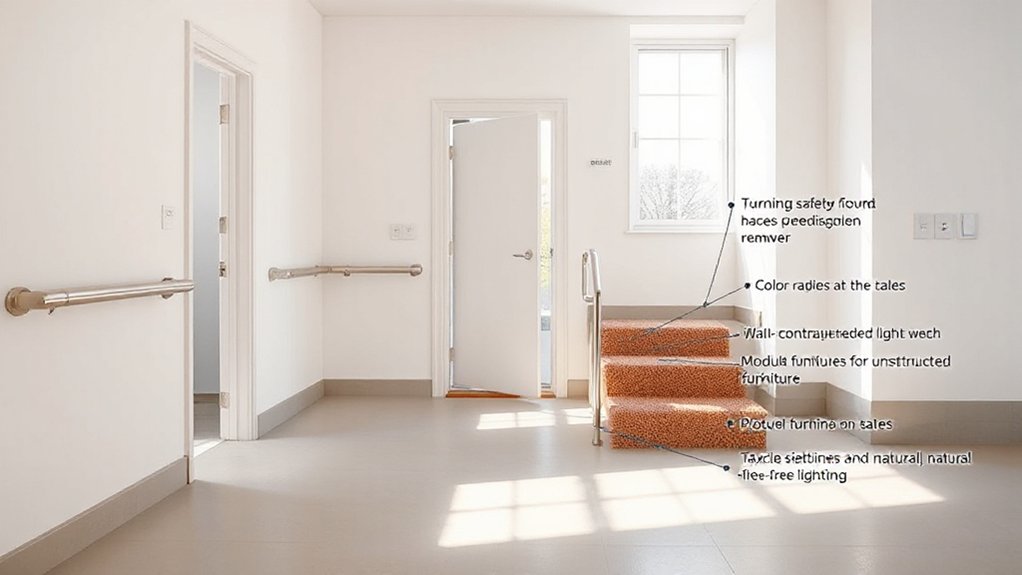
Door Swings, Thresholds, and Obstacle Reduction
A clear door swing and well-planned thresholds can dramatically improve flow between rooms and reduce accidental collisions. You’ll optimize door swings by prioritizing clearance at high-traffic paths, ensuring hinges, handles, and stopping points don’t snag furniture or walls.
Assess threshold materials for durability and accessibility, selecting low-profile options where possible to minimize toe-trips and visual clutter. Document door widths, hinge placements, and swing directions to standardize layouts across the home, aiding future renovations.
Consider pocket or barn doors in tight spaces, but verify structural support and hardware compatibility. Choose door hardware that’s ergonomic and consistent with the home’s style, then pair with thresholds that resist wear and moisture.
Track impact metrics—collision incidents, door-open times, and user feedback—to refine obstacle reduction strategies.
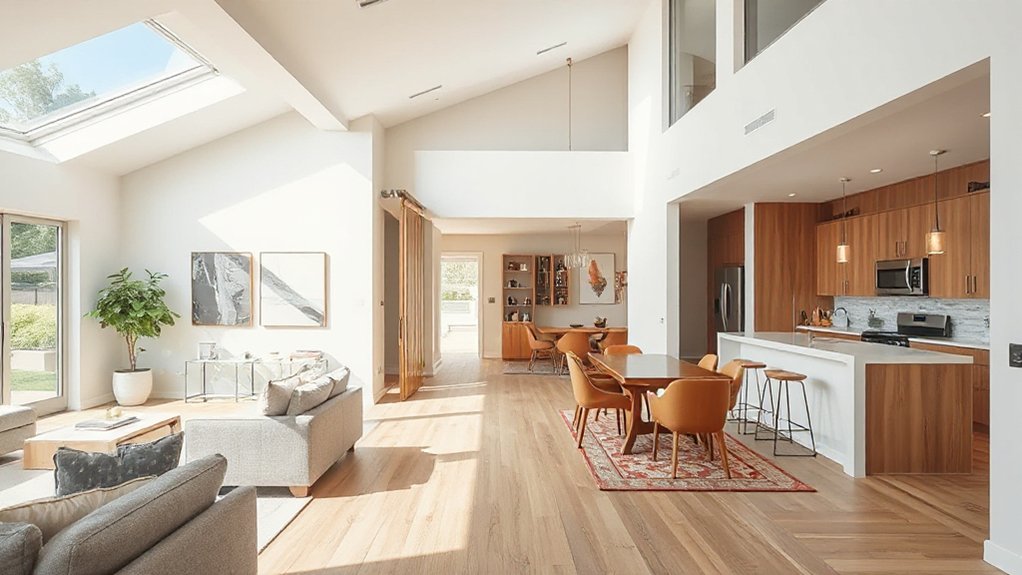
When to Embrace Open-Plan: Clear Guidelines
You’ll assess how flow between zones can be improved with open-plan layouts, balancing sightlines and movement to keep pathways clear.
Consider how public-private balance shifts when walls come down, and where partitions or furniture zones maintain privacy without breaking openness.
Make certain natural light access remains a priority by locating key windows and avoiding decisions that create dark corners or glare.
Flow Between Zones
Open-plan layouts work best when zones share a clear purpose and traffic flows are predictable; start by aligning the kitchen, dining, and living areas around a central hub that supports both access and sightlines.
You’ll measure how often you pass through, and adjust partitions to minimize detours while maintaining generous sightlines. Use furniture zones and built-ins to define function without closing sight.
Prioritize outdoor integration where climate allows, linking doors or large windows to the yard or terrace for natural light and ventilation.
In colder months, optimize energy efficiency with thermal breaks and well-sealed openings between zones.
Track usage data—footfall, duration, and heat loads—to confirm flow improvements and prevent bottlenecks that disrupt belonging and comfort.
Public-Private Balance
When deciding whether to embrace open-plan living, balance private spaces against communal ones by mapping daily routines and sound/privacy needs; design around predictable task zones, sightlines, and controllable barriers.
In practice, you’ll separate tasks that require concentration from shared activities, then deploy flexible boundaries like movable screens, partial walls, or soft zoning with furniture. Prioritize private zones for bedrooms, home offices, and intimate corners, ensuring acoustical buffers and visual privacy.
For public areas, define clear circulation and gathering zones, aligning furniture to natural pathways. Consider outdoor handoffs as extensions of living space, but keep them distinct from private zones to maintain control over noise and activities.
Use data on usage patterns to guide timing, scale, and material choices for lasting balance.
Natural Light Access
Natural light should guide where open-plan layouts work best: rooms with strong, consistent daylight and clear sightlines benefit most, while spaces far from windows or shaded by overhangs may suffer from gloom and energy inefficiency.
You’ll balance openness with function by measuring daylight patterns and aligning zones to exterior aesthetics, so interior flow respects garden landscaping views. Use light, reflective surfaces to amplify existing sun.
Plan for screen walls or flexible partitions to preserve bright cores while offering privacy where needed.
- Prioritize rooms with direct sun exposure for main living areas.
- Size openings and glazing to minimize heat gain without sacrificing daylight.
- Align north-facing daylight with soft, diffuse illumination.
- Coordinate outdoor landscaping to extend interior brightness into rooms.
Furniture Footprint: Protect Clear Pathways
To protect clear pathways, start by mapping your furniture footprint so every piece leaves at least 30 inches of walkway width for comfortable movement. You’ll measure from door swings to chair backs, then adjust task places to guarantee logical traffic routes.
Prioritize a cohesive furniture arrangement that keeps primary axes open: from entry to living zones, then to workspaces. Use decor accents sparingly to reinforce flow without crowding corridors.
Choose compact or multi-functional pieces where possible, and test clearance by walking the route with your own steps and a soft object to simulate furniture. Document clearances in a simple layout note, updating as you reconfigure.
This disciplined approach minimizes disruption, supports accessibility, and helps occupants feel welcome and included in a well-orchestrated home.
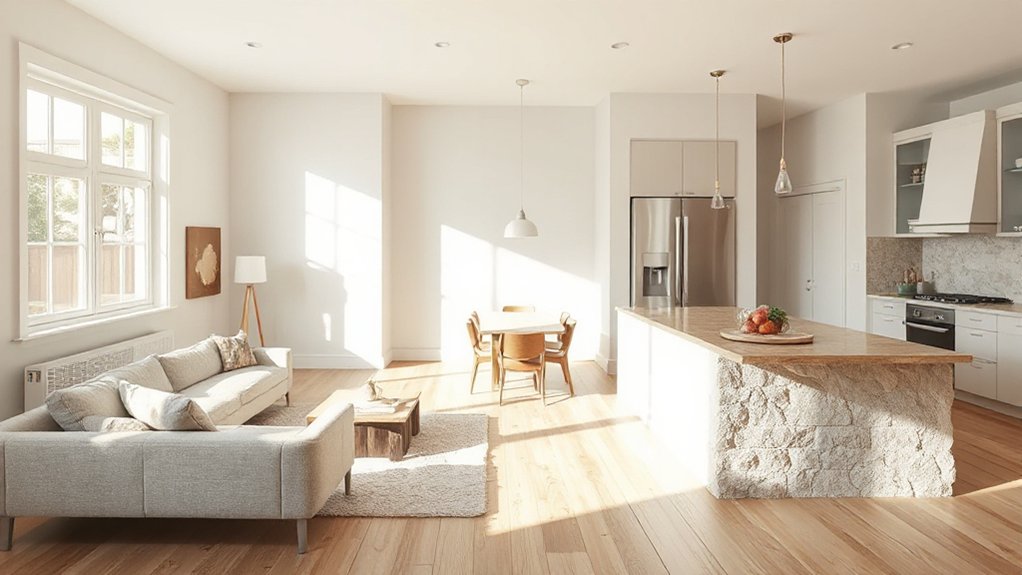
Kitchen, Dining, Living: Build a Natural Trio
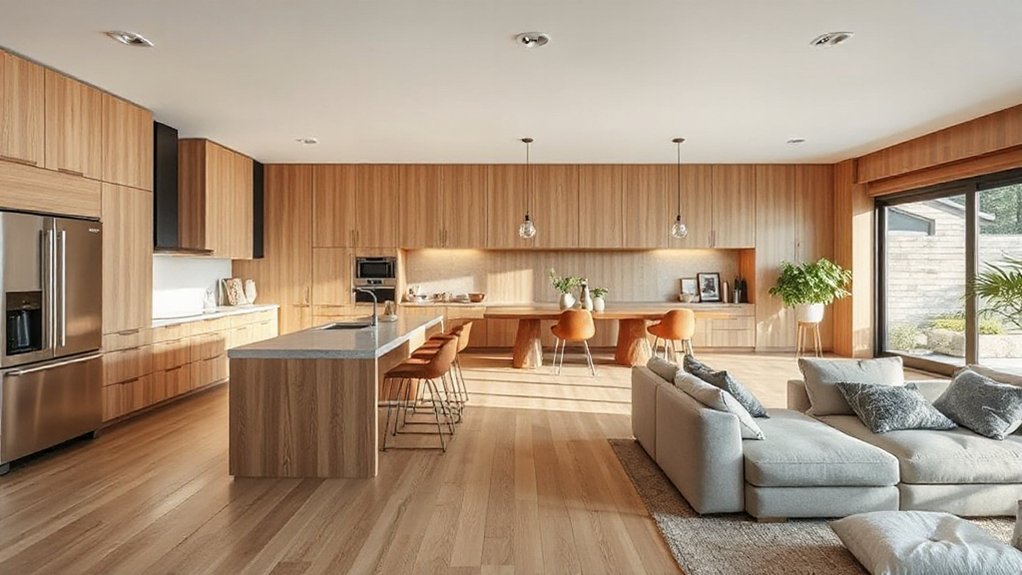
A natural trio in Kitchen, Dining, and Living spaces isn’t about stacking rooms; it’s about purposeful alignment, service zones, and sightlines. You’ll optimize flows by locating prep, dining, and lounging within easy reach of one another, while keeping key utilities in a smart, centralized hub.
Outdoor integration expands living beyond walls, extending seating and access to fresh air without breaking the trio. Smart technology enhances efficiency with adaptive lighting, climate, and entertainment that respect space and energy use.
- Align work zones so you can cook, serve, and relax with minimal steps.
- Use sightlines to maintain openness while preserving intimate seating.
- Integrate outdoor access as a seamless extension of the living area.
- Centralize controls for comfort, security, and convenience.
Measure Your Circulation: Clearances You Need
To guarantee smooth movement, you’ll measure clearance in high-traffic areas and confirm walkways meet minimum widths for chairs and doors.
Check doorway width standards and how they affect your circulation loop, so you don’t trap or bottleneck the space.
This sets the foundation for precise layout decisions based on data-driven standards.
Clearances For Walkways
- Maintain a minimum 36-inch width for main walkways to accommodate two people side by side.
- Target a 60-inch turning radius in U-turns or intersections for wheelchairs or strollers.
- Align edging and surfaces to minimize trip hazards and trip reversals.
- Plan lighting and surface texture for step-free, confident strides outdoors.
These measures support belonging, safety, and practical use of garden pathways.
Doorway Width Standards
Doorways are choke points in a home, so getting the width right matters for everyday living and future adaptability. You should plan for at least 32 inches (81 cm) clear opening in most living spaces, with 34 inches (86 cm) preferred for wheelchair access where possible.
In tighter renovations, aim for a minimum of 30 inches (76 cm) to maintain flow, but evaluate hinge swing and trim removals first. Track door thickness and jamb depth to ensure hardware won’t crowd the passage.
Consider doorway aesthetics when choosing trim and finishes that visually expand openings. Color psychology can influence perceived width: lighter, cooler tones can feel more spacious.
Document measurements, verify with site conditions, and tailor heights for light switches and thresholds to reinforce inclusive, belonging-focused design.
Circulation Loop Proximity
- Maintain clearances of at least 36 inches (91 cm) in major walkways to support two-way traffic.
- Guarantee unobstructed turning radii around fixed furniture for easy navigation.
- Align door swings with anticipated travel paths to avoid clashes.
- Verify sightlines across rooms to sustain spatial connectivity and intuitive wayfinding.
Storage and Vertical Space to Cut Clutter Drag
To reduce clutter and maximize usable space, start by auditing every storage area and vertical surface for underutilized potential. You’ll quantify current capacity, then map gaps where items cause friction or visual noise.
Prioritize hidden storage concretely: under stairs, behind doors, and in coffers, ensuring access remains seamless.
Implement vertical shelving that leverages wall height without crowding floors, freeing floor space for flow and function. Use modular, adjustable systems to adapt to changing needs, labeling clearly to reinforce habits that reduce rummaging.
Measure impact by tracking time saved locating items and the reduction in duplicate purchases.
Favor light, neutral finishes to minimize visual clutter while keeping spaces feeling connected and belonging-filled.
Data-driven adjustments keep your layout calm, efficient, and welcoming.
Hallways, Nooks, Transitions: Small Design Tricks

You’ll shape hallway rhythm with precise pacing, using layout data and sightline studies to space openings and lighting for smooth shifts.
Nook micro-zones’ll get defined with purpose-built functions, measuring footprint, seating, and storage to maximize use without crowding.
For transitions, we’ll compare light play, color, and texture shifts to guide movement and reduce claustrophobic feel.
Hallway Rhythm Tactics
Hallways set the pace of a home, and smart rhythm tactics hinge on subtle shifts in width, lighting, and focal points to guide movement and experience. You’ll tune progressions by measuring corridor proportions, then apply targeted cues that feel natural and cohesive.
- Align lighting to bermattan points: linear LEDs along walls to subtly widen or narrow perceived space.
- Vary width at key junctures to create comfortable pauses and intentional travel sequences.
- Use decorative accents and color psychology to cue function without shouting.
- Place mirrors or reflective surfaces to extend depth while preserving calm, socialable vibes.
This approach favors data-driven choices, durable finishes, and clear, inclusive messaging—so every passerby feels welcomed and oriented.
Nook Micro-Zones
Data shows passive supervision from low-profile seating lowers perceived clutter while boosting usable width by visually expanding the corridor. Use narrow display niches to stage daily items—keys, mail, and chargers—so passages stay clear and calm.
Cozy corners emerge with warm finishes, task lighting, and a soft rug that dampens echo without narrowing sightlines. Label zones subtly through color accents or material changes, reinforcing belonging as you move through the home.
Transition Light Play
Shift light play focuses on how subtle illumination changes guide movement and emphasize passages between spaces. In hallways and passages, you’ll use layered lighting to create a sense of arrival and belonging, while supporting color psychology and aesthetic harmony. Measure lumens, not just fixtures, and align brightness with function to reduce fatigue and confusion.
- Layered layers: Combine ambient, task, and accent lighting to sculpt path and mood.
- Color cues: Use cooler whites for longer passages and warmer tones near living areas to cue comfort.
- Scale and repetition: Mirror fixtures or trim to reinforce cohesion across transitions.
- Dimming: Integrate controls to adjust intensity as occupancy shifts.
This approach yields clear wayfinding, a calm flow, and a cohesive feel throughout the property.
Power, Lighting, Data: Future-Proof Your Flow
To future-proof your home’s flow, plan power, lighting, and data by mapping current usage and forecasting needs over the next decade. Then design layouts that flex with changes in furniture, devices, and room functions.
You’ll prioritize scalable circuits, dimmable lighting, and ample data drops in key zones, so upgrades stay clean and affordable. Track peak loads and align outlets with furniture plans to minimize cords and clutter, boosting energy efficiency and safety.
Integrate a centralized smart home hub to consolidate control without overloading panels, and choose low-EMF, efficient fixtures with long lifespans. Document wire paths and future expansion points, enabling quick reconfigurations as needs evolve.
This practical framework fosters belonging, clarity, and confident, tech-enabled living. Smart home, energy efficiency.
Entry and Circulation: Create a Welcoming Path
Entry and circulation set the tone the moment you enter, so design a path that’s direct, well-lit, and unobstructed by furniture or doors. You’ll create a practical flow by prioritizing sightlines, door swing, and a clear focal point in the entry.
Use data-driven measurements to confirm corridor widths and turning radii, then match lighting to daylight hours to reduce glare and shadows.
Incorporate intentional entryway decor to signal belonging and warmth, while keeping clutter minimal. Circulation signage can guide guests subtly without crowding space.
- Map primary traffic routes and optimize for shortest, obstruction-free paths
- Choose lighting temperatures that align with room function and time of day
- Align entryway decor with overall design language
- Use discreet signage to shape flow without visual noise
Accessibility and Safety: Inclusive Layout Essentials
Accessible design starts with measurable, user-centered decisions that keep everyone safe and moving smoothly through the home. You’ll assess door widths, turning radii, and threshold heights, prioritizing clearances over aesthetics when needed.
Incorporate universal design principles: slip-resistant floors, tactile indicators, and lighting that reduces glare while preserving contrast. Your layout should minimize travel distance between primary rooms, with clearly defined zones that support independent movement.
For exterior approaches, verify garden pathways are level, well lit, and curb-free where possible, with slip-resistant surfacing and handrails where appropriate. Use exterior signage that’s high-contrast and legible from a distance, guiding guests safely to core spaces.
Document findings with metrics to track improvements and refine safety standards over time.
Colors and Materials That Guide Movement
Colors and textures aren’t just aesthetic choices—they actively guide movement by signaling shifts, defining zones, and improving contrast for wayfinding. You’ll leverage color psychology to cue passages, while selecting durable materials that endure traffic without compromising flow.
Focus on predictable cues, high-contrast junctions, and consistent finishes that help visitors move intuitively through spaces.
- Use contrasting trim or floor color at core paths to indicate passages between rooms.
- Choose durable, non-slip materials in high-traffic areas to sustain clarity and safety.
- Reserve warmer tones for intimate zones and cooler tones for communal corridors to steer pace.
- Align material changes with function shifts (e.g., entry to living, living to kitchen) for natural wayfinding.
These choices reinforce belonging by guiding movement with evidence-backed color psychology and material durability.
Budgeting for Flow: Value-Driven Tweaks
You don’t need to empty your wallet to improve layout flow. Budgeting for flow hinges on value, not cost, so you target tweaks with the highest impact per dollar.
Start with a simple audit: map high-traffic zones, note friction points, and quantify time saved or stress reduced.
Prioritize low-cost fixes first, like reconfiguring furniture arrangement to open sightlines and improve circulation. Use furniture placement to create clear paths, allocate functions, and avoid crowding.
Outdoor landscaping can soften progressions and frame routes without expensive remodeling, boosting perceived space and cohesion.
Track outcomes with measurable stops, such as time to reach rooms or task completion efficiency.
Reinvest savings into high-return projects, ensuring every dollar strengthens flow, usability, and a sense of belonging.
Step-by-Step Roadmap to Better Flow
To build a better flow, start with a concrete, data-driven roadmap that translates observations into actionable steps. You’ll map functions to zones, measure traffic, and prioritize changes that yield the biggest impact on daily life, with outdoor landscaping and historical preservation kept in balance.
1) Assess current routes: document pinch points, note sightlines, and quantify steps between key rooms.
2) Prioritize moves: rank based on time saved, safety improvements, and emotional comfort for inhabitants.
3) Pilot adjustments: test one change at a time, track user feedback, and adjust before full execution.
4) Validate results: confirm flow metrics post-renovation, then document lessons for ongoing care and community belonging.
Common Mistakes in Retrofitting Flow: and Fixes
Common mistakes in retrofitting flow often arise from assuming changes will work the same in every space. You’ll miss critical constraints if you overlook existing structures, sightlines, and traffic patterns. Start with data: map foot traffic, door swings, and appliance zones, then test one targeted change before broad application.
Fixes include preserving clear routes, avoiding awkward landings, and aligning progressions with room purposes. Don’t chase trends; prioritize function, then finish. When you aim for vintage charm, you risk cluttering sightlines—use restrained detailing and purposeful placement.
Color psychology matters: choose palettes that ease navigation and reduce fatigue, enhancing perceived openness. Measure outcomes (time to pass through rooms, return visits, user comfort). Learn from small iterations, document results, and refine until the flow serves everyone’s sense of belonging.
Frequently Asked Questions
How Long Does It Take to Improve Layout Flow?
Answer: It typically takes weeks to months, depending on scope, but you’ll see steady gains as you adjust interior lighting and furniture arrangement, measure traffic, and iterate layouts, ensuring you feel grounded and connected throughout the process.
What Budget Range Is Typical for Renovations?
Typically, budgeting for renovations runs from $20,000 to $150,000 depending on scope. You’ll compare material costs and plan contractor selection carefully, prioritizing value. You’ll compare quotes, track contingencies, and share progress transparently to feel connected and secure.
Can Small Changes Impact Flow Significantly?
Swift, subtle shifts smooth space flow; yes, small changes dramatically impact flow. You’ll see space optimization and aesthetic enhancement multiply as you reconfigure sightlines, reduce clutter, and prioritize purpose, making you feel belonging, purposeful, and practically supported.
Do I Need Permits for Layout Changes?
Yes, you almost certainly need permits for layout changes; check zoning regulations and start the permit application process early to avoid delays. You’ll stay compliant, while documenting approvals, and feel confident belonging to a well-managed renovation community.
How to Measure Improvement After Changes?
Yep, you measure success by furniture placement and lighting enhancement, so you track space usage, flow, and mood before vs after, then quantify with room angles, traffic paths, and brightness levels to prove improvement.
Conclusion
Think of your home as a river system. Your habits are the current, rooms are tributaries. If the river splits awkwardly, float slows; if the channels connect cleanly, water rushes with purpose. Map, define zones, and remove bottlenecks the way you’d clear rocks from a streambed. Budget for the most impactful moves, not the flashiest. Your flow improves as friction drops: fewer steps, clearer cues, and spaces that guide daily life like a well-trodden waterway.