
Maximize your bath with smart, space-saving storage that works in tight spots. Start by zoning for daily essentials, toiletries, and cleaning supplies, prioritizing vertical and hidden options. Install slim, wall-mounted shelves, rail systems, and recessed niches to reclaim counter and floor space. Add over-the-door organizers and under-sink pull-outs to disguise clutter. Use multi-purpose furniture and labeled, moisture-resistant organizers to keep items easy to find and clean. Curious how to tailor this to your space? You’ll discover more soon.
How Compact Bathroom Storage Works: Core Principles for Small Spaces
Small spaces demand efficiency, so compact bathroom storage starts with smart zoning: designate zones for daily essentials, toiletries, and cleaning supplies to minimize rummaging and clutter. You’ll maximize space utilization by assigning each zone clear purpose, reducing impulse buys and wasted motion.
Core principles guide your setup: accessibility, visibility, and modularity. Keep frequently used items at eye level and within reach, while seasonal or rarely used products store higher or lower.
Choose modular organizers that snap together and adjust as needs shift, so you adapt without a full overhaul. Use vertical space, hooks, and slim shelves to free counter space and maintain a tidy flow.
With intentional zoning and flexible systems, you’ll feel more confident, connected, and at home in your compact bathroom.
Assess Your Bath: Space, Budget, and Layout Before You Start
Start by evaluating the space you have and note any constraints like doors, outlets, and plumbing.
Then set a realistic budget and map out how you’ll use every inch without waste.
Finally, sketch a simple layout plan that fits your needs and keeps expansion possibilities open.
Assess Space Efficiently
Before you plunge in, take a clear look at your bathroom’s layout, footprint, and traffic flow to guide what you can realistically fit. You’ll assess space efficiently by mapping zones: wet, dry, and storage, then measuring alcoves, doors, and clearance.
Prioritize vertical freedom—wall shelves, tall cabinets, and corner units maximize real estate without crowding footprints. Choose modular pieces you can reconfigure as needs evolve, and keep bulk items hidden behind decorative accents for a cohesive feel.
Consider access paths, lighting, and moisture exposure when selecting materials; opt for moisture-resistant finishes and easy-clean surfaces. Balance functionality with a touch of luxury fixtures, ensuring each addition earns its keep.
Your goal: a calm, organized space that invites belonging and simplicity.
Plan Within Budget
Planning within budget starts with a clear, honest view of your bath’s space, needs, and costs, so you don’t overspend or overbuild. You’ll map out what you have, what you need, and what fits your daily routine.
Prioritize budget friendly options that deliver durable function without excess. Measure dimensions, note plumbing constraints, and flag zones where clutter builds up.
Choose modular, space saving storage that can flex with changing needs. Compare prices, consider secondhand or repurposed pieces, and set a realistic cap for installations.
Leave room for core essentials first, then add accessories as funds allow. By planning upfront, you create a cohesive, affordable plan you’ll actually follow and feel a sense of belonging in your refreshed, organized bath.
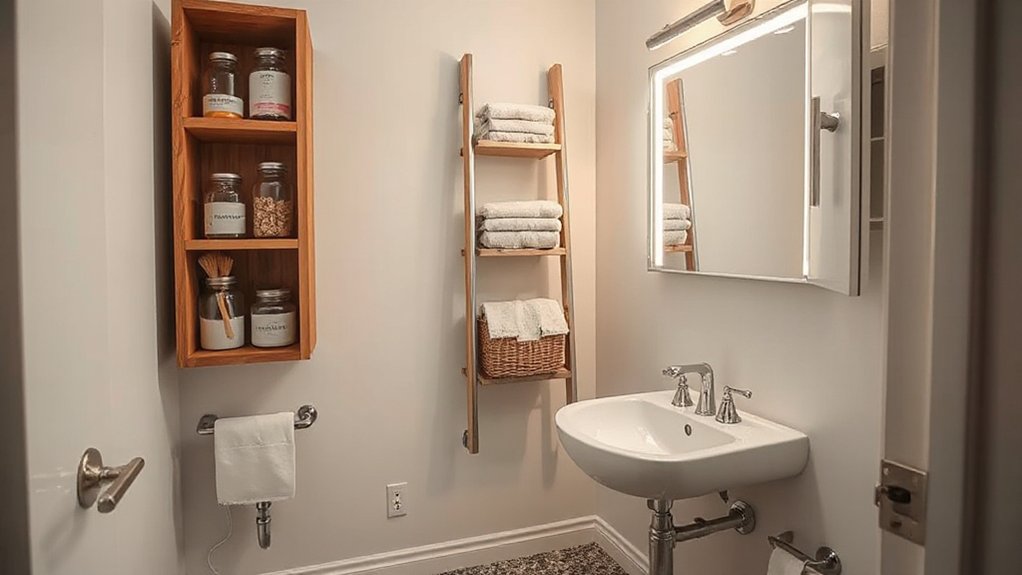
Wall-Solutions That Disappear: Slim Shelves and Rail Systems
Wall-mounted, slim shelves and rail systems vanish into the bathroom’s design while still delivering practical storage. You’ll notice how these solutions reduce visual clutter without sacrificing function.
Slim profiles let you reclaim counter and floor space, while rails keep everyday items within easy reach. Concealed compartments in the edges or brackets add discreet storage for small essentials, keeping surfaces clean and intentional.
Floating units provide a light, modern look that blends with tile and fixtures, yet remain highly usable for towels, toiletries, and grooming tools.
Installation is straightforward: measure, mount at workable heights, and secure with concealed hardware for a seamless finish. This approach delivers dependable organization you can live with, fostering a bathroom that feels calm, capable, and truly yours.
Over-the-Door Organizers: Installation Tips and Best Fits
Over-the-door organizers are a simple upgrade, but choosing the right fit and installing them correctly makes the difference. I’ll walk you through selecting the best fits for your space and items, plus quick installation tips to avoid sagging or slipping.
When you know how these fit your door and daily routine, you’ll use more of the space without adding clutter.
Installation Tips
If you’re installing an over-the-door organizer, start by choosing the right model for your door and bathroom needs. Then verify weight ratings and mounting hardware so you won’t overload it.
Install on a clean, dry surface and center the track at a height you’ll actually use daily. Use the door’s top edge as a guide, but don’t force it if clearance is limited; swap to a slimmer option if needed.
Group items by frequency of use and place everyday essentials within easy reach. Keep storage containers organized with labeled bins, and reserve decorative accents for visible shelves to avoid clutter.
Finally, test the system with a light load to ensure stability and adjust as necessary for a secure, tidy bathroom.
Best Fits and Usage
To choose the best over-the-door organizer, match the model to your door type, bathroom size, and how you use the space. Start by measuring clearance around the door and the available wall space above it. Opt for a design that fits your storage needs without crowding fixtures or lighting solutions.
For small bathrooms, choose slim profiles with clear pockets to reduce visual clutter and keep essentials accessible. Use quick-access baskets for daily items and labeled containers for toiletries, so everyone knows where things belong and feels included.
Consider moisture resistance and ease of cleaning—materials like-coated fabric or rustproof metal perform better long-term.
Finally, position organizers to enhance bathroom decor without blocking lighting or switches, creating a cohesive, welcoming space.
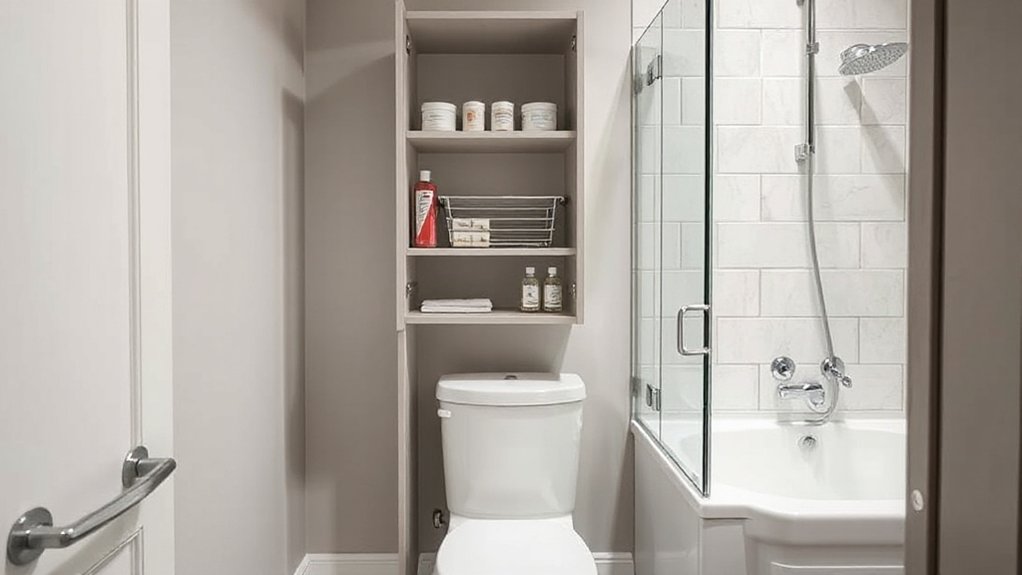
Hidden Niches and Quiet Drawers: Seamless Storage Additions
Hidden niches and quiet drawers transform a compact bathroom by hiding storage in plain sight. You’ll gain organized calm without clutter, thanks to concealed compartments and subtle dividers that keep essentials within reach. This approach feels intentional, not gimmicky, so you’ll sense belonging in a well-ordered space.
- Add vertical niches behind medicine cabinets for daily-use items
- Install shallow pullouts under sinks to conceal toiletries
- Use recessed shelves for spare towels and skincare
- Integrate magnetic strips for small metal tools
- Choose doors with soft-close hardware for seamless flow
These additions blend with your existing style, offering practical, unobtrusive storage. You’ll move confidently, knowing items are easy to find, yet neatly hidden when guests arrive.
Embrace the balance of form and function.
Corner Solutions: Turn Dead Space Into Smart Storage
Corner Niche Storage and Hidden Corner Shelves let you reclaim dead space without crowding a room. You’ll install slim niches or recessed shelves that blend with your walls and keep essentials within easy reach.
This approach keeps the bath tidy and maximizes every inch, so you can access what you need without clutter.
Corner Niche Storage
Looking for smart ways to use dead space in your bathroom? Corner niche storage turns awkward corners into functional space you can actually rely on. You’ll create a cohesive look with decorative niches that echo your style and keep essentials close at hand. Use proper lighting to highlight the niche and guarantee easy access without clutter.
- Install slim, recessed shelving in a corner for towels and daily items
- Choose decorative niches that match your fixtures and add depth
- Add LED corner lighting for soft, task-friendly glow
- Use labeled baskets to keep items organized inside the niche
- Keep moisture-resistant finishes for longevity and easy maintenance
This approach feels intentional and connected, giving you belonging and confidence in a tidier bathroom.
Hidden Corner Shelves
Tucked into tight spaces, hidden corner shelves maximize bathroom storage without crowding your counter or tub area. You’ll gain accessible spots for daily-use items, while keeping the surface clean and uncluttered. Measure carefully, choose right-angled brackets, and select slim, water-resistant materials to blend with existing decor.
Install shelves at eye level for quick retrieval and to reduce repoking into cabinets. Use decorative accents to personalize the space and create a cohesive look with your vanity, towels, and matching hardware.
Keep the architecture simple and sturdy—avoid overloading shelves and secure anchors into studs. Lighting solutions integrated with the shelf edge or nearby vanity lighting highlights items and adds safety.
With thoughtful placement, your corners feel intentional, welcoming, and part of a streamlined, belonging-focused bathroom.
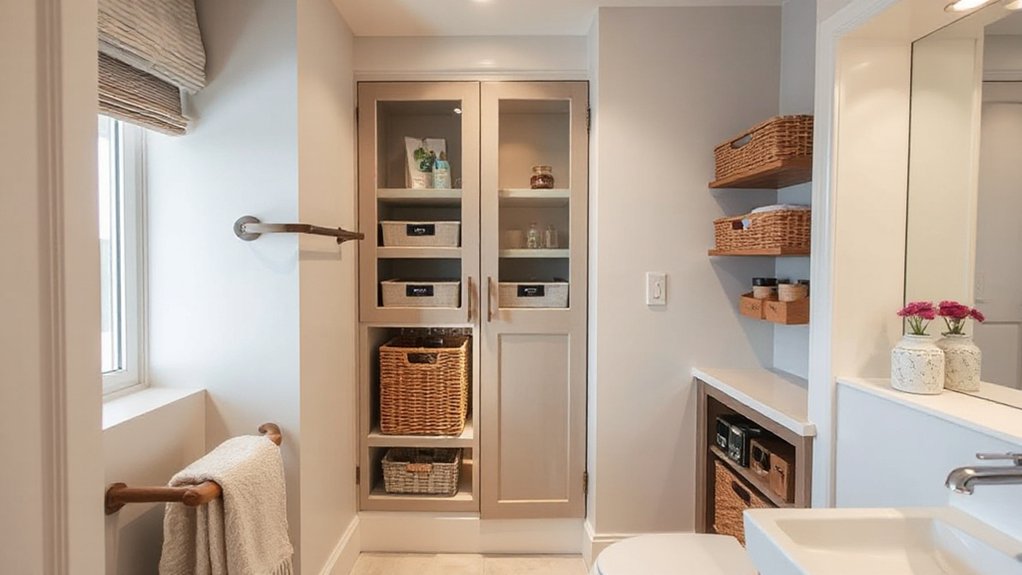
Budget-Friendly Cabinet Makeovers: Quick, Custom-Look Upgrades
Want to upgrade your cabinets without paying for a full remodel? You can achieve a custom look on a budget with practical steps that fit any bath.
Swap hardware for a cohesive, modern vibe.
Repaint with a high-quality, bathroom-safe enamel.
Install glass or acrylic inserts for visual interest.
Add under-cabinet lighting to boost usability.
Line interiors for easy cleaning and longevity.
These simple updates will give your space a refreshed feel without disrupting plumbing or layout. You can also add open shelving or glass inserts to showcase decor and brighten the space with smart lighting solutions.
Use budget-friendly liners to protect surfaces and create a crisp finish.
Daily-Use Organization: Labeling, Refill, and Rotation Systems
Set up a simple system for daily use by labeling containers, establishing straightforward refill rules, and rotating supplies before they run out. You’ll implement labeling systems that stay legible in bathroom humidity, so you always know contents at a glance.
Keep a compact refill schedule: when you see a product level dip, replace it on a fixed cadence—weekly for essentials, monthly for backups.
Place items by frequency of use, creating intuitive zones that invite participation from everyone in the home.
Track expiration dates with a quick checklist, and rotate stock so oldest items get used first.
This approach builds confidence and belonging, reducing stress. Adopt clear labels, consistent refill strategies, and short, actionable reminders for durable daily order.
Vertical Dividers and Rails: Tidy Small Essentials (Cosmetics, Tools)
Vertical dividers and rails keep small items—cosmetics, tools, and other daily touchpoints—within easy reach and out of the way. You’ll gain order without crowding counters, and you’ll feel confident every time you grab what you need.
- Use clear cosmetic containers to see contents at a glance
- Attach slim rails for brushes, razors, and tweezers
- Separate daily essentials from backups with labeled dividers
- Position items by frequency of use for quick access
- Mount near counter edges to save valuable counter space
This setup reinforces decor organization by keeping surfaces tidy and cohesive. With dedicated slots, your cosmetics stay protected, tools stay organized, and your bathroom feels intentional.
You’ll cultivate belonging through predictable, thoughtful storage that’s easy to maintain.
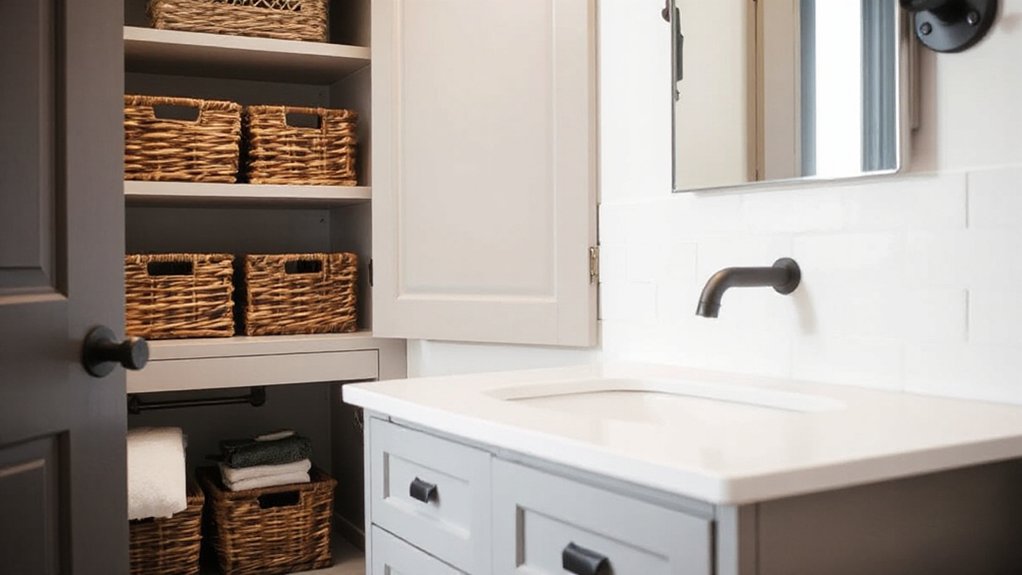
Under-Sink and Vanity Hacks: Pull-Outs, Bins, and Slim Drawers
Under-sink and vanity storage can transform clutter into accessible space with a few simple updates. You’ll benefit from pull-out bins, slim drawers, and organizer rails that maximize depth and minimize reach-in chaos.
Choose pull-outs with soft-close runners to reduce noise and protect delicate items. Slim drawers fit into narrow gaps beside pipes, letting you stash cleaning supplies, backup essentials, and small tools without bulk.
Use modular bins to keep items categorized, and label faces so everyone in your home feels they belong in a tidy space.
For safety and comfort, plan ventilation options near the sink to prevent moisture buildup, and match lighting to task zones. Pair these ideas with thoughtful bathroom lighting to illuminate every inch of under-sink real estate.
Multi-Purpose Furniture for Tiny Baths: Storage Meets Seating
When space is tight, multi-purpose furniture does double duty in tiny baths—turning storage into seating without sacrificing floor area. You gain function without clutter, choosing pieces that blend with vintage fixtures and modern efficiency.
Look for compact benches, ottomans, and cabinets with hidden shelves, lift tops, or rolling interiors. Prioritize eco-friendly materials that resist humidity and age gracefully. Crisp lines and neutral tones help rooms feel larger while inviting you to linger.
- Compact storage benches with cushioned tops
- Lift-top ottomans that reveal hidden bins
- Wall-mounted cabinets doubling as seating surfaces
- Stools with integrated shelves and hooks
- Reclaimed wood accents that honor vintage fixtures
These choices create belonging, practicality, and calm in a tight bathroom.
Quick-Start Plan: A 1-Weekend Checklist to Tailor Storage to Your Bath
Take a practical, hands-on approach this weekend to tailor storage to your bath. You’ll start with a quick audit: measure available wall and floor space, note high-traffic zones, and identify items you consistently use.
Next, map zones for essentials, like daily toiletries, towels, and cleaning supplies, so you can assign purpose-built storage to each area. Choose modular pieces that fit your layout, avoiding bulky bulk.
Prioritize accessible surfaces for everyday items and create hidden storage for infrequently used goods. Integrate Bathroom decor elements and lighting solutions that enhance function and mood, not just look.
Finish with a simple plan: install adjustable storage, label bins, and maintain a 15-minute weekly reset. You’ll gain clarity, belonging, and a calmer, more efficient bath.
Frequently Asked Questions
How Can I Measure My Bathroom for Storage Efficiency?
To measure your bathroom for storage efficiency, you start by sketching a quick floor plan and noting ceiling height. Measure wall lengths, door and window clearances, and any obstructions.
Check for under-sink, corner, and alcove spaces. Then assess storage options like decorative baskets and vertical shelving to fit available widths and heights.
Make sure you leave space to move. Use your measurements to balance function with style, creating a cohesive, welcoming, belonging-centered setup.
What Are the Best Moisture-Resistant Storage Options?
Rising like sturdy ships against a damp harbor, your best moisture-resistant options include moisture barriers and rust proof containers.
You’ll want cabinets with sealed backs, shelving that’s epoxy-coated, and wall organizers made of plastic or stainless steel.
Use moisture barriers behind sinks and in shower niches, and choose rust proof containers for towels and toiletries.
With these, you’ll feel confident, organized, and truly part of a space that resists humidity.
What Hidden Spaces Can a Tiny Bath Exploit?
Hidden niches let you tuck away essentials without widening your footprint, while vertical shelving exploits wall height for overflow storage.
In a tiny bath, you’ll carve recessed shelves in shower alcoves, pair them with slim, moisture-resistant units, and mount vertical shelving over the vanity to keep daily items reachable yet out of sight.
You’ll maximize every inch, feel calmer, and belong to a smart, organized space you can trust each day.
How Do I Prioritize Items to Store First?
Start by listing everyday items you actually use, then set a realistic limit for toiletries and towels. Prioritize frequently accessed essentials first, placing them within arm’s reach.
Use vertical storage and clear containers to reveal what you own. Apply organizational strategies like grouping similar items, labeling, and rotating seasonal products.
For decluttering tips, remove duplicates and unused favorites, keeping only what fits your routines. You’ll feel belonging when your space stays calm and functional daily.
Which Tools Are Essential for Quick Installs?
You’ll want essential tools like a drill, level, stud finder, screwdriver set, tape measure, utility knife, and silicone sealant for quick installs.
Tool selection matters—choose compact, cordless options for tight bathrooms.
Keep a small carpenter’s square handy for precise fits.
Use installation tips: pre-mark studs, test fit before final mounting, seal edges to prevent moisture, and wipe away excess Caulk promptly.
With these basics, you’ll complete installations confidently and feel like you belong on the project.
Conclusion
You’ve got the blueprint to turn a cramped bathroom into a clever, calm haven. Think of your space as a pocket universe where every inch hides potential. With compact ideas, you’ll weave vertical rails, hidden niches, and pull-out drawers into a seamless routine—no clutter, no compromise. Stay practical, stay lean, and let functionality lead the design. Before you know it, your tiny bath will feel expansive, organized, and ready for just about anything. Your space, reimagined, is within reach.